AnyX Guide Topic: identity

  • Azure Active Directory

    Azure Active Directory

    You can add one (or more) Azure Active Directory systems as Upstream Identity Providers. Doing this will allow your team to sign in with their Active Directory username/password. If you work with more than one corporation, you may add multiple Upstream Identity Providers.

    Agilicus Front-End Create Upstream Issuer

    The setup is very simple and takes less than 2 minutes to acomplish. There is a ‘stepper’ that walks you through the tasks.

    First, open the admin user interface (https://admin.__MYDOMAIN__). Login as your (initial) administrative user. Nagivate to ‘Organisation’/’Authentication Issuer’. From here you may select ‘Add Provider’, adding a new identity provider.

    b77387a9 image

    At this stage, you will enter a Stepper which will walk you through the steps graphically. First select Azure Active Directory as the type:

    a898230b image

    Azure Application Registration

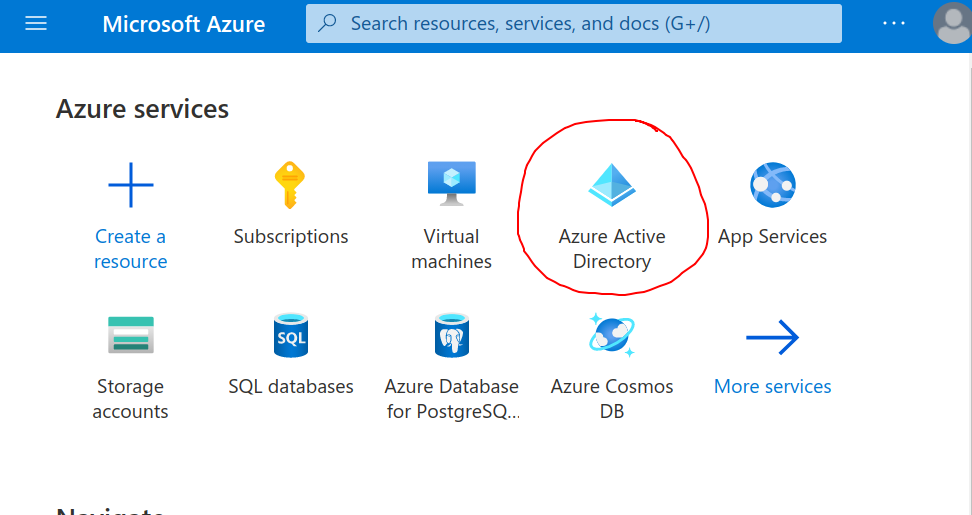
    The Stepper will show screen shots of how to configure Azure, they are also here. First, select ‘Azure Active Directory’ in your Azure console:

    614dfe71 image

    Now create a new Application. This will be for all logins to the Agilicus platform.

    1afa6942 image

    Select a name. This will be shown to the user on the Login select page, we recommend making it related to your organisation. E.g. “My Company Active Directory”. In the Application stepper you are given a “Redirect URI”, paste it here.

    1031aab2 image

    You will now be given 3 pieces of information. A ‘Display Name’, an ‘Application (Client) ID’, and a ‘Directory (Tenant) ID’. Enter these in the appropriate spots in the Stepper.

    Here you can see where this information is placed in the Agilicus Admin Stepper, from the Azure screen we have:

    f1286f6b image

    On the Agilicus Stepper we have:

    d04b6a1d image

    Now we create a ‘Client Secret’. This is a shared secret between the two systems. Create this in the Azure Portal:

    c048db09 image

    As a description we recommend using the same name as for the Application. If you select an Expiry (e.g. something other than Never) you must remember to update the Admin user interface at a later date.

    3467f491 image

    In the Admin stepper paste the secret you received. You are now done!

    a5067979 image

    NOTE: Multiple Azure tenant with same email address

    If your Active Directory login name is the same as the email address you provided through your Apple ID / Google ID / LinkedIn ID, you may have an issue. Please contact Agilicus (info @ agilicus.com) and we can join these accounts for you. E.g. if your Apple ID email is foo@mycompany, and your Active DIrectory is foo@mycompany, let us know and we can join these two together.

    Azure Claims

    This section is optional. If you wish to synchronise groups, or use UPN as welll as email, you should configure a set of additional claims. Agilicus recommends:

    • email — this gives access to the user ’email’ which may differ from the UPN
    • onprem_sid — this is used if you will do passthrough authentication (e.g. using SAML with Citrix)
    • upn — this gives access to the user principal name
    • sid — this can be used to allow per session sign-out
    • preferred_username — this controls how the user might interact with the system as a name
    a3ed4875 image

    (Optional) Azure Groups

    You may wish to directly import your Azure groups into Agilicus for role-based access control. To do so, enable the groups claim in Azure.

    a0a5823e image

    On your Azure Upstream Identity Issuer, enable the group mapping as below. You may need to use the GUUID and map to names.

    bafff4f2 image

    At this stage you may try a login. You can keep the Admin portal logged in and use https://profile.MYDOMAIN to try. You should see a new Sign-In option, which is named as you have above.

    5fdebd27 image

    The first (and only) time you select this new Sign in option, you will be presented with a question as to whether you consent to the information shared. The Information shared is your Name, and your Email. No permission is being granted to access any Azure or Office 365 information.

    95ccb7b6 image

    You are now complete. All users can now Sign in with their corporate login, no additional passwords to remember.

    Advanced Grant Workflow

    NOTE: If you use advanced grant workflow
    If you use a per-application or per-user grant workflow, we recommend granting access to this new ‘App Registration’ under the ‘Enterprise Applications’ section of Azure Active Directory. You may navigate to the specific application (as below), and then ‘Permissions’, and then ‘Grant admin consent’.
    If you do not do this, you may find that users who use the ‘offline_access’ workflow (also known as the refresh token) may be confused by constantly being requested to grant access

    bd0aab7b azure ea
    77f170bf azure ea perm
    cfdf2aa4 azure ea add perm
  • Legacy Active Directory

    Legacy Active Directory

    Active Directory Identity Provider

    Many entities will have a single corporate employee identity managed by Microsoft Active Directory. This might take the form of a self-hosted setup or SaaS. In both cases, we create an OpenID Connect `Application Group` (in ADFS or Azure). More information is available below in Appendix: Active Directory Setup, and also in https://docs.microsoft.com/en-us/windows-server/identity/ad-fs/development/ad-fs-openid-connect-oauth-concepts 

    In Active Directory, enable the scopes: (https://docs.microsoft.com/en-us/azure/active-directory/develop/active-directory-optional-claims)

    • OpenID
    • allatclaims
    • email
    • Profile
    • sid
    • amr (if present, used if Active Directory Multi-Factor-Authentication is used)

    To add this identity provider, select Authentication Issuer, select “ADD PROVIDER” under OpenID Connect Upstream Providers. From here we have a set of fields:

    • Name: This will be a phrase your staff will see when logging in.
    • Issuer: This is the URI of your Active Directory or ADFS endpoint, often https://my-org.ca/adfs.  To find your issuer under Azure Active Directory, see appendix.
    • Icon: This will be referenced in your CSS if you choose to theme, named dex-btn-icon–NAME.
    • Client id: This will be generated by your ‘Create OpenID Application” interface in Active Directory.
    • Secret: This will be generated when you create the application in Active Directory.
    • Issuer External Host: leave this blank
    • Username Key: typically UPN
    • Email Key: typically UPN.
    • User ID Key: typically sid
    • Verifies Email: typically checked (this removes the request scoped `email_verified`)
    • Redirect URI: https://auth.ca-1.agilicus.ca/callback.

    Appendix: Active Directory Setup

    Overview

    In order to establish a relying party trust between Agilicus and your Active Directory, identifying information and a shared secret must be established between them. This is done by creating an OpenID Connect configuration in ADFS known as an Application Group, which consists of a Server application and a Web API. Both of these components together specify the Agilicus redirect URIs that need to be invoked during authorization code flows as well as permissions, scopes, claims, and a client identifier and shared secret that Agilicus uses to communicate with your ADFS server.

    Details

    The steps to create an Application Group in ADFS are described below. These instructions are for Active Directory Federation Services for Windows Server 2016.

    • Open the AD FS Management console (Server Manager → Tools → AD FS Management)
    • Right-click Application Groups and select Add Application Group; alternatively, select Application Groups and select Add Application Group from the list of available actions under the Action menu bar or the Actions pane
    • Enter a Name and optionally a Description for the new application group
    • In the Template list, under Client-Server applications, select the Server application accessing a web API type. Click Next
    • Make note of the Client Identifier. This ID will become the “Client ID” in the Agilicus Administrative Portal.
    • Enter the Redirect URI that was given in the Agilicus Administrative Portal.
    • Check the option to Generate a shared secret. This will be used in the Agilicus Administrative Portal.
    • Add an Identifier value that is equal to the Client Identifier generated above. Click Next
    • Under Choose an access control policy, select Permit everyone. Click Next
    • On the Configure Application Permissions page, under Permitted scopes, make sure OpenID, email, profile, amr (if present), and allatclaims are checked. Click Next
    • Review the summary and click Next to create the Application Group
    • Click Close to complete the wizard

    The Application Group is now created and should be listed in the Application Groups pane. In order to populate the user tokens with the appropriate information during OAuth2 exchanges, some additional configuration steps are needed to transform Active Directory data into token claims.

    • Right-click the newly created Application Group and select Properties; alternatively, select the newly created Application Group and select Properties from the list of available actions under the Action menu bar or the Actions pane
    • Select the Web API entry under Applications and click Edit
    • Go to the Issuance Transform Rules tab and add each of the following three rules
    • Group Rule
    • Click Add Rule
    • Under Claim rule template, select the option Send LDAP Attributes as Claims and click Next
    • Enter a name for the claim rule such as AD Group With Qualified Long Name
    • Under Attribute store, select Active Directory
    • In the mapping table on the first row, under the LDAP Attribute column, select the Token-Groups – Qualified by Long Domain Name option
    • In the mapping table on the same row, under the Outgoing Claim Type column, select the Group option and click Finish
    • Subject Rule
    • Click Add Rule
    • Under Claim rule template, select the option Send LDAP Attributes as Claims and click Next
    • Enter a name for the claim rule such as Subject Claim
    • Under Attribute store, select Active Directory
    • In the mapping table on the first row, under the LDAP Attribute column, select the User-Principal-Name option
    • In the mapping table on the same row, under the Outgoing Claim Type column, select the Name ID option and click Finish
    • UPN Rule
    • Click Add Rule
    • Under Claim rule template, select the option Send LDAP Attributes as Claims and click Next
    • Enter a name for the claim rule such as User Principal Name
    • Under Attribute store, select Active Directory
    • In the mapping table on the first row, under the LDAP Attribute column, select the User-Principal-Name option
    • In the mapping table on the same row, under the Outgoing Claim Type column, select the UPN option and click Finish
    • Click OK to save and close the updated Web API properties
    • Click OK again to close the Application Group properties

    Appendix: Azure Active Directory

    Creating your Client ID and Secret

    Adding the Optional Claims for sid

    3c7b9b7a optional claim

    Finding your Issuer

    Your Issuer is found by looking at the WS-Federation sign-on endpoint, changing ‘login.microsoftonline.com’ to ‘sts.windows.net’, and removing the wsfed from the end. It will look like ‘https://sts.windows.net/XXXXX-XXXX-XXXX/’.

  • Azure Active Directory

    Azure Active Directory

    614dfe71 image

    Sign-In With Microsoft with Policy

    You can add one (or more) Azure Active Directory systems as Upstream Identity Providers. Doing this will allow your team to sign in with their Active Directory username/password. If you work with more than one corporation, you may add multiple Upstream Identity Providers.

    Azure Active Directory

    You can add one (or more) Azure Active Directory systems as Upstream Identity Providers. Doing this will allow your team to sign in with their Active Directory username/password. If you work with more than one corporation, you may add multiple Upstream Identity Providers.

    Note: you can consider using the shared ‘Sign in with Microsoft’ Identity provider, which has zero-config. See considerations.

    Agilicus Front-End Create Upstream Issuer

    The setup is very simple and takes less than 2 minutes to acomplish. There is a ‘stepper’ that walks you through the tasks.

    First, open the admin user interface (https://admin.__MYDOMAIN__). Login as your (initial) administrative user. Nagivate to ‘Organisation’/’Authentication Issuer’. From here you may select ‘Add Provider’, adding a new identity provider.

    b77387a9 image

    At this stage, you will enter a Stepper which will walk you through the steps graphically. First select Azure Active Directory as the type:

    a898230b image

    Azure Application Registration

    The Stepper will show screen shots of how to configure Azure, they are also here. First, select ‘Azure Active Directory’ in your Azure console:

    614dfe71 image

    Now create a new Application. This will be for all logins to the Agilicus platform.

    1afa6942 image

    Select a name. This will be shown to the user on the Login select page, we recommend making it related to your organisation. E.g. “My Company Active Directory”. In the Application stepper you are given a “Redirect URI”, paste it here.

    1031aab2 image

    You will now be given 3 pieces of information. A ‘Display Name’, an ‘Application (Client) ID’, and a ‘Directory (Tenant) ID’. Enter these in the appropriate spots in the Stepper.

    Here you can see where this information is placed in the Agilicus Admin Stepper, from the Azure screen we have:

    f1286f6b image

    On the Agilicus Stepper we have:

    d04b6a1d image

    Now we create a ‘Client Secret’. This is a shared secret between the two systems. Create this in the Azure Portal:

    c048db09 image

    As a description we recommend using the same name as for the Application. If you select an Expiry (e.g. something other than Never) you must remember to update the Admin user interface at a later date.

    3467f491 image

    In the Admin stepper paste the secret you received. You are now done!

    a5067979 image

    NOTE: Multiple Azure tenant with same email address

    If your Active Directory login name is the same as the email address you provided through your Apple ID / Google ID / LinkedIn ID, you may have an issue. Please contact Agilicus (info @ agilicus.com) and we can join these accounts for you. E.g. if your Apple ID email is foo@mycompany, and your Active DIrectory is foo@mycompany, let us know and we can join these two together.

    Azure Claims

    This section is optional. If you wish to synchronise groups, or use UPN as welll as email, you should configure a set of additional claims. Agilicus recommends:

    • email — this gives access to the user ’email’ which may differ from the UPN
    • onprem_sid — this is used if you will do passthrough authentication (e.g. using SAML with Citrix), or fine-grained access control on a Share
    • upn — this gives access to the user principal name
    • sid — this can be used to allow per session sign-out
    • preferred_username — this controls how the user might interact with the system as a name
    a3ed4875 image

    (Optional) Azure Groups

    You may wish to directly import your Azure groups into Agilicus for role-based access control. To do so, enable the groups claim in Azure.

    a0a5823e image

    On your Azure Upstream Identity Issuer, enable the group mapping as below. You may need to use the GUUID and map to names.

    bafff4f2 image

    At this stage you may try a login. You can keep the Admin portal logged in and use https://profile.MYDOMAIN to try. You should see a new Sign-In option, which is named as you have above.

    5fdebd27 image

    The first (and only) time you select this new Sign in option, you will be presented with a question as to whether you consent to the information shared. The Information shared is your Name, and your Email. No permission is being granted to access any Azure or Office 365 information.

    95ccb7b6 image

    You are now complete. All users can now Sign in with their corporate login, no additional passwords to remember.

    Advanced Grant Workflow

    NOTE: If you use advanced grant workflow


    If you do not do this, you may find that users who use the ‘offline_access’ workflow (also known as the refresh token) may be confused by constantly being requested to grant access.

    bd0aab7b azure ea
    77f170bf azure ea perm
    cfdf2aa4 azure ea add perm
  • Identity & Authentication Methods

    Identity & Authentication Methods

    authentication

    Identity & Authentication Methods

    Methods of identifying a user

    Identity & Authentication Methods (Authentication Issuer)

    The Agilicus platform uses external Identity Providers (called Upstream Identity Providers). There are no passwords stored within the system. Supported standards include OpenID Connect (an extension of OAuth 2.0) and SAML 2.0. In turn, you will configure Authorisation in the Agilicus system. What this means is “who” is provided by a 3rd party, and “what they can do” is controlled by you, the Administrator.

    Within the Authentication Issuer you have several configuration options:

    1. You can configure the sign-in screen theming with your own logo and colours.
    2. You can select from a set of Agilicus-Managed Upstream Identity Providers (Apple, Google, Linkedin)
    3. You can add your own Identity Providers (Azure Active Directory, Microsoft ADFS, etc)
    4. You can configure multi-factor authentication
    5. You can control rules regarding when/how/who can authentication to the system
    381dcb22 image
  • Users

    Users

    cyber-insurance-compliance

    Users

    A User is an identify which can authenticate against the Agilicus AnyX platform

    Concepts

    2bbe30a4 identity flow

    User

    A “User” is an identity which has a set of authorisations, a set of permissions. A user may be identified by one or more Identity Providers (e.g. Azure Active Directory, Google, Apple, etc.)

    Users’ may be collected into groups, and, groups behave the same as a user for permission purposes. Groups may also aggregate other groups.

    Identity Provider

    An Identity Provider authenticates a user. It may do this with a password, with biometric, or with any trustworthy means. Agilicus acts as an Identity Provider for your applications.

    Upstream Issuer

    An Upstream Issuer is an Identity Provider that is federated in to the Identity Provider. This might include Apple, Google, Azure, Okta, Auth0, etc. The Upstream Issuer acts to authenticate a user.

    Configuration

    See Identity & Authentication Methods.

    See Azure Active Directory.

  • Resource Groups

    Resource Groups

    group

    Resource Groups

    Resource Groups

    Resource Groups are a means of applying a common permission across a set of resources (connectors, applications, shares, etc).

    Common uses for Resource Groups are:

    • all resources on a site
    • all resources of a type
    • all resources of a manufacture
    • all resources used by a specific Agilicus Launcher

    A Resource Group may contain other Resource Groups, allowing nesting. Each Resource Group can contain 0 or more Resources.

    A common overall strategy is to use Groups (of users) assigned by role, assigning permission of these Groups to Resource Groups by role/location/device-type etc.

  • Sign in With Microsoft

    Sign in With Microsoft

    cyber-insurance-compliance

    Sign in With Microsoft

    4cf6458a image

    On initial product signup you may be offered the ability to “Sign in with Microsoft (Azure, Skype, …)”. This option is a zero-configuration setup, and will allow you to assign users from any Microsoft certified source. This includes your own Active Directory, but also can include XBox Live, Skype, hotmail, etc.

    Once you have signed up, you have a choice. You can continue to use this pre-setup shared Identity Provider. Or, you may configure the system to use your own Azure Active Directory.

    The pro/con of each approach are discussed below.

    b5901263 image

    As an administrator, you will be granting access to this shared Microsoft Issuer. The first time you sign in you will see a screen as below.

    In it, you are requested to

    This screen requests 2 permissions:

    1. “Sign you in and read your profile”. This is granting the Agilicus platform to the following information, called ‘profile’ in OpenID terminology (for more information see Section 2.4 “Scope Values” of the OpenID Connect specification).
      • First Name
      • Last Name
      • Email
    2. Maintain access to data you have given it access to. This is commonly called a ‘refresh’ token, and it allows the platform to cache access so you can sign in a second time on the same device without re-authenticating.

    There is a 3rd box, ‘Consent on behalf of your organisation’. Checking this will ensure that end users are not asked these questions.

    You may revoke access any time at https://myapps.microsoft.com/

    ad10f88e image

    Consideration: Theme & Branding

    If you use the shared Identity provider you can set the theme & branding information on the initial Agilicus screen. However, once the user chooses ‘SIgn in with Microsoft’ there is no option to set branding information. The end user will see a a generic Microsoft screen.

    Consideration: Auto Create users

    In the event you create and assign your own Azure Active Directory Application for Agilicus you can use ‘auto create’ users. In this model you may choose to auto-trust. “If my Active Directory trusts the user, so will Agilicus”.

  • Groups

    Groups

    New Application: Groups

    Groups

    Groups allow simplified user management, decoupling role permissions from resource adding.

    Groups

    The ‘Group’ concept exists in several locations in Agilicus AnyX. It can apply to users (giving the ability to simplify permissions), to resources (also giving the ability to simplify permissions), and, to the system level (given administrative distinctions).

    System Groups

    There are 3 system groups used to govern administration:

    ‘admin’: a global admin, can do any action

    ‘apps-admin’: can create / update any resource (SSH, Desktop, Share, …)

    ‘users-admin’: can add/delete users, assign permission to them.

  • Service Accounts

    Service Accounts

    8f897ca4 undraw server down s 4 lk

    Service Accounts

    A service account is a specific subset of permissions assigned to a non-human user. The most common use is the Agilicus Connector.

    Service Accounts

    0ec9a374 image

    A service account is a specific subset of permissions assigned to a non-human user. The most common use is the Agilicus Connector.

    Service accounts (typically) do not sign in via an OpenID Connect web-based identity-provider. Instead they use an ‘Authentication Document’ which is a cryptographic proof of identity and scopes combined, which is periodically refreshed.

    Service accounts behave the same as all other users for the sake of permission assignment.

    When you install your Agilicus Connector, a service account is created for it at that time. If you delete the Connector, you can delete the service account for it. WARNING: do not delete the service account if the Connector is still in use (it will stop functioning).

    Service accounts show up in the audits as any other user: all actions are audited individually.

    Service account’s have a name which is similar to an email address, in the format of:

    agent-connector-erx-service-account-kx4mfqwadgxbccz3axyrr9@serviceaccounts.agilicus.com

    The email address and authentication document may be downloaded as below.

    cb4a22de image

    If you download the authentication document, you will see something as below. This may be used in applications you write that use the Agilicus SDK.


  • Authentication Issuer – Custom Identity

    Authentication Issuer – Custom Identity

    fc240c96 undraw authentication re svpt

    Authentication Issuer – Custom Identity

    An Identity provider holds the user database, and, authenticates users against it. Agilicus supports any OpenID-Connect based identity provider. This includes Okta, Microsoft, Google, etc.

    Authentication Issuer – Custom Identity

    An Identity provider holds the user database, and, authenticates users against it. Agilicus supports any OpenID-Connect based identity provider. This includes Okta, Microsoft, Google, etc.

    Most customers will use the ‘Shared Identity’ feature which is zero-touch configuration. However, some will wish to implement custom rules inside their identity provider, requiring creation of a ‘new application registration’.

    To add a custom provider, select ‘add provider’

    a3513275 image

    You will see two choice: ‘Azure Active Directory’ (which will give you a guided walk through), or, ‘Other’. In other you will configure a row in a table.

    7ba4b661 image
    d17bf7ec image

    Once you have added the row, you have these columns:

    • name — what the user will see on the sign in page
    • issuer — the URI (e.g. https://login.microsoftonline.com/TENANTID/v2.0)
    • icon — from your theme, e.g. google, microsoft
    • client id — as given by your identity provider (e.g. TENANTID)
    • secret — as given by your identity provider
    • auto-create — if set, users will be created automatically in Agilicus if they can sign in via this upstream identity provider. Do not use with public providers.
    • type — Generic (or Microsoft for non-compatible extensions)
    • offline consent — if true, ask for consent to do refresh flow (aka offline)
    • request user info — if true attempt to fetch additional user info (e.g. group mappings)
    • issuer external host — leave blank typically
    • username key — blank (or e.g. username, email, etc)
    • email key — typically email
    • verifies email — if set the upstream provider forces verification of email address
    • redirect uri — the redirect URI to your Agilicus-provided authentication federation. Typically https://auth.ca-1.agilicus.ca/callback

    You may also use the action-button (3-dots) to configure group mappings, these will import groups from your upstream identity provider automatically


  • Auto-Create Users From Specific Domain With Google Workplace

    Auto-Create Users From Specific Domain With Google Workplace

    federated-users

    Auto-Create Users From Specific Domain With Google Workplace

    The Agilicus Managed Upstream Providers option of ‘Google’ allows users to sign in with GMail and Google Workplace (G Suite) with zero-configuration. In some circumstances (for example, to enable the use of auto-create locked to a specific domain) you may wish to create your own Google Identity Provider setup.

    Auto-Create Users From Specific Domain With Google Workplace

    b767fe45 image

    The Agilicus Managed Upstream Providers option of ‘Google’ allows users to sign in with GMail and Google Workplace (G Suite) with zero-configuration. In some circumstances (for example, to enable the use of auto-create locked to a specific domain) you may wish to create your own Google Identity Provider setup.

    To do so, we will use the Google Console, create a Credential, OAUth2, Web application, and from there obtain a client-id and client-secret.

    We will then configure the list of acceptable domains which may use it, and cross-configure this information into the Agilicus admin portal.

    There is no general requirement to create your own Credentials in Google: do so if you wish finer-grained control by e.g. restricting source domain, or if you have specific audit requirements.

    For more information see Google’s “Getting Started With Authentication“.

    Navigate to https://console.cloud.google.com/apis/credentials . You may be prompted to enable the API for your organisation.

    268b2668 image
    d408910f image

    Create a new OAUTH2 client of type Web Application.

    Give this “credential” a name. Add a redirect URI of https://auth.ca-1.agilicus.ca/callback

    f1616548 image
    f671b582 image

    At this stage you will be given two facts (client ID, client secret). You will now enter these into the Agilicus Admin portal.

    In the Agilicus Admin portal, add a new Identity Provider of type ‘Other’ (this is a generic OpenID Connect Identity Provider).

    73bf0dd3 image

    Enter a name (your users’ will see this, so e.g. “Agilicus Google Workplace”), the Issuer url (https://accounts.google.com), the Client ID (from above) and the Secret (from above).

    You may wish to enable auto-create on this Identity Provider, in which case authenticated users will be automatically provisioned.

    e5155ea4 image

    At this stage, you may wish to enable “Authorized Domains” in your Google Workplace settings.

    Users may now sign in to the system via this Identity Provider.


  • Authentication Issuer – Onsite Identity

    Authentication Issuer – Onsite Identity

    Shadow IT Identity Sprawl

    Authentication Issuer

    Authenticate users in the cloud, using the on-premise identity providers. Make legacy Active Directory serve as modern OpenID Connect.

    Authentication Issuer – Onsite Identity

    In some circumstances, a local, on-premise identity provider is the best source available. The Agilicus Connector facilities, providing a bridge between a local machine acting as an authentication proxy, and a proper OpenID Connect web public interface. The user credentials are encrypted end-to-end, from the user’s browser to the backend.

    Care must be taken when using Onsite Identity. If the connector facilitating is removed, any user with this as a sole identity source will be unable to sign in.

    40bf0ab7 image
  • Sub Organisation Issuer

    Sub Organisation Issuer

    sub-org-issuer

    Partitioned Identity Management

    You can now create an issuer for a suborganisation from a parent organisation. Doing so will bring up a new admin/profile endpoint for the suborganisation, at the suborganisation’s subdomain. E.g. admin.suborg.myorg.cloud.

    You can see the motivation for this in “Merging Local Identity With Online Identity

    You can now create an issuer for a suborganisation from a parent organisation. Doing so will bring up a new admin/profile endpoint for the suborganisation, at the suborganisation’s subdomain. E.g. admin.suborg.myorg.cloud.

    You do this from the suborganisations screen:

    9f003e59 image

    By default, the new suborganisation will inherit the authentication policy of its parent, as well as any Managed or Custom identity sources you have configured in the issuer being used for the parent. You will likely want to verify the customer identity sources to ensure that they have added your new issuer to their list of redirects.

    As long as you had permission to configure the suborganisation prior to enabling the new issuer on it, you can switch to it via the org choose as always. However, now that there is an issuer on that suborganisation, you will be able to customize it like you would its parent: you can create new sources of identity, customize the theme, set a new policy and so on.

    To create a policy distinct from the parent organisation’s, simply choose one of the preset policy options from the Authentication Policy menu.

    589f8724 image