AnyX Guide Type: guide

  • Sign-In Theming

    Sign-In Theming

    about-agilicus

    Theming Agilicus AnyX

    Logos, Fonts, Colours: Theming Agilicus AnyX

    Agilicus AnyX supports personalising the sign-in and usage environment to match your corporate brand. This is more than just asthethic: a consistent look and feel helps train users to reduce the likelihood of a successful spear-phishing attack.

    Setting up your theme on Agilicus AnyX is quite simple. The basic steps are:

    1. Download template
    2. Modify template
    3. Test locally in browser
    4. Upload template
    5. Test live

    So lets get started. Before you start, you will want 3 files that can often be found on your company website:

    1. favicon.png. This should be a square-aspect ratio, usually 256×256 or 512×512, of your company logo. It will show in a browser tab.
    2. logo.png. This should be rectangular in size, approximately 1600×300 resolution. This will show in Profile in place of the Agilicus logo. We recommend a transparent background, and a foreground that will look proper with a blue background (#0057b8).
    3. my-login.svg. This should be a square-aspect ratio svg, it will show in Profile in place of the Agilicus logo. The foreground should work with a blue background (#0057b8)

    The Agilicus AnyX uses a strong, restrictive content-security-policy. This prevents linking to external 3rd-party css/js/images/fonts during the sign-in process. These must be mirrored into the theme file and served via the platform to be used.
    Theming Agilicus AnyX

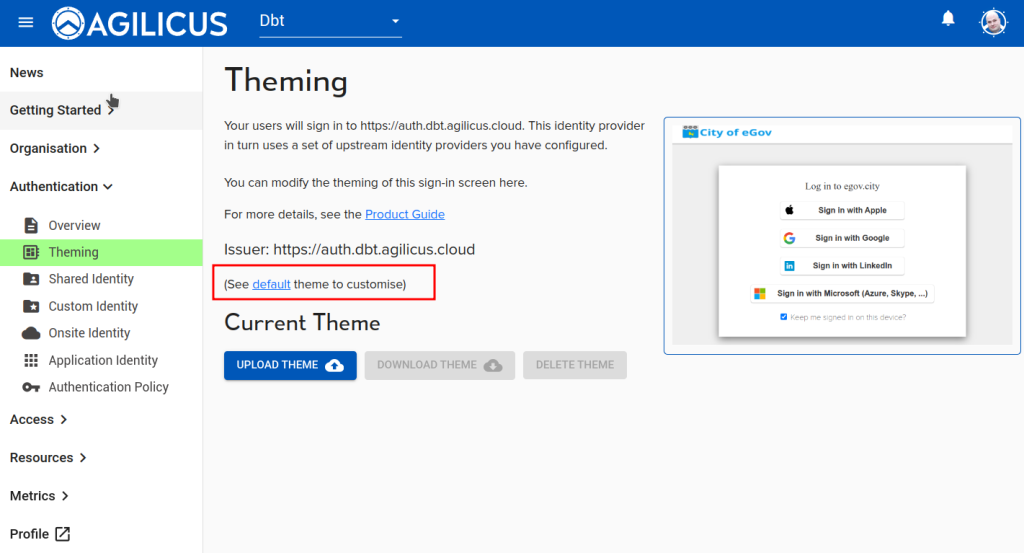
    First, we will download the ‘default’ theme.

    This default theme can be unpacked somewhere on your computer.

    The ONLY files you can modify are in the ‘theme’ subdirectory. The rest are read-only and just for the purpose of testing on your desktop.

    When you re-pack this file, repack from the root directory, e.g. your new zip file should look the same as below, with an ‘index.html’ file in the top directory, and a theme-subdirectory.

    You may add fonts/logos/etc to the theme directory and refer to them by relative path.

    Once you have downloaded and unpacked this file, you will see the below contents. Do not change files other than in the theme directory (your changes will be ignored by the system). Overwrite the favicon.png and logo.png files in the theme directory. You may now proceed to testing.

    ├── agilicus_error.html
    ├── approval.html
    ├── challengedeclined.html
    ├── endsession_prompt.html
    ├── error.html
    ├── footer.html
    ├── header.html
    ├── index.html
    ├── login.html
    ├── mfa.html
    ├── oob.html
    ├── password.html
    ├── README.md
    ├── scripts
    │   ├── end_session.js
    │   ├── login.js
    │   ├── mfachallenge.js
    │   ├── password.js
    │   └── wasthisyou.js
    
    ├── static
    │   ├── font
    |   |    . . .
    │   ├── img
    │   │   ├── apple-icon.svg
    │   │   ├── bitbucket-icon.svg
    │   │   ├── coreos-icon.svg
    │   │   ├── email-icon.svg
    │   │   ├── github-icon.svg
    │   │   ├── gitlab-icon.svg
    │   │   ├── google-icon.svg
    │   │   ├── ldap-icon.svg
    │   │   ├── linkedin-icon.svg
    │   │   ├── microsoft-icon.svg
    │   │   ├── oidc-icon.svg
    │   │   ├── saml-icon.svg
    │   │   └── yahoo-icon.svg
    │   ├── index.html
    │   └── main.css
    ├── theme
    │   ├── favicon.png
    │   ├── logo.png
    │   ├── my-login.svg
    │   └── styles.css
    └── wasthisyou.html

    Testing Your Changes

    On your desktop, in the directory you have unpacked the files, there is a file ‘index.html’. Double-click this, it should open in your browser. You can now see a list of links to the various pages, try each one to assess your changes. You may edit the styles.css and reload in the browser to iterate.

    Once you are satisfied with your changes, proceed to the re-pack and re-upload.

    Upload Template
    e7e91e52 image

    Now that you are satisfied with your changes, make a zip-file of the entire directory structure you unpacked. E.g. ‘index.html’ will be in the root directory of the zip, and theme will be a sub-directory.

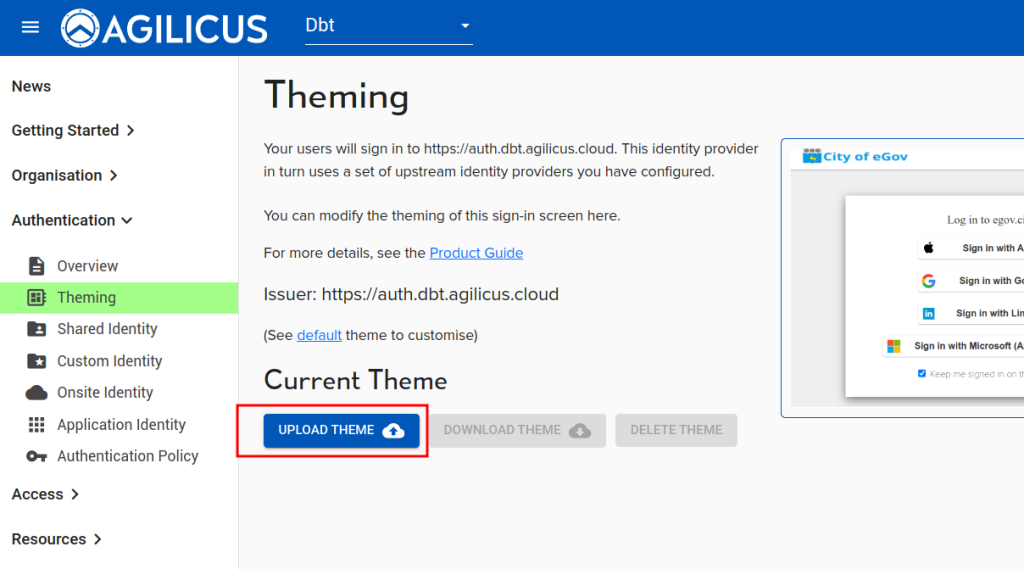
    From your browser, use the UPLOAD THEME button in Authentication/Theming. Select the zip file you just made.

    The theme will take affect after approximately 60-90 seconds. You may then test by signing-in again (e.g. in an incognito window).

    NOTE: Browser Caching

    Your browser may cache the icons and fonts. Flush your cache if they do not seem to have changed.

    Custom fonts

    You may add your own fonts. To do so, we will do these steps:

    1. Create a font-face entry in theme/styles.css
    2. Add font-files to theme/my-font/
    3. Adjust h1/body entries in theme/styles.css to reference your font
    @font-face {
        font-family: 'My Font';
        src: url('/static/theme/my-font/my-font.woff2') format('woff2'),
            url('/theme/my-font/my-font.ttf') format('truetype'),
        font-weight: 900;
        font-style: normal;
    }

    Once you have added your font, in theme/styles.css, you might change these two lines:

    h1,h2,h3,h4,h5,h6{font-family: 'My-Font';}
    body{font-family: 'My-Font';}

    Next Steps, Other Ideas

    You might consider modifying the styles.css to set a background image, to change hover behaviour, etc.

    To change the background image and colours, consider e.g. put an image called ‘background.jpg’ in the theme dir, then add a background-color/image/repeat to body or navbar as appropriate:

    .theme-body {
      background-color: beige;
      background-image: url("background.jpg");
      background-repeat: no-repeat;
    }
    ...
    .theme-navbar {
      background-color: beige;
    }
    8e06cb00 image

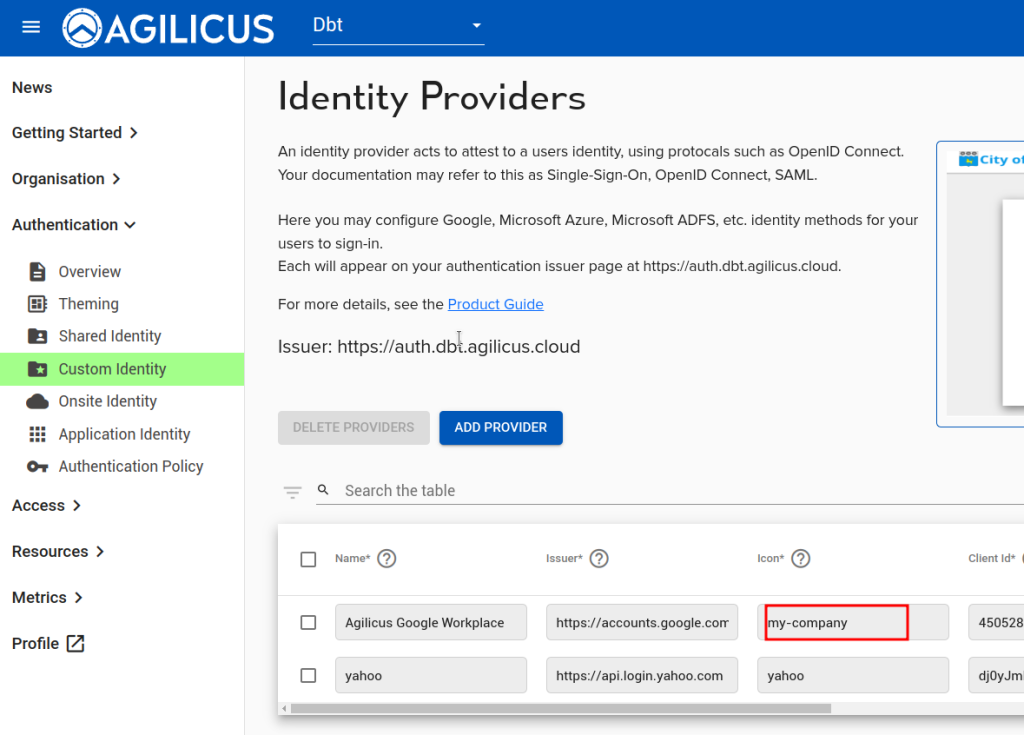
    You may also have your own identity-provider and wish to change its icon (the Microsoft and Google ones are default). To do so, you will need an SVG file which is square in aspect ratio (see the my-login.svg as an example).

    Add your ‘my-company.svg’ file, add a section in styles.csss to reference it:

    .dex-btn-icon--my-company {
      background-color: #FFFFFF;
      background-image: url(my-company.svg);;
    }

    Once done, set the ‘Icon’ field in your identity provider to match the name.

    The default footer is an empty ‘div’ with class theme-footer, you may modify this in your styles.css if you wish.

    .theme-footer::after {
      content: "I AM A FOOTER";
      color: white;
    }
  • Agilicus Connector

    Agilicus Connector

    Agilicus Connector

    Agilicus Connector

    The Agilicus Connector facilitates connection from a bastion network and end-users. It installs on a device somewhere inside the protected network, making an outbound connection.

    Agilicus Connector Overview

    The Agilicus Connector facilitates connection from a bastion network and end-users. It installs on a device somewhere inside the protected network, making an outbound connection.

    If you are new to the system, you may try a full ‘demo’ setup with your own connector in a virtual enviroment in our system, with no install. See “Agilicus AnyX Demo“. When you ‘create a connector’ it will offer you a ‘demo’ this will create a new virtual environment to test in with no isntall, no obligation.

    The Connector is self-updating. Once installed it will stay up to date. The live Changelog shows the updates that have occurred.

    Connectors facilitate:

    • shares [must have local access to the files)
    • Web Applications (must have onward connectivity)
    • Local authentication
    • Network resources (e.g. SSH, Remote Desktop, VNC)

    Theory of Operation

    The Agilicus Connector creates an outbound connection, using HTTPS, to the Agilicus AnyX Cloud. This persistent connection is then used to route individual user requests back in to the appropriate resource.

    Each individual inbound request first has the user identity checked (authentication), then has the user’s role (authorisation) checked, prior to being routed inwards.

    The net affect is that no traffic arrives at the protected resources unless it is for:

    • An authenticated user (optionally with multifactor authentication)
    • An authorised action (e.g. can the user edit the wiki)
    • A valid resource

    This is a very strong guarantee, and, achieved without complex (or any) firewall rules.

    The use of industry-standard HTTPS and WebSocket means inspecting firewalls such as Zscaler or PaloAlto can be used in the path.

    If we expand the data flow for a hypothetical SSH client with animation, we will see the WebSocket flows (blue) establish, and then the ssh flow. The SSH flow is delivered from User to SSH server encrypted end-to-end: the host key is maintained intact.

    SSH Animated Data Flow
    SSH Animated Data Flow

    High Availability Option

    The Agilicus Connector supports high availability (resiliency), either natively, or, via Windows Clustering. See High Availability installation for more information.

    Installation

    Installation of the connector is very simple: 3 steps.

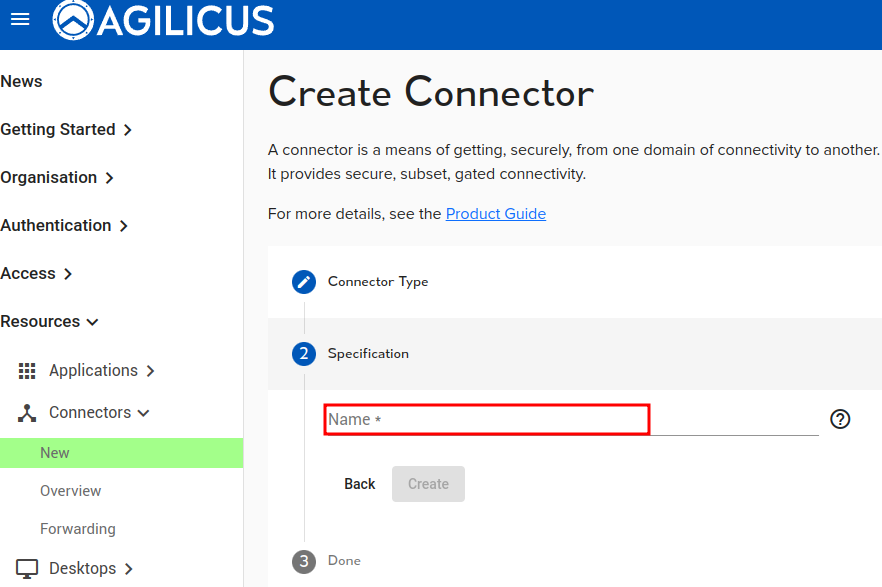
    First, create (Admin console: Resources/Connectors/New)

    Second, name (a name that means something, must be a valid hostname. E.g. the machine it is installed on, the site it connects, etc)

    Third, install (paste the command on the target machine)

    Once installed, the connector will keep itself up to date using The Update Framework.

    During the creation of the Connector you will give it a name. This name should have some meaning for you, e.g. the site it is installed in, the host it is installed on, etc. We recommend it be the hostname that is running the Connector.

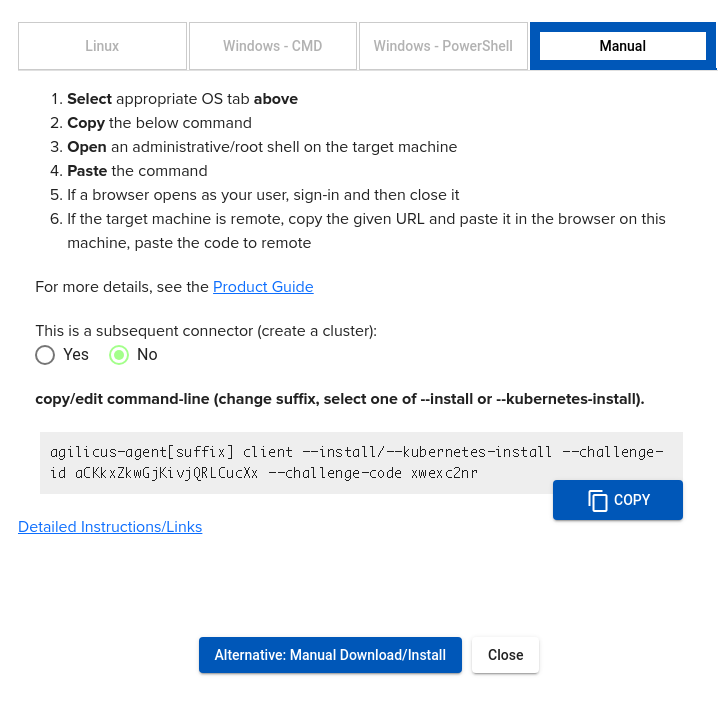
    At this stage you will see a dialog giving installation instructions. At the top are 3 tabs (Linux, Windows-CMD, Windows-PowerShell).

    eec3f30e image
    connector-install-manual

    The Linux tab should work on most Linux or FreeBSD-derived hosts, including pfSense, OpenWRT, Ubuntu, Debian, Synology, etc.

    On a Windows host it does not matter which of the two instruction you follow, they will lead to the same result. Typically you will use the ‘cmd‘ instructions.

    In all 3 cases, copy the text box (using the blue-button at the bottom right) and paste it into an administrative shell.

    Uninstall / Delete

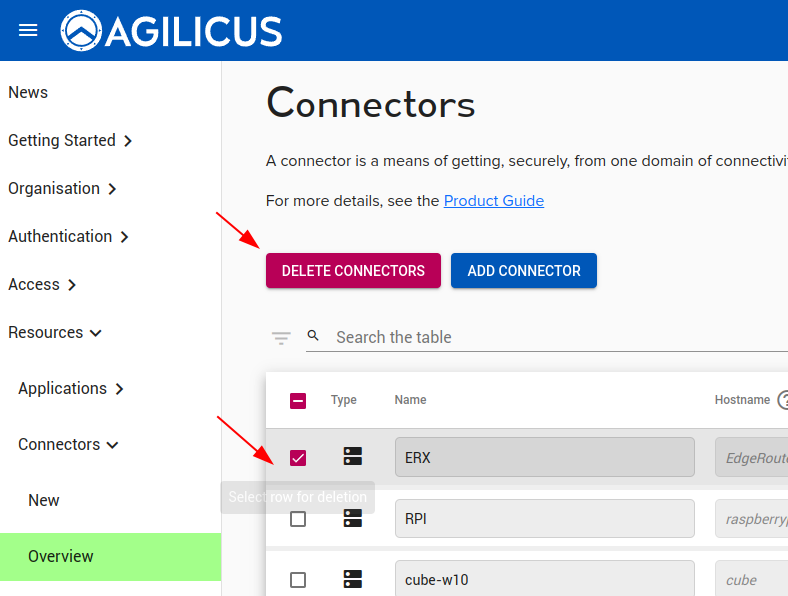
    When you no longer need an Agilicus Connector, you should first uninstall it from the host it is on. Then you may delete it from the Admin portal.

    Typically on Linux you will run:

    Typically on Windows you will run:

    a7022a60 image

    Manual Download

    Typically the installation is done from the Agilicus Admin portal. This will give you a link per platform. In rare cases you may wish to manually download, the linux are below for convenience. NOTE: you will need a ‘code’ from the admin web interface to install (under Resources/Connectors/New).


    More Information

    Below you will see cards for specific aspects of the connector (theory of operation, installation onto various platforms such as pfSense, Mikrotik, OpenWRT, Windows, etc.)

  • Profile

    Profile

    profile

    Profile

    End users interact with Agilicus AnyX via Profile, a progressive web application that appears mobile-native.

    Overview

    The Profile is a Progressive Web Application. You may access it as https://profile.MYDOMAIN. Depending on your platform, you can cause it to behave as a Mobile application by selecting ‘Save to Home Screen”.

    Profile is responsible for:

    • Proviiding an Application Launcher interface. Each application you have published will (if marked public) have an icon. The interface will look similar to a mobile launcher screen
    • Desktop integration
    • Providing a Catalog for discovery purposes of available applications
    • Allowing end-users to request access to applications
    • Configuration and control of Multi-Factor Authentication (WebAuthN, TOTP Authenticator Applications)
    • Providing a catalog and request workflow for Shares

    Applications, Initial Launch

    32ed2f27 image

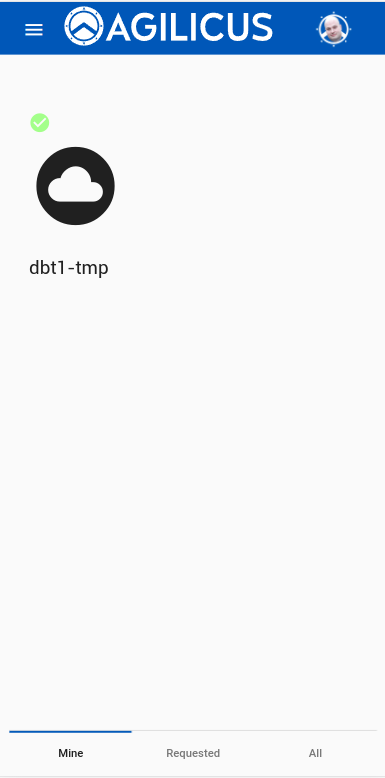
    On startup, the Profile will show a launch tray. There are 3 tabs which may be access via swiping or selecting (depending on platform).

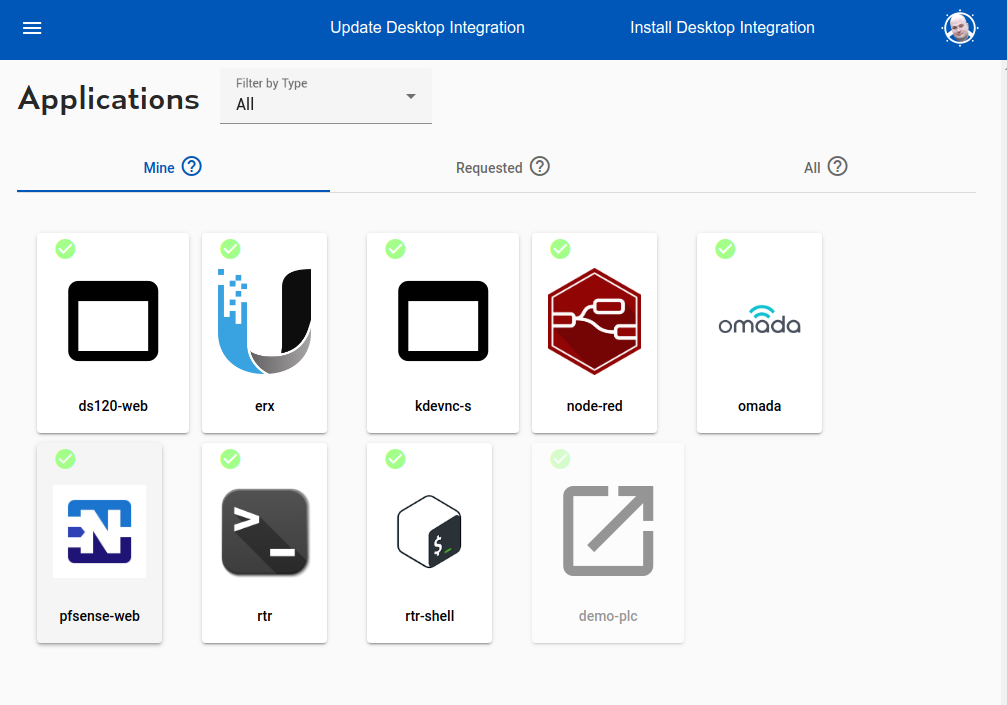
    The default tray, ‘Mine’ has an icon per application of the organisation. These may be selected to launch the web application directly.

    The ‘Requests’ tray has a list of applications the user has requested access to, which are pending approval. You can see more information about how the Requests work.

    The ‘All’ tray has a list of all applications. Once which are already available will have a green checkmark. The remainder may be selected, the user will be prompted for some context information, which will be presented to the Request Approver. This might be their employee id, team, reason for asking, etc.

    Shares

    The Shares tab works the same was Applications does. A user may see the list of Shares their organisation has, the ones they have requested access to, and the ones they have access to.

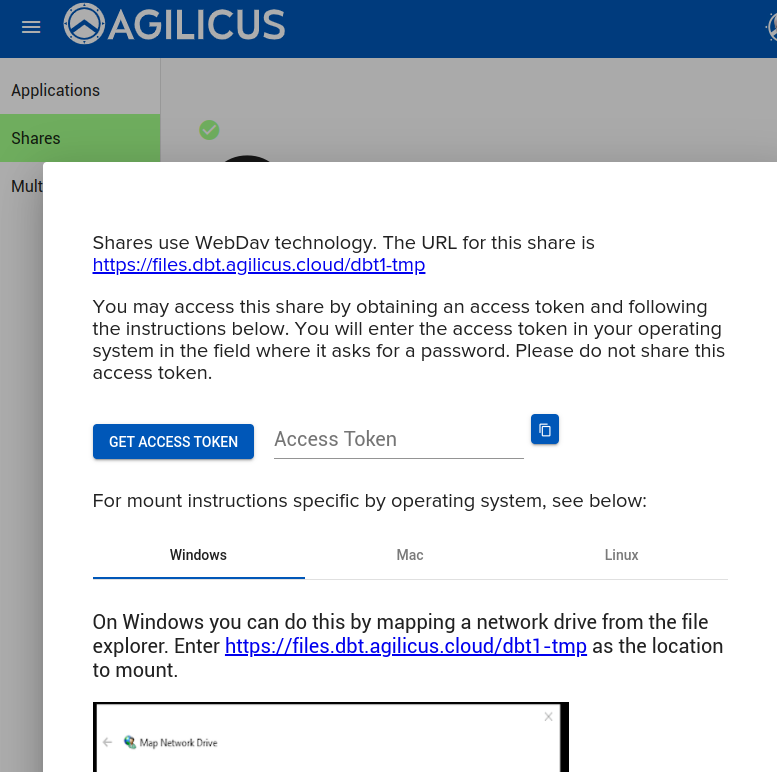
    For the Shares the user may select one and will be given instructions on how to mount it, including creating an Access Token, which acts as a one-time password.

    0906f2cc image

    Multi-Factor Authentication

    See setting up and configuring Multi-Factor Authentication for more information on rules, methods, trust-on-first-use, audit, etc.

    End users can configure their multi-factor authentication enrollment and preferences via Profile. If Trust-On-First-Use is enabled, they will be forced here on their first sign-in.

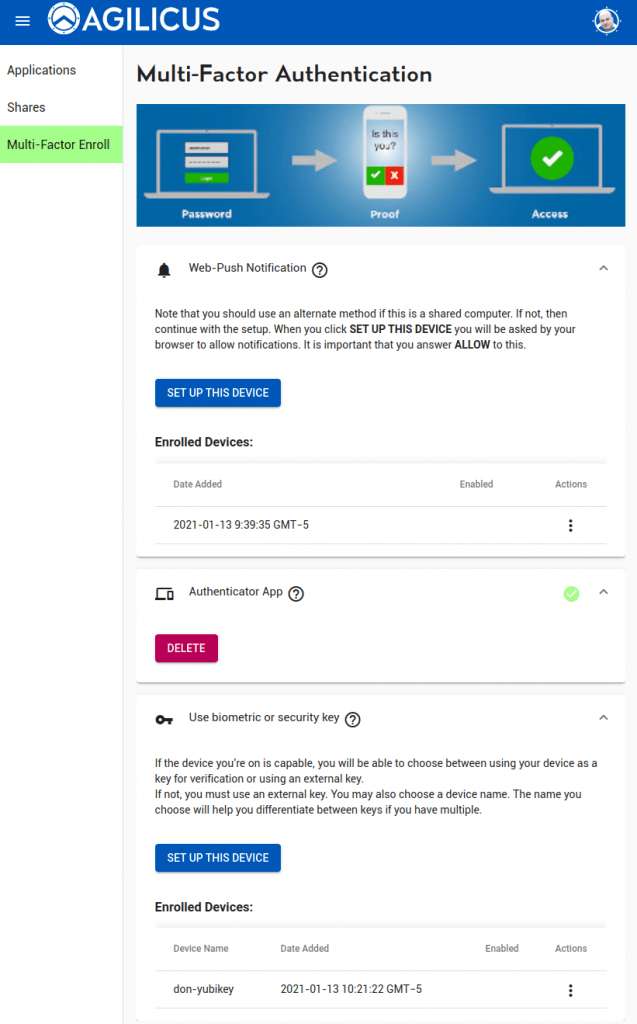
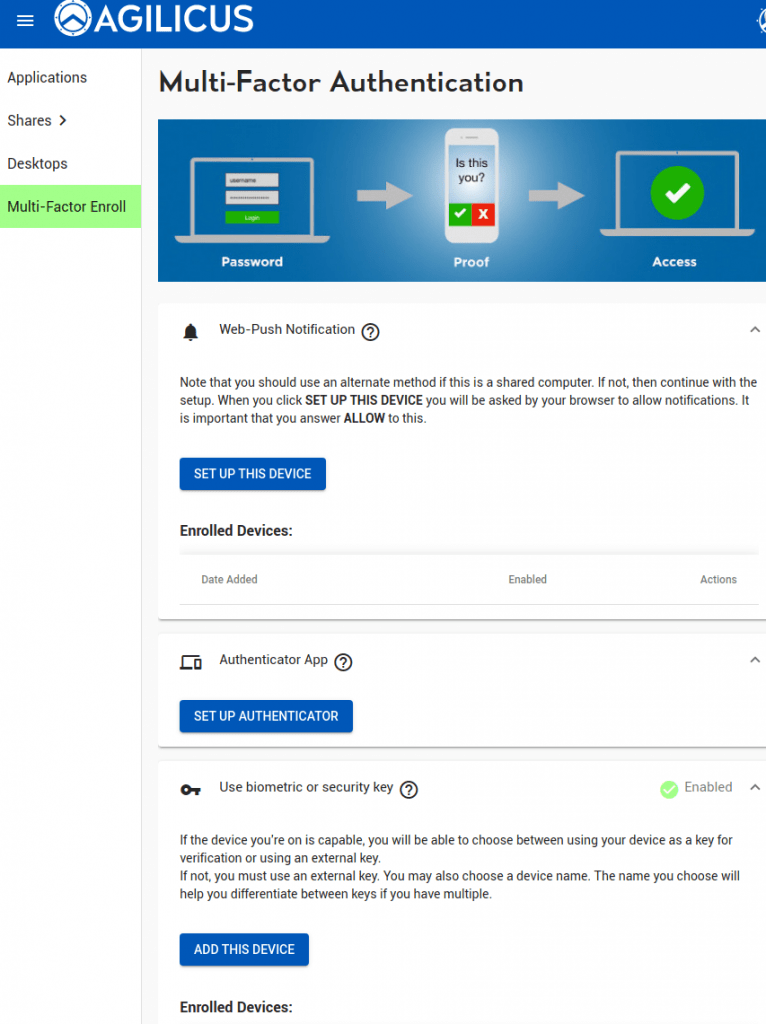
    Depending on how you have set up your organisation, users will have one or more methods available to configure. These include WebPush, Authenticator Applications (TOTP), and WebAuthN (USB Key, built-in trust store, biometric, etc).

    3a00b633 image

    WebPush Notification

    Web Push notifications work on all platforms except IOS. In this model, the user marks this device as trusted. When they sign in, this device will alert them, and they can choose to accept/deny the sign-in. A user may enroll multiple devices. A user may sign-in on a desktop device and receive the verification methods to e.g. a mobile device.

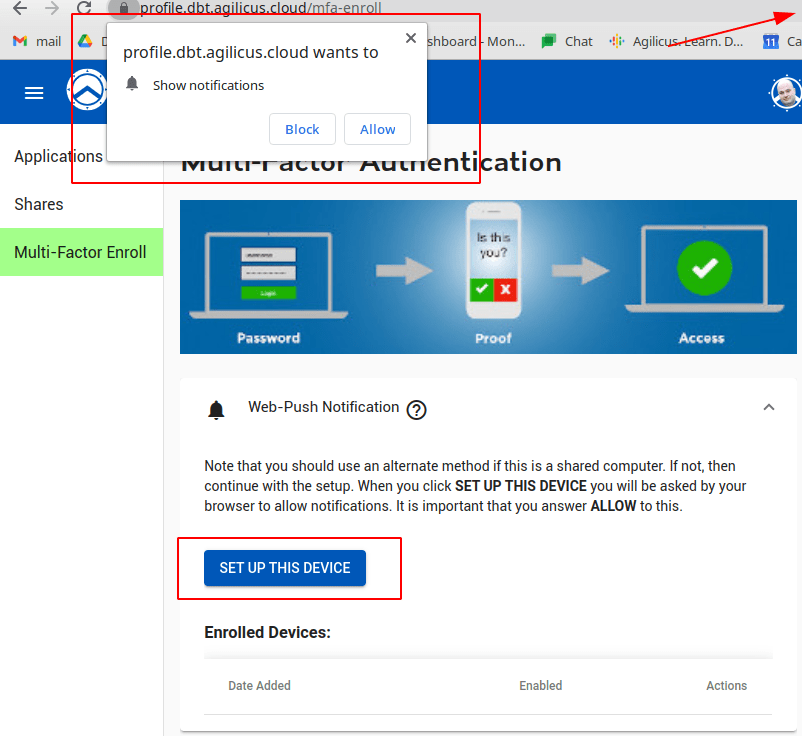
    When the user selects ‘SET UP THIS DEVICE’ they will be prompted to accept push notifications. They will then receive a test notification which they must click and accept.

    Some users may need to enable push notifications for this site, or globally, in order to use this feature.

    8fb72611 image

    Authenticator Application (TOTP)

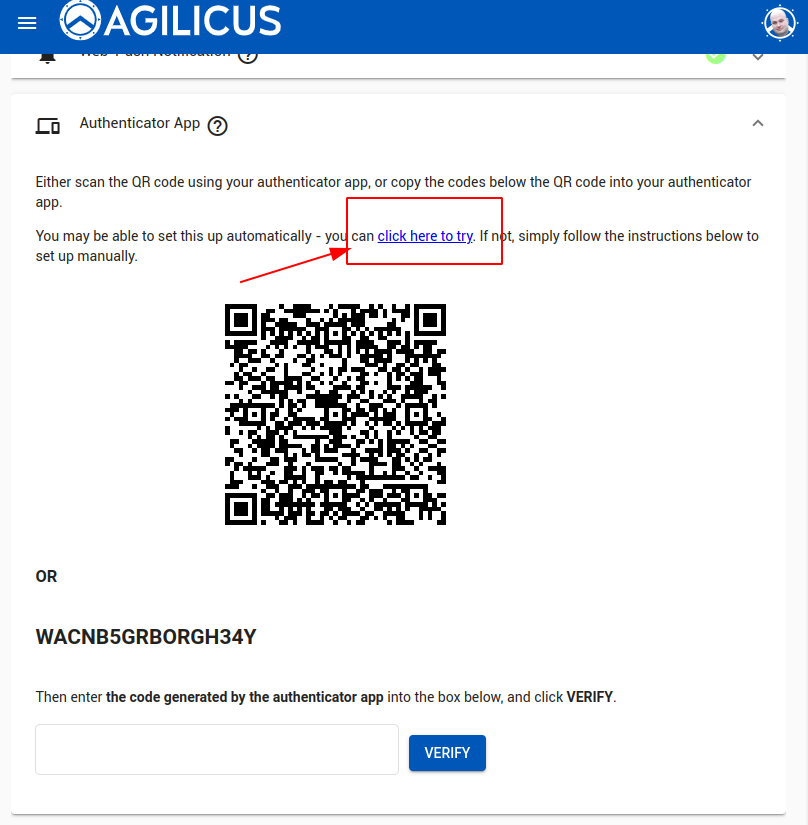
    An Authenticator Application uses a rotating one-time key that changes every 30s or so. In order to use it the user must install an Application. Agilicus recommends Authy, but the TOTP standard works also with FreeOTP, Google Authenticator, Microsoft Authenticator, and others.

    The user may enroll a single authenticator device. If the Authenticator runs on the same device you are enrolling on, select the “Click Here to Try” link, which will switch to your Application and walk you through the process.

    If the authenticator runs on a different device (e.g. on your mobile and the profile is opened from desktop), there will be a QR code shown, open your Authenticator and add via its instructions.

    2c132013 image

    Biometric Or Security Key

    This sets up a set of standards called WebAuthN. The end user might use a USB Key (e.g. Yubikey, Google Titan).

    if using the built-in trust store (e.g. biometric), then the Profile *must* be run on the same browser you plan to use for the other applications.

  • Permissions

    Permissions

    permission-authentication

    Permissions

    Permissions bind users to resources.

    Overview

    f11b5a27 image

    Each resource has an inherent set of roles it supports. For some, its a single role (e.g. SSH, you either can, or cannot, use). Others can be more fine grained (e.g. a Share can be Read-Only (Viewer) vs Read-Write (Editor). For Web Applications, these roles are user defined (e.g. Managing-Editor, Contributor in a web site).

    A permission is the assigning of which user (or group) has which role in which resource.

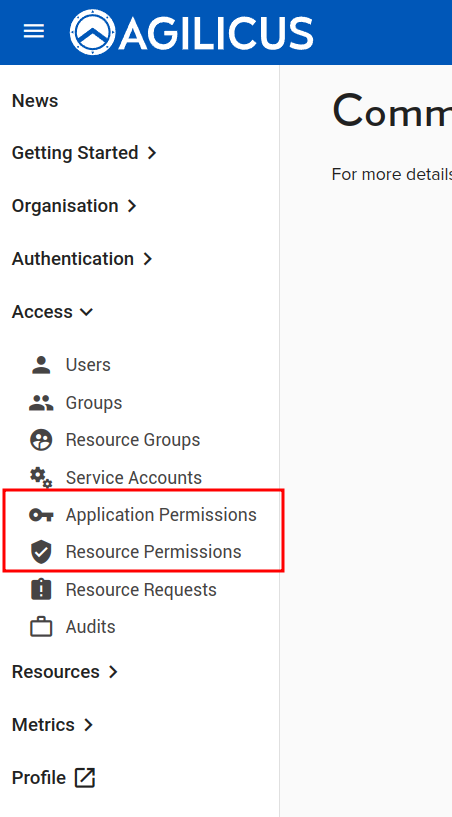
    Permissions are assigned under Access/Application Permissions (for web applications), and, Access/Resource Permissions (for all other resources such as a Share, Desktop, Launcher, etc.)

    Application Permissions

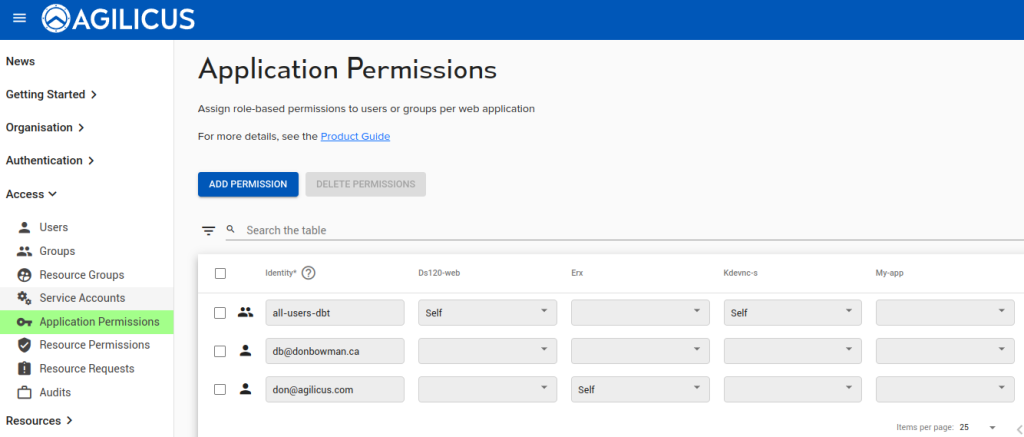
    To assign users (or groups) permissions to a web application, enter the ID (user email or group ID) on a new row, and then set the permission on each column.

    Agilicus recommends using Groups (so assign users to the group, assign permissions to the group) as it reduces configuration requirements.

    0f6acbbe image

    Resource Permissions

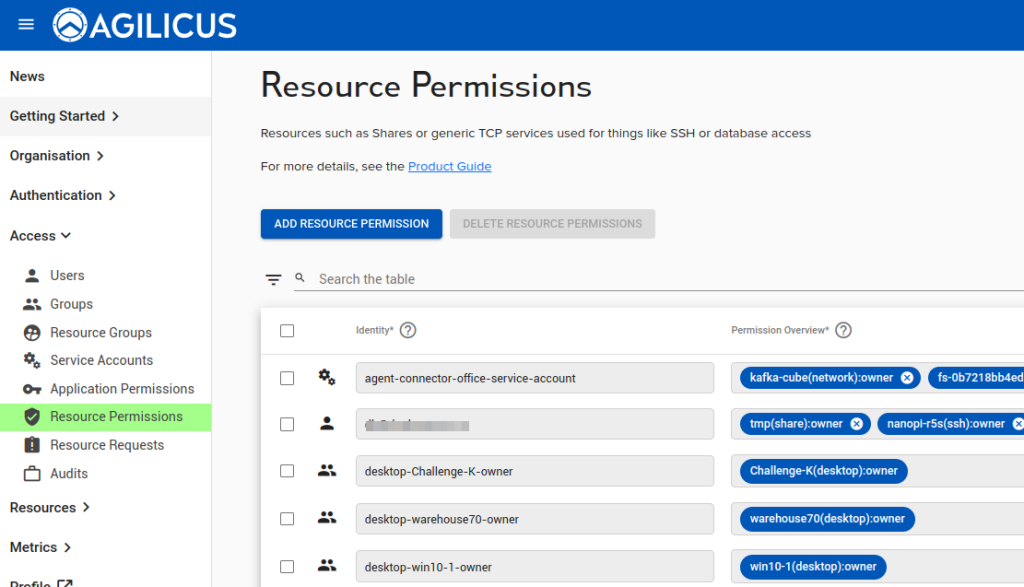
    For resource permissions, enter a new user or group row, and then add each individual resource permission as a ‘chip’. Start by typing the resource name, and then select the role. The roles are often Owner (all permission) or Self (all permission).

    f8200fe2 image

    Diagnose User Permission Issues

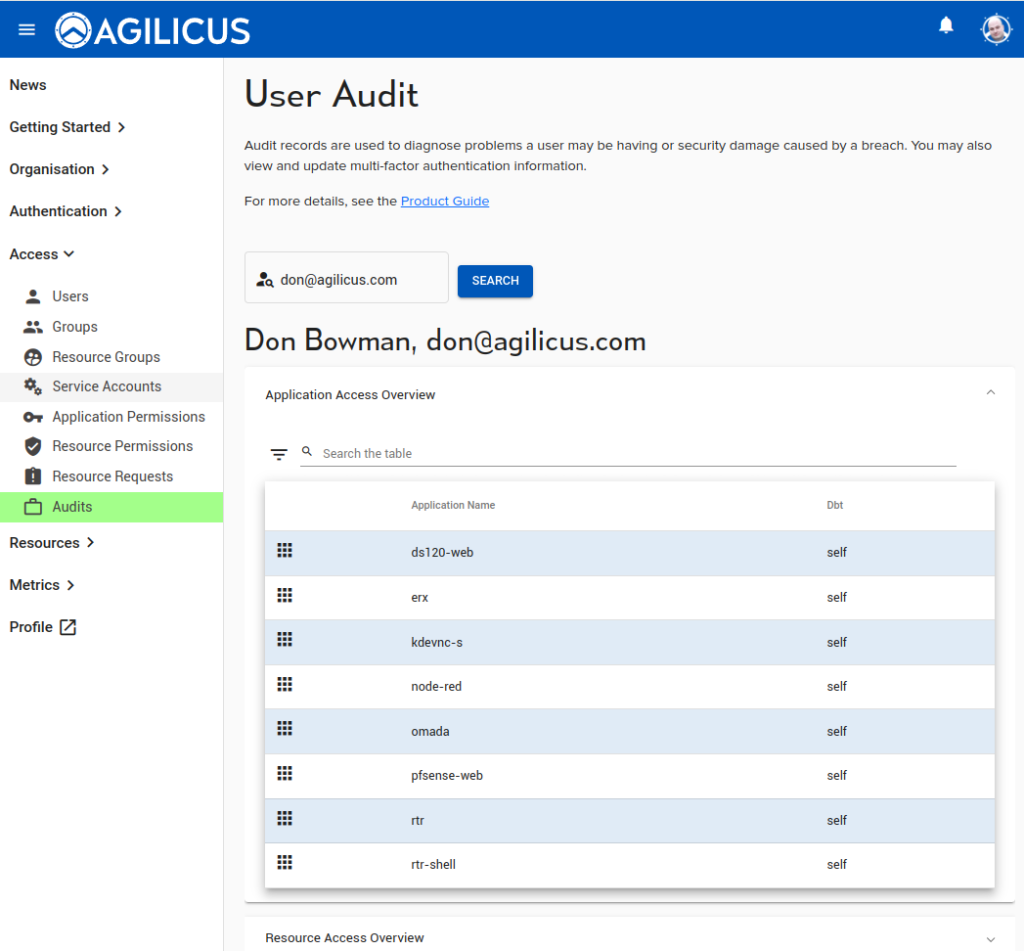
    To determine how an individual user might interact, you can use the Access/Audits menu. Enter a few letters of the user email and search. Below you will see the entire set of permissions, and, recently used access.

    373c24cd image

  • Multi-Factor Authentication

    Multi-Factor Authentication

    multi-factor-auth

    Multi-Factor Authentication

    Enable this best-practice on any application, for any user, regardless of authentication identity provider.

    Multi-Factor Authentication Configuration

    See background on Multi-Factor Authentication.

    In this implementaiton of Multi-Factor Authentication, the user is prompted to authenticate to their upstream identity provider, and, then, a multi-factor challenge is provided via web.

    State can be kept in a secure cookie on the ‘auth.DOMAIN’ endpoint. This can allow single-sign-on with multi-factor as well as only requiring a 2nd factor over some time interval.

    Supported Methods: WebAuthn (Passkey, USB Authenticator, FIDO U2F, …)

    The Web Authentication (WebAuthn) standard is the current best practice. It allows seamless integration of platform-specific features (biometric, TPM) with external U2F and CTAP devices.

    Browsers and versions supporting WebAuthn can be seen here.

    WebAuthn is designed to be privacy preserving, no information on the user or device is shared with the network. This includes biometrics.

    8e1b3b16 image

    Supported Methods: TOTP (Time based challenge app)

    A time-based one-time password (TOTP) is a universal standard, implemented by many applications (including Authy, Google Authenticator).

    TOTP is private (there is no network communication flow) and works even without a graphical or browser flow.

    Agilicus’ implementation works with all TOTP-supporting applications, however, we recommend Authy.

    Our strategy is to not supply “yet another” TOTP application. Instead, we recommend users use a common one across all websites, including ours.

    Web Push

    Web Push uses a network authentication profile called VAPID. This is designed to be entirely private: there is no way to identify the user or device receiving the push. In the Web Push model, the user’s browser (whether open or not) will receive a ‘push’ “WAS THIS YOU” message when you try to login, even on another device.

    Web Push is secure and convenient. However, the major downside is Apple, which does not support push methods. There is a petition requesting support.

    7ad4854b image

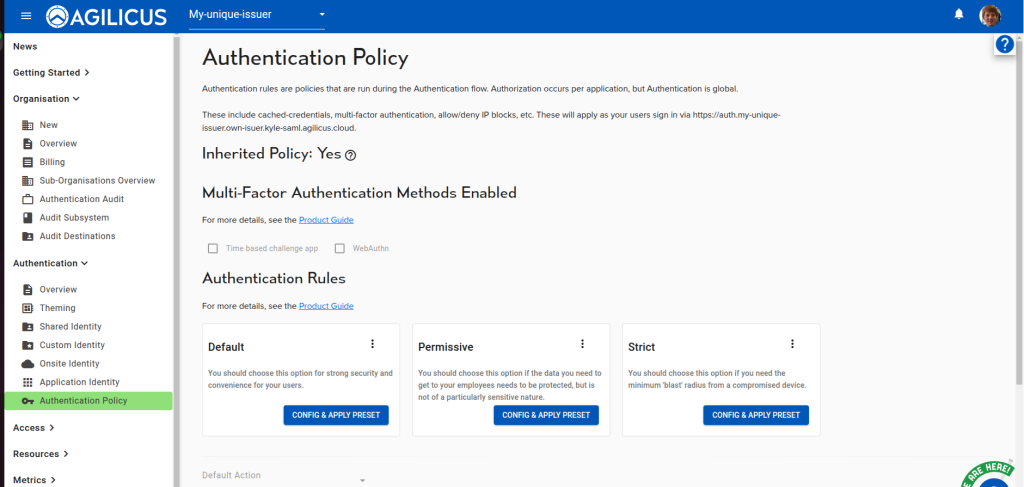
    Authentication Rules

    Authentication Rules are a type of Conditional Access. They are logically part of the authentication flow, after he user has proven identity. These rules can augment the logic with things like:

    • has provided multi-factor authentication
    • is in / not in IP ranges
    • application properties
    • user properties
    • device properties

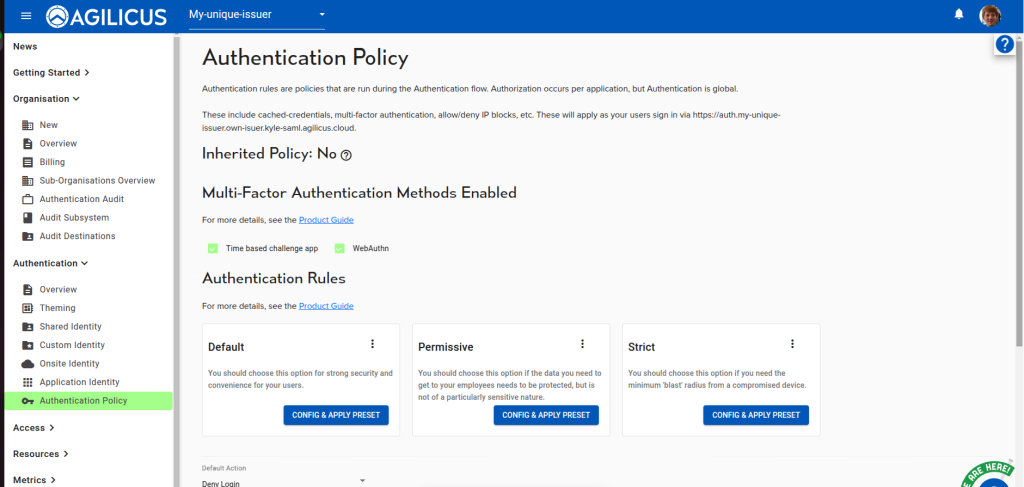
    The system has a set of policy presets. These operate like macros, overriding the current rules and then leaving them free to configure.

    See more information on Authentication Rules.

    Three presets are provided:

    Default

    You should choose this option for strong security and convenience for your users. Using a single identity source of truth among many applications enables maximal ease of use, while enabling multi-factor-authentication ensures that anyone without physical access to their device(s) cannot compromise the account. You will always be able to revoke a user’s access at any time and audit their usage of any applications or services. Details: Multi-factor authentication can be enabled per client, by default it will follow a user’s preference A user’s session is shared between apps unless that app’s client has Single Sign-On set to ‘never’ A user’s session lasts up to 7 days Multi factor authentication must be used to log in after every 30 days if a multi-factor authentication method has been configured

    Permissive

    You should choose this option if the data you need to get to your employees needs to be protected, but is not of a particularly sensitive nature. This option enables low barrier to entry to get as many users as possible onto the system with as little administrative overhead as possible. You will always be able to revoke a user’s access at any time and audit their usage of any applications or services. Details: Multi-factor authentication can be enabled per client, by default it will follow a user’s preference. A user’s session is shared between apps unless that app’s client has Single Sign-On set to ‘never’ A user’s session lasts up to 14 days Multi factor authentication must be used to log in after every 30 days if enabled

    Strict

    You should choose this option if you need the minimum ‘blast’ radius from a compromised device. By reducing the sharing of sessions between applications, minimizing multi-factor authentication duration and requiring frequent logins you can guarantee that in the event an employee’s device is compromised they cannot access anything other than what the employee is currently logged into. You will always be able to revoke a user’s access at any time and audit their usage of any applications or services. Details: Multi-factor authentication can be enabled per client, by default it will follow a user’s preference A user’s session is not shared between apps unless that app’s client has Single Sign-On set to ‘always’ A user’s session lasts at most 1 day Multi factor authentication must be used to log in every 7 days

    Trust On First Use

    Agilicus recommends a ‘Trust On First Use’ method of self-enrolment. In this model, a user is forced to setup their second-factor on the next sign-in, with a maximum deadline.

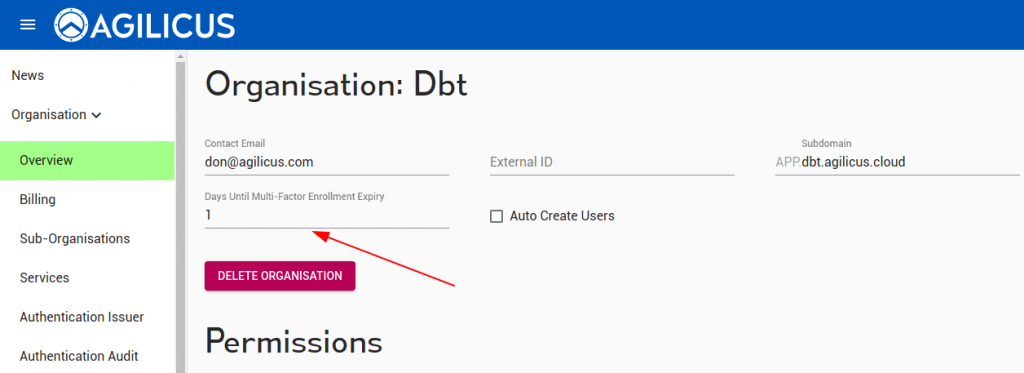
    The deadline is set organisation wide, and is the delta from when the user is created until when they must have successfully demonstrated a 2nd-factor setup.

    1822a2aa image

    End-User Setup (Profile)

    99849e39 image

    The end user may manually navigate to “Profile” (via https://profile.DOMAIN). They may also install it as a Progressive Web App (PWA), making it appear as a mobile-native application.

    In the Profile, the user may setup whichever multi-factor methods their organisation has chosen to support.

    if trust on first use is used. the user will be forced here on their first login within the enrolment period.

    Diagnostics and User Audit

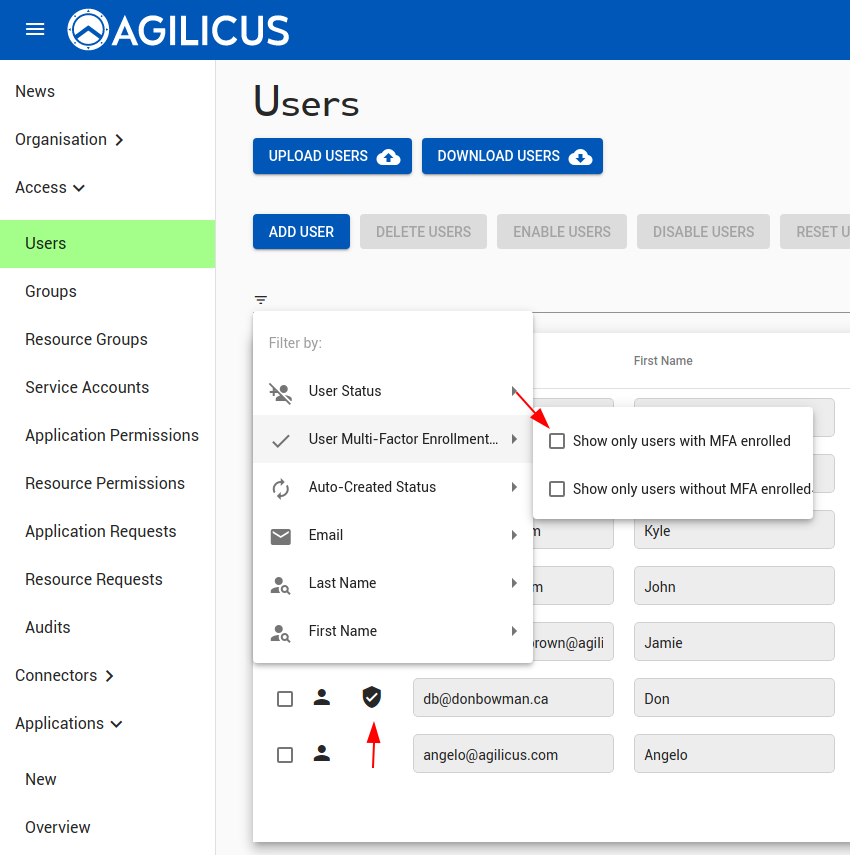
    We can see which users have multi-factor setup in the ‘Users’ screen (via the shield). We can also filter to show only user with/without multi-factor authentication enabled.

    The “RESET” users option will unset the multi-factor setup & preferences of a user.

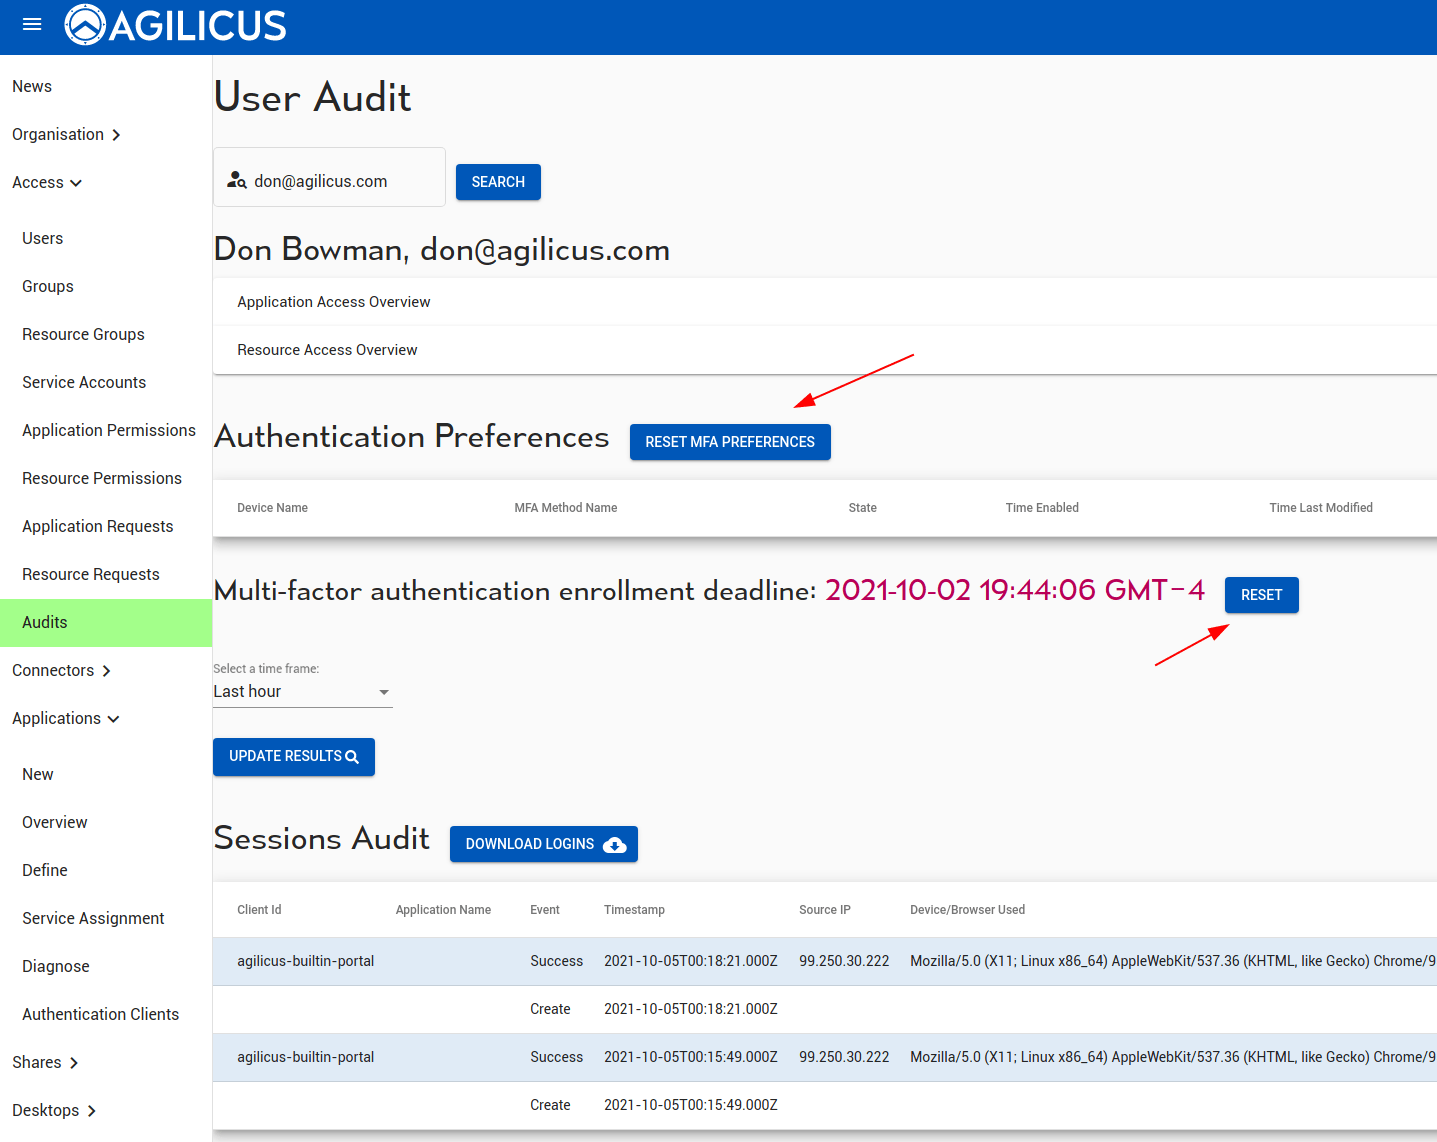
    We can see the multi-factor sessions and preferences (as well as all other audit information) of a given user on the audits screen. Here too we can reset the trust-on-first-use timeline.

    Requiring multi-factor authentication

    Normally, a user must periodically present their second factor when authenticating only if they have it enabled. That said, you can configure the policy to require a set of users to have a second factor method configured. If such a user tries to log in when they do have not have a second factor method configured, they will either be asked to enrol one, if they are within the enrolment deadline, or they will be denied access.

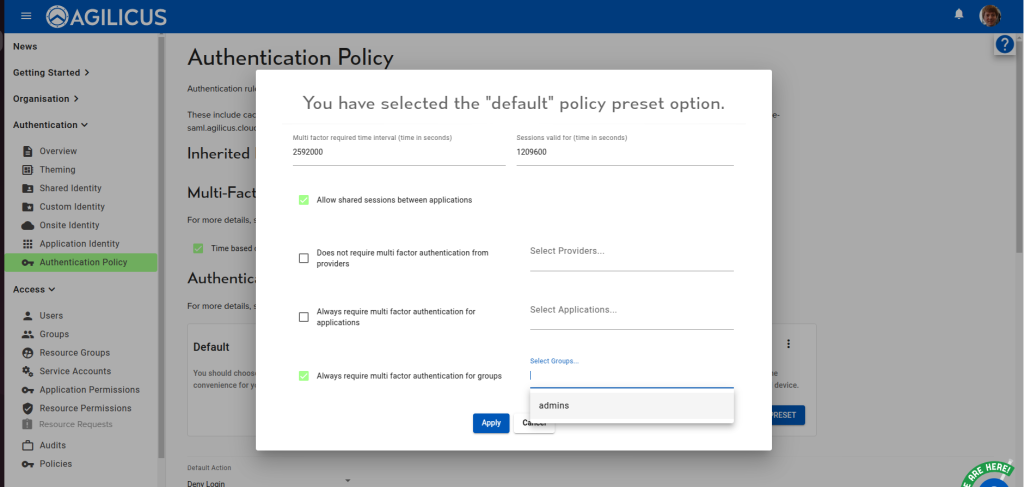
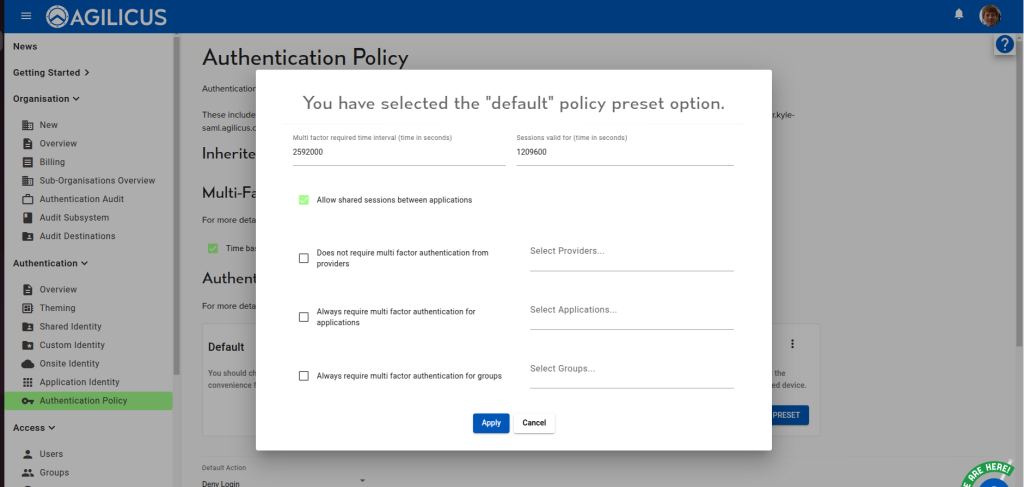
    You can configure this setting in one of two ways. If you have not yet customised your authentication policy, you can apply one of the presets. Choose the preset to apply, then select the groups for which you want to force multi-factor authentication in the “Always require multi factor authentication for groups” section.

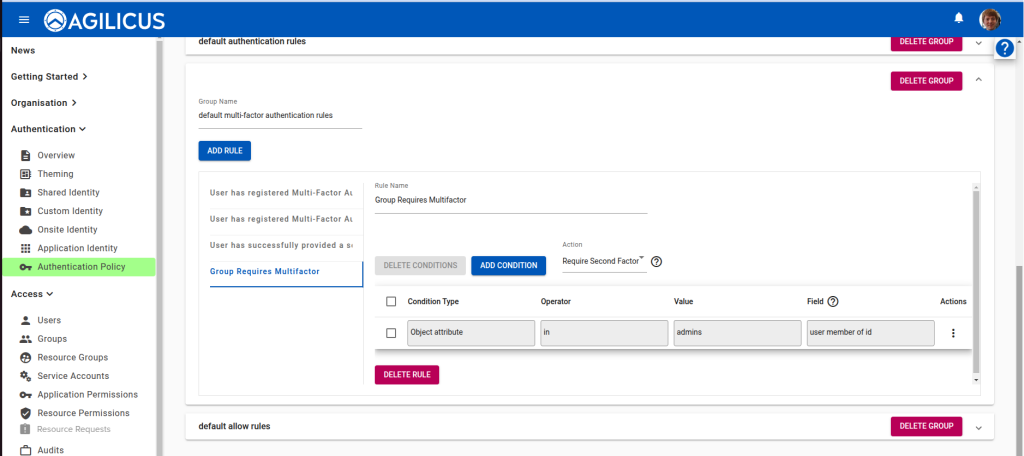
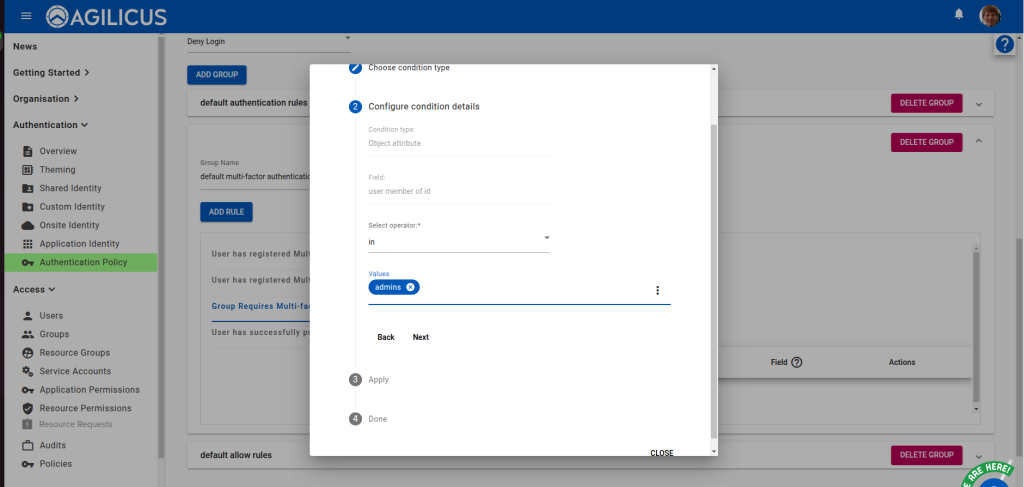
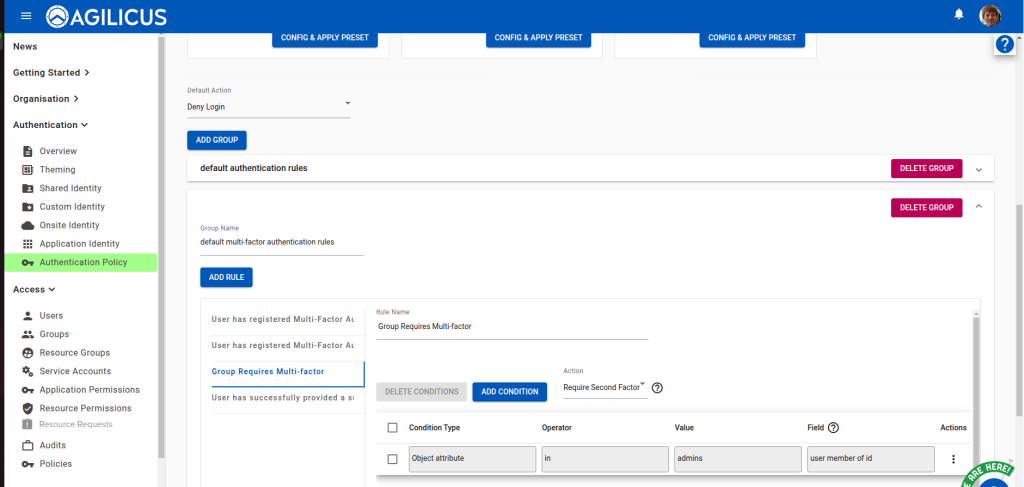
    If the group you want does not exist, create it first. If you have customised the policy, you can either edit the existing rule which controls this behaviour, or create a new one. Under the “default multi-factor authentication rules” group, select the “Group Requires Multifactor” rule, then configure its condition (via the actions menu).

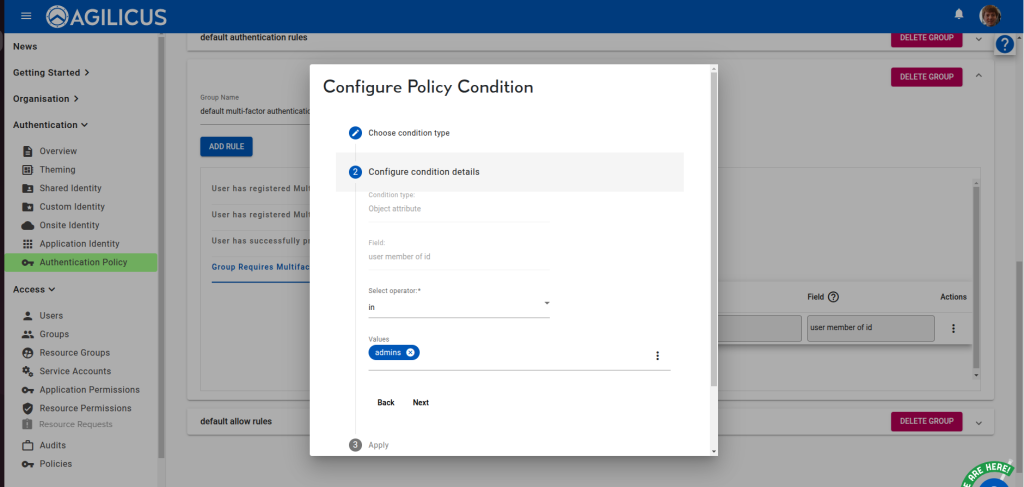
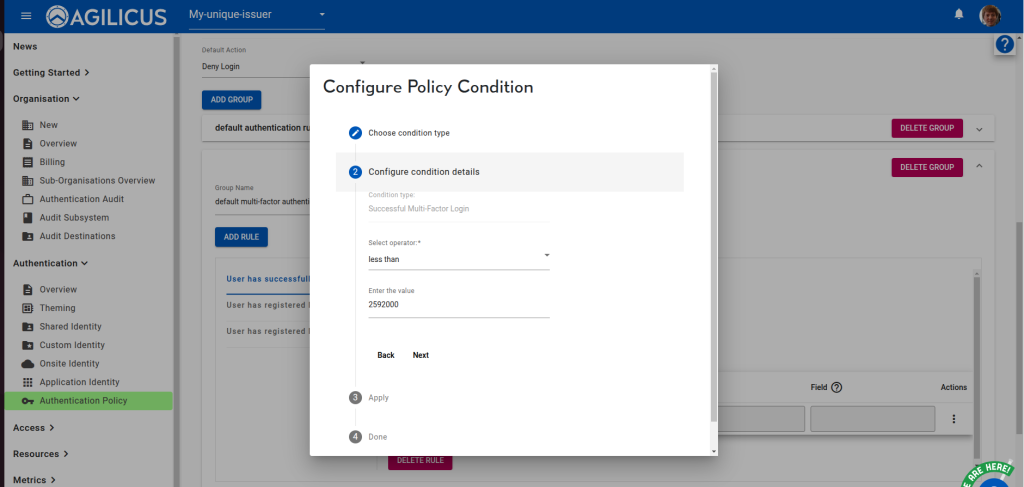
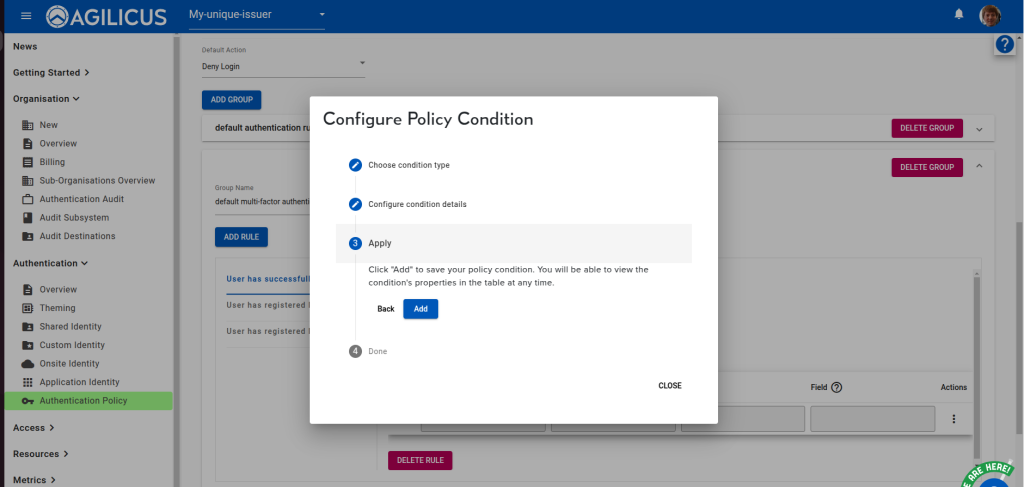
    Choose “Configure condition details”, then select the desired groups in the “Values” chiplist. Do not change the operator. Once you have chosen the groups, navigate to “Apply” and click “Add”.

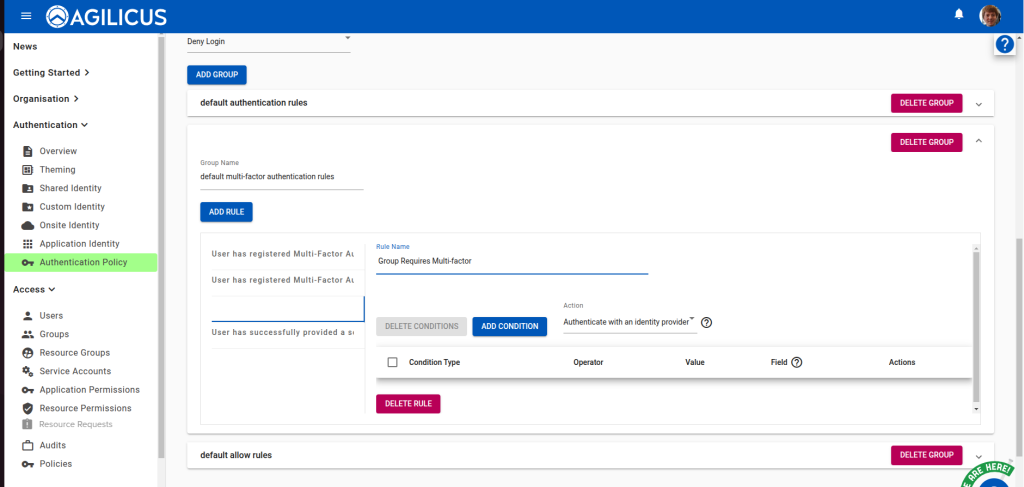
    If this rule does not exist, you will need to create a new one in the “default multi-factor authentication rules” group. First, click “Add rule”, then select the newly created, blank rule. Change its name to “Group Requires Multi-factor”:

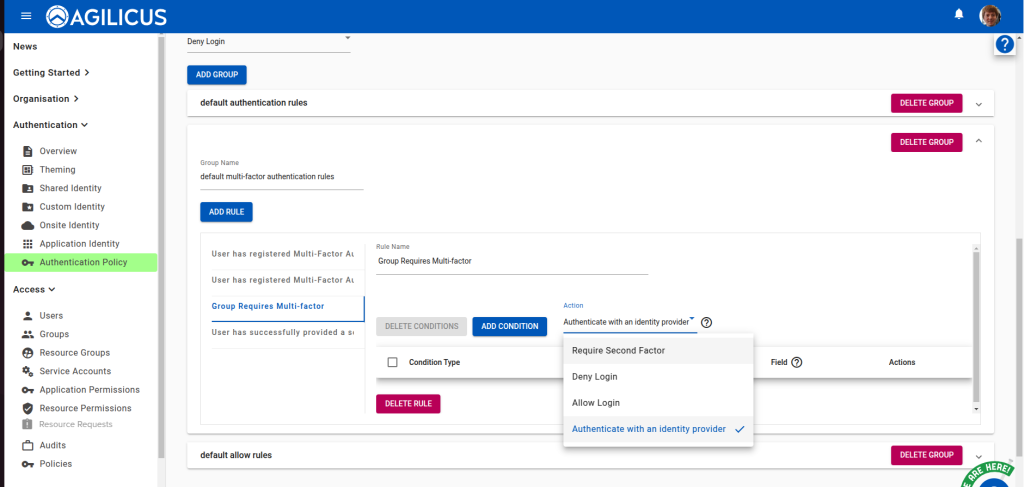
    Set its Action to “Require Second Factor”.

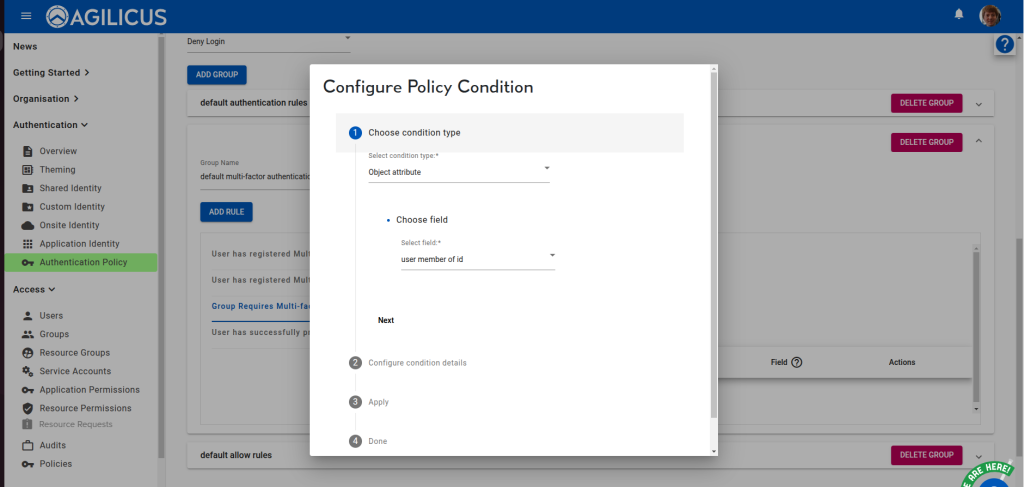
    Then add a new condition. Set its type to “Object attribute” with field “user member of id.

    Move next to “Configure condition details”, where you will choose the “in” operator. Select the desired groups under “Values”.

    Move next to Apply to add the condition. Once you done so, the policy will be updated, and users in the configured groups will be forced to provide a second factor.

    Multi-Factor Authentication Frequency

    Similar to an authentication session, a user’s proof of their second factor is only valid for a configurable amount of time. This configuration is part of the authentication policy. The duration for how long the second factor is valid is expressed in seconds. It can be configured either by applying a new preset, or by editing the appropriate authentication rule.

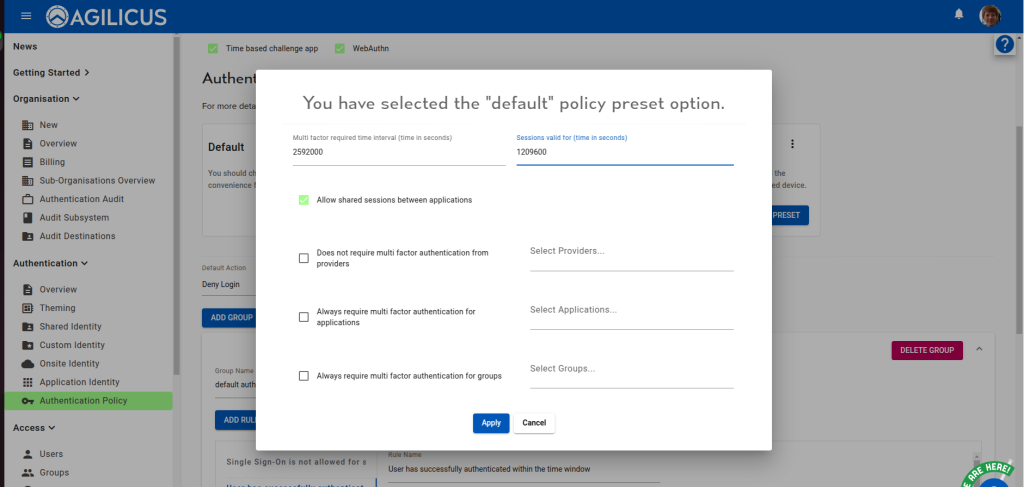
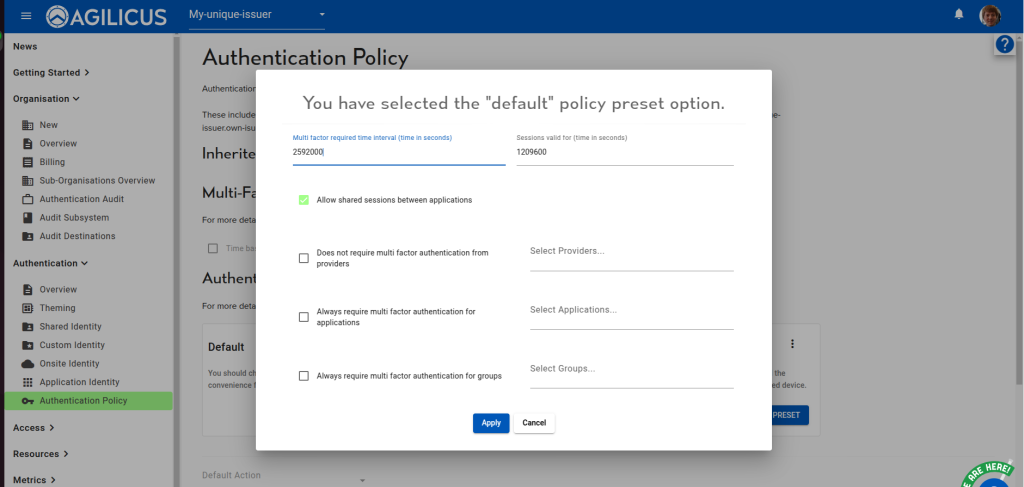
    To apply a preset, choose the desired one from the “Authentication/Authentication Policy” page, then choose the time interval.

    In this example, users will be asked to present their second factor every 2592000 seconds (30 days). Choose your desired value, then hit apply.

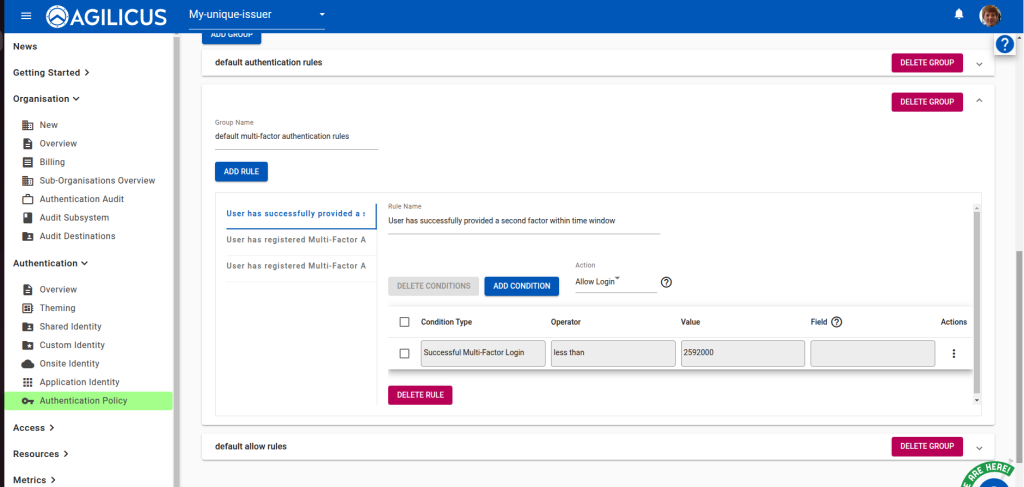
    To configure the existing policy, open the “default multi-factor authentication rules” group, and choose the “User has succesfully provided a second factor within time window” rule.

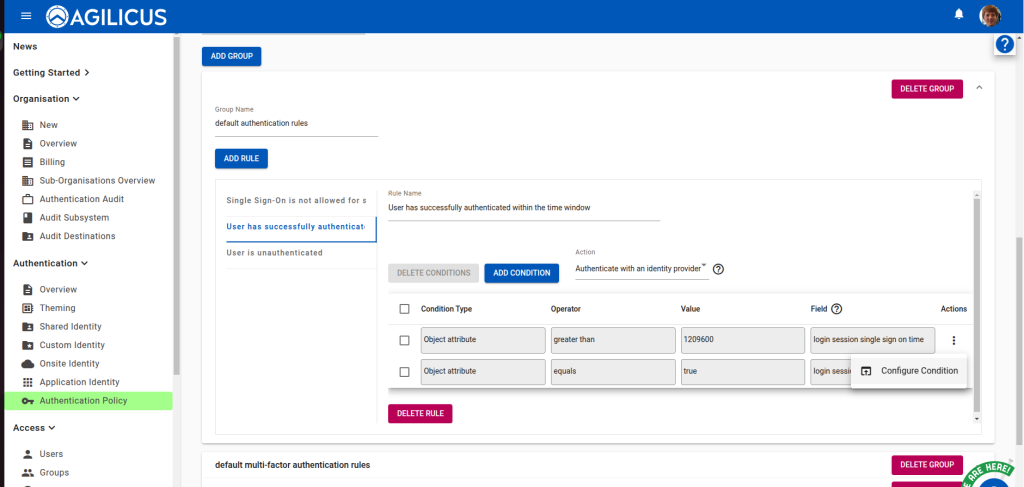
    Edit the value by selecting “Configure Condition” from the actions menu.

    Then apply the change by select “Add”.

  • Identity & Authentication Methods

    Identity & Authentication Methods

    authentication

    Identity & Authentication Methods

    Methods of identifying a user

    Identity & Authentication Methods (Authentication Issuer)

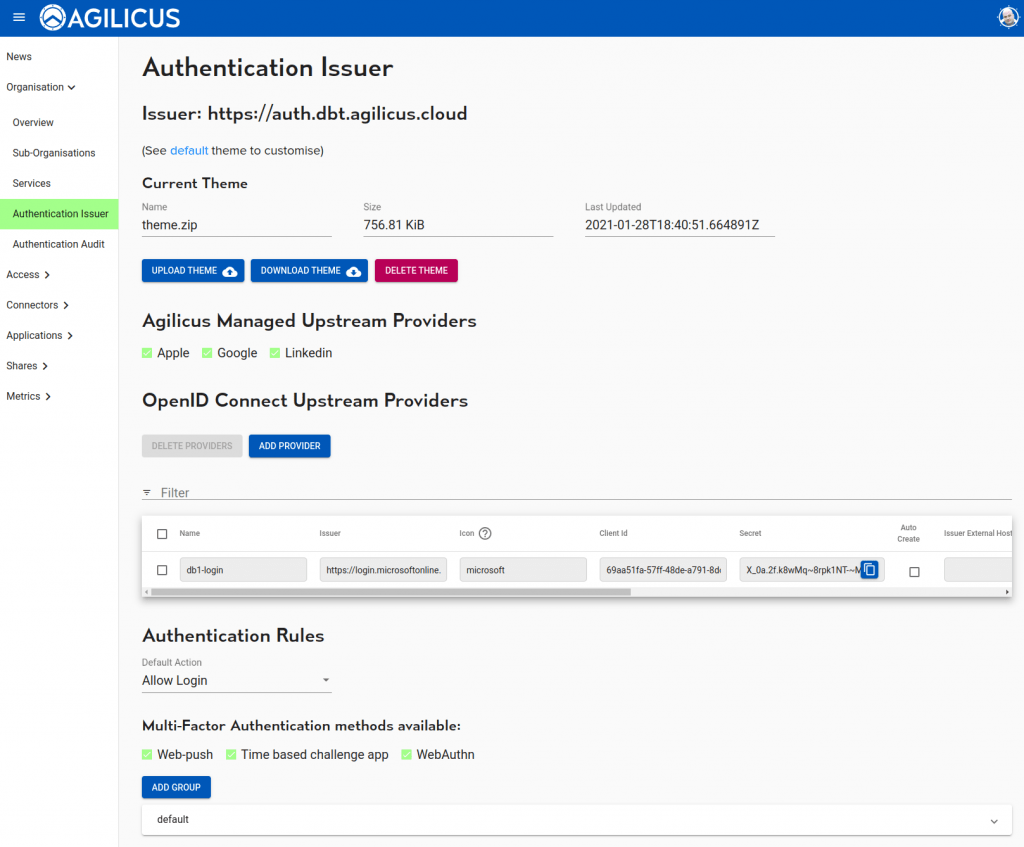
    The Agilicus platform uses external Identity Providers (called Upstream Identity Providers). There are no passwords stored within the system. Supported standards include OpenID Connect (an extension of OAuth 2.0) and SAML 2.0. In turn, you will configure Authorisation in the Agilicus system. What this means is “who” is provided by a 3rd party, and “what they can do” is controlled by you, the Administrator.

    Within the Authentication Issuer you have several configuration options:

    1. You can configure the sign-in screen theming with your own logo and colours.
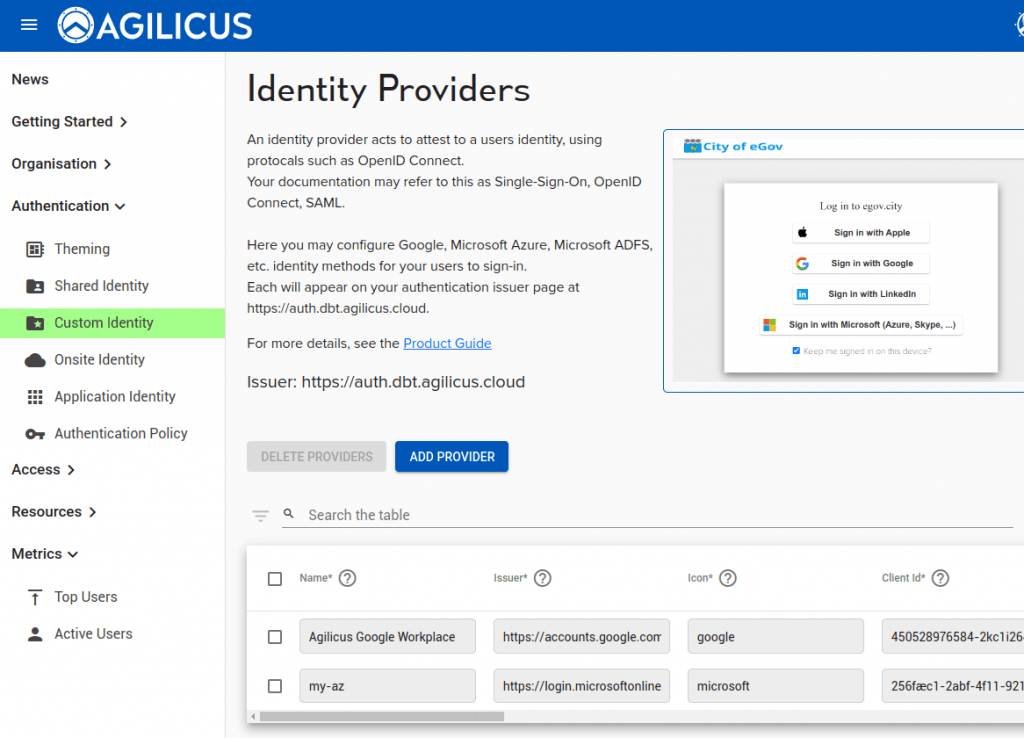
    2. You can select from a set of Agilicus-Managed Upstream Identity Providers (Apple, Google, Linkedin)
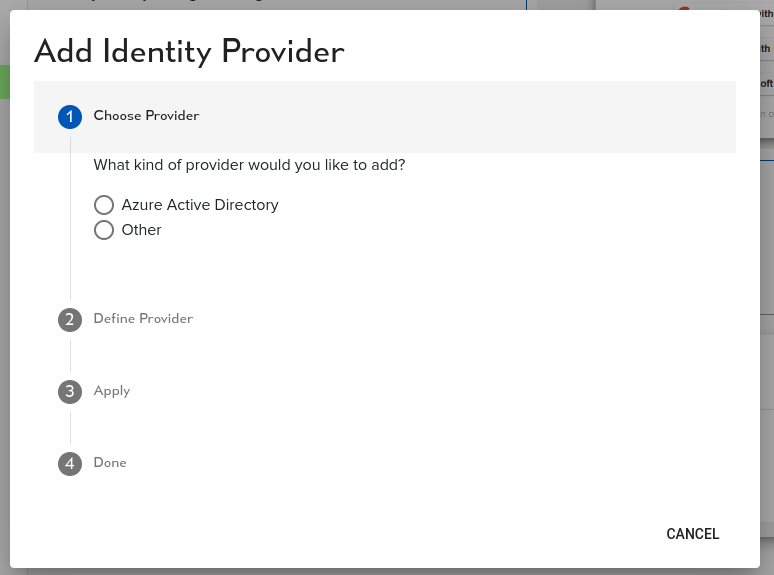
    3. You can add your own Identity Providers (Azure Active Directory, Microsoft ADFS, etc)
    4. You can configure multi-factor authentication
    5. You can control rules regarding when/how/who can authentication to the system
    381dcb22 image
  • Authentication Clients

    Authentication Clients

    Authentication Clients (clientid)

    Authentication Clients

    Advanced configuration of per-application settings on authentication.

    Authentication Clients

    The Authentication Clients implement OpenID Connect client id. This is an advanced setting, it is rarely required to configure. These are created automatically for each web application. You might create these if you have 3rd party applications using Agilicus AnyX as a Single-Sign-On provider (see VTScada Single-Sign-On as an example), you might edit them if you wish to alter the default parameters of a single application.

    Background

    An OpenID Connect (OIDC) client_id is a unique identifier assigned to an application that wants to use OIDC for authentication and authorisation. Think of it like a username for your application when it talks to an OIDC provider (in this case Agilicus AnyX)

    • Purpose: It tells the OIDC provider which application is requesting access. This allows the provider to apply the correct security policies, redirect users back to the right place after login, and more.
    • Uniqueness: Each client application registered with an OIDC provider gets a unique client_id. This is crucial for security and proper functioning.
    • Configuration: When you register your application with an OIDC provider, you’ll receive a client_id (along with other credentials like a client_secret in some cases). You’ll then configure your application to use this ID when making authentication requests.
    • Usage: The client_id is included in authentication requests sent to the OIDC provider. It’s used to identify the application and retrieve the appropriate configuration details.

    Setup

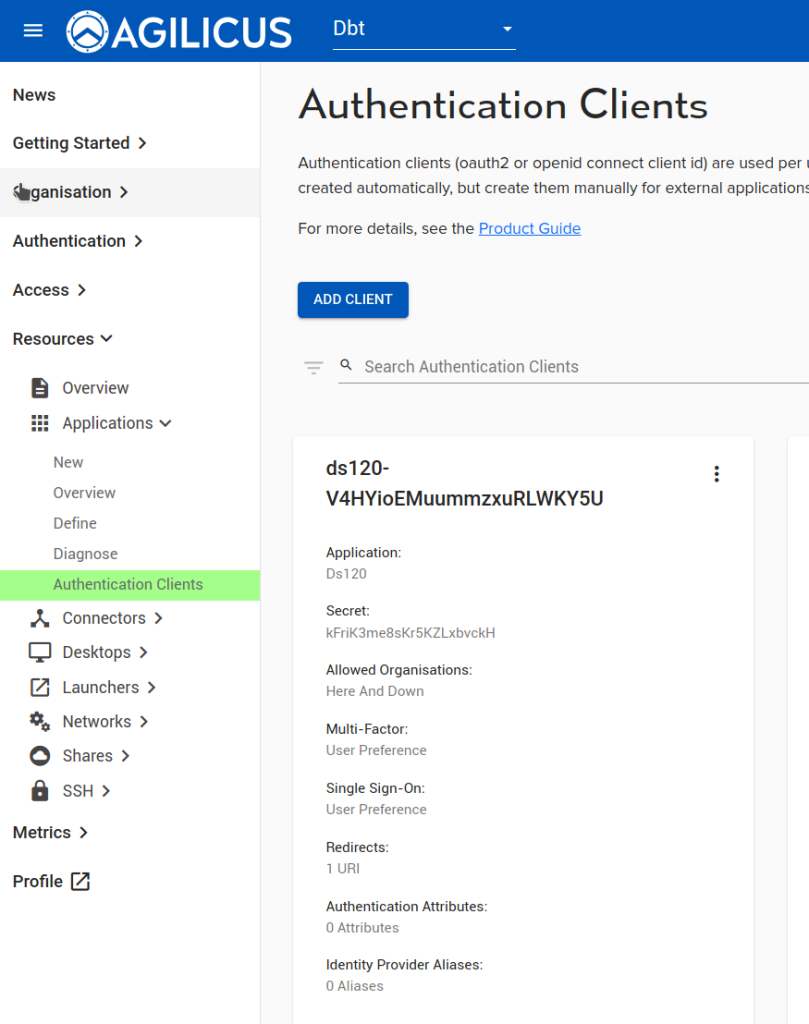
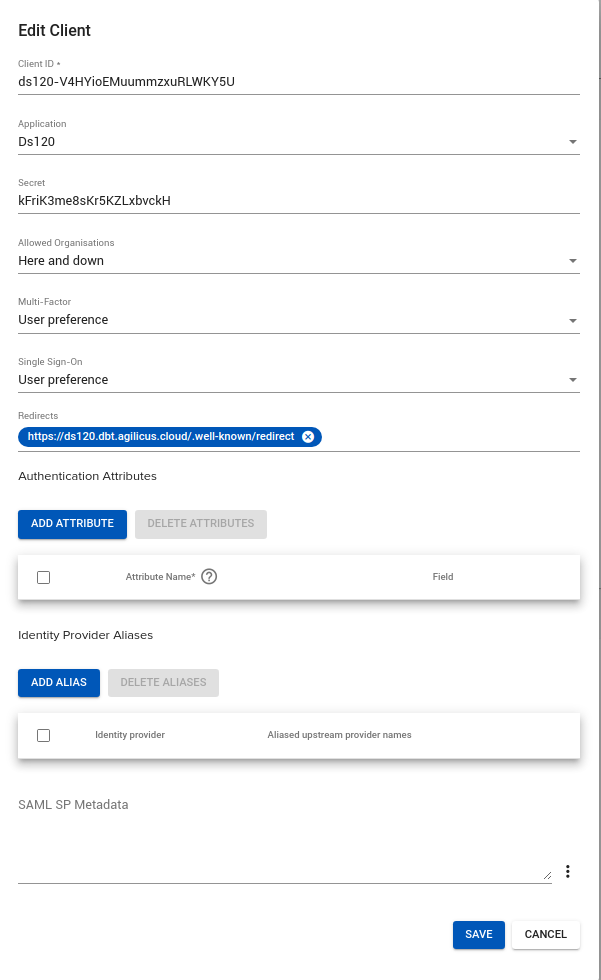
    The below images show an example of a default created client id for a web application. The name is created with a unique trailer to allow it to work into a sub-org that might have a same-named application.

    The fields are:

    • Client ID: the OpenID Connect client-id. This must be unique within all of your orgs
    • Application: this is a pull down, selecting which application in the system to tie to
    • Secret: this string is used when configuring an OAUTH2 3-legged flow (see The OAuth 2.0 Authorization Framework) in which a backend, non-graphical component participates as well as a browser
    • Allowed Organisations: This can be used to control, grossly, which org can use this Client ID (rather than relying solely on assigned permissions). Valid values include: “Here Only”, “Here and Down”, “Any”, “<this org name>”, “<This org sub name>”.
    • Multi-Factor. This is an alternate way of assigning multi-factor “when”. Valid values include: “Always”, “User preference”, “Trust upstream”
    • Single Sign On Preference: This allows controlling whether a user can use ‘cached’ credentials (e.g. sign-in once for all apps, or, be forced to sign-in to each). Valid values include “User preference”, and “Never”.
    • Redirects. If you add applications outside the scope of the Agilicus AnyX platform, you may need to configure a redirect URI that is specific to it.
    • Authentication Attributes. This can be used to set fields that will appear in the ID Token to the application, e.g. username.
    • Identify Provider Aliases. Cause one identity provider to alias another.
    08681b7f image
    b968ed35 image
  • Application Request Access

    Application Request Access

    request

    Application Request Access

    End User request permissions to a specific application.

    Application Request Access

    In some environments, temporary workers may request access to an application. In this model, the administrator will receive a push notification to accept/deny.

    Enable Push Notifications

    Although it is possible to ‘poll’ the outstanding requests, we recommend enabling push notifications. These will come to your phone and can be directly dealt with.

    There is no requirement to install an application on your phone, the push notifications use the native phone platform messaging.

    Administrator View

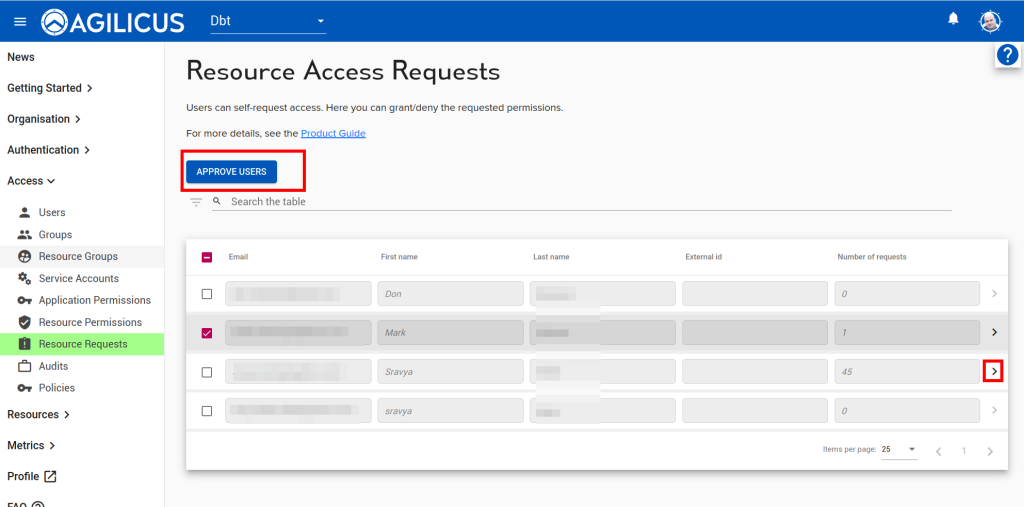
    You can see pending requests, accept-them as-is, reject them, or edit them as below image.

    End-User View

    The end user in https://profile.__MYDOMAIN__/ sees 3 tabs they can swipe between. These show:

    • mine (applications I have access to)
    • pending (applications I have asked for access but he administrator has not yet acted on)
    • all (all applications which have ‘published’ set are visible to request).

    When the user requests an application from the ‘all’ tab, a dialog pops up where they can put a message.

    Video Walk-through

    The below video shows a walk-through and explanation of the rationale of this feature.

  • Services

    Services

    5293bad2 services

    Services

    Services

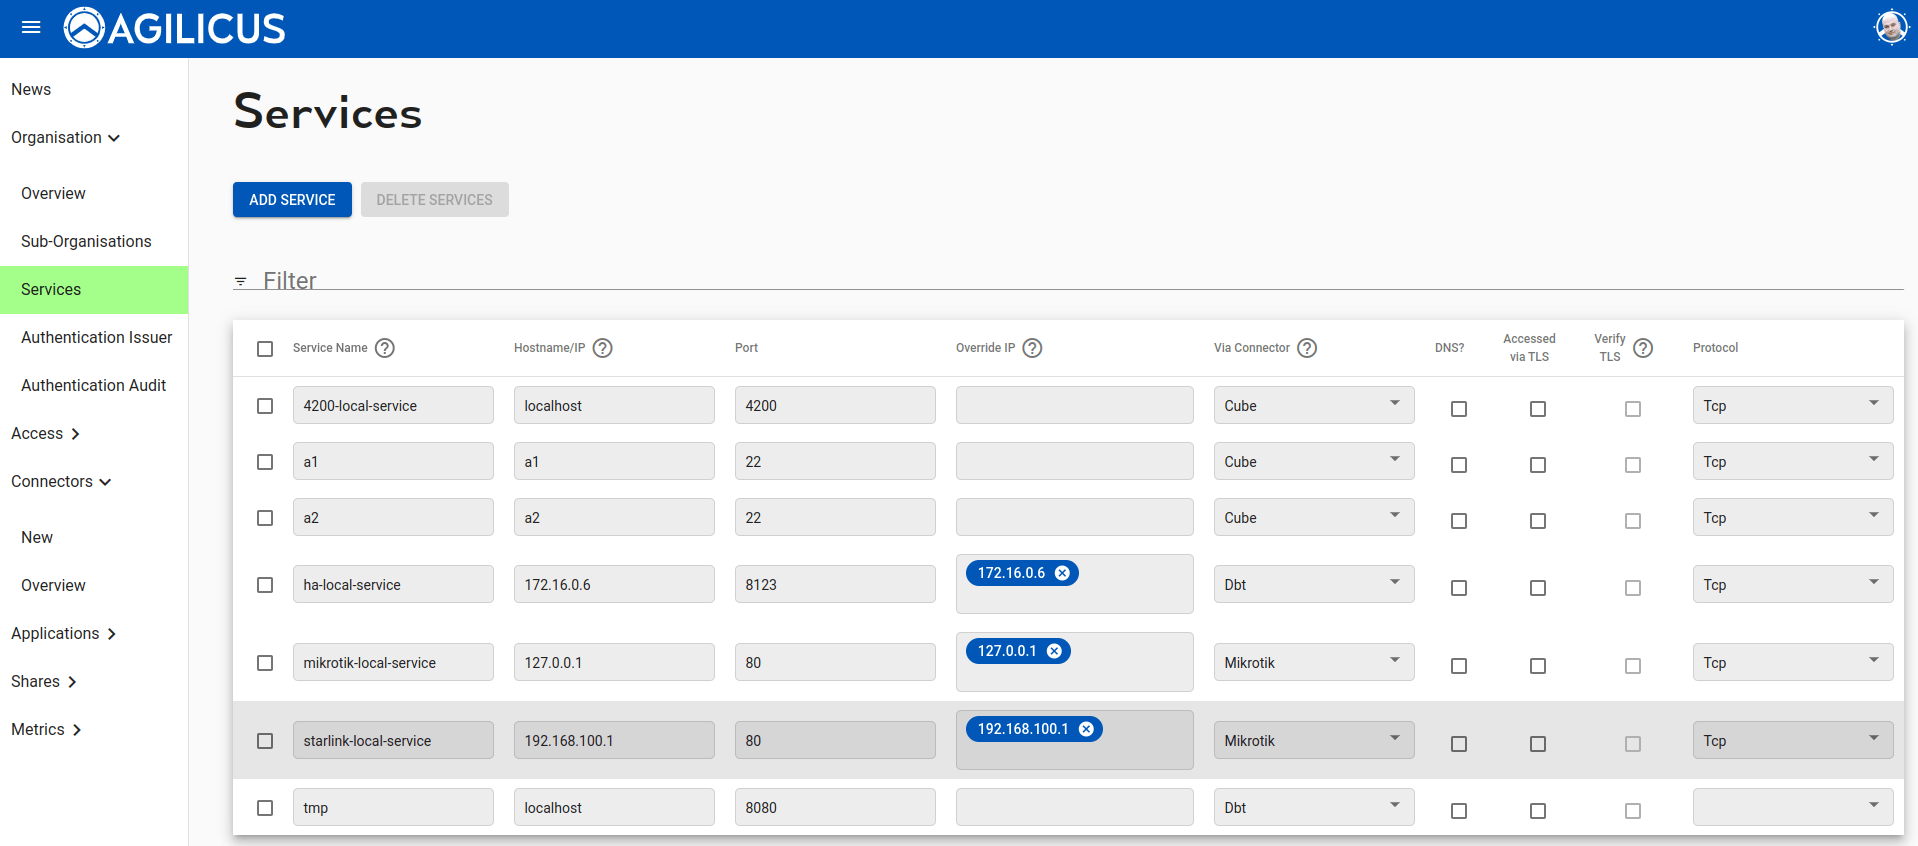
    A service is a basic primitive of a Network Resource. It consists of a set of coordinates that ultimately resolve to a TCP host + port.

    Configuration includes:

    • Service Name: This is the name the service is accessed via as a user (e.g. the ssh name they will use) or one of your Application Resources will use to address
    • Hostname/IP: This is the name that the Secure Exposed Agent will resolve. It is often the same as the service name
    • Port: the TCP port # (0-65535)
    • Override IP: typically blank, but, in the event that DNS is not available, the IP address of the Hostname.
    • Via Connector: this is the method and connection to reach the Network Resource.
    • Accessed via TLS: If checked this connectons to this Network resource will be initiated via TLS
    • Verify TLS: if TLS is checked, if this is checked, the destination certificate is confirmed
    • Protocol: currently only TCP
  • Zero-Trust SSH Access

    Zero-Trust SSH Access

    7423582c ssh terminal

    SSH Access

    Any identity provider.

    Multi-factor authentication.

    Direct SSH access, end-to-end encrypted.

    Web access from any device, or, existing SSH client.

    SSH Access via Zero Trust

    SSH by its very nature is end-to-end encryption with strong protection against Man-In-The-Middle attacks. All servers need to be accessible via SSH to be manageable, often by external users (e.g. vendors, outsourced NOC, etc). However, despite SSH being strong on encryption it is challenging on accessiblity. The servers are typically on private networks (e.g. Virtual-Private-Cloud VPC, internal network VLAN’s, etc). Making them directly accessible to the Internet can be dangerous (we would have to somehow police that all users have passphrases on their keys, that we don’t have passwords allowed, etc.). SSH jump-boxes add a step to the workflow, are difficult to ssh-port-forward and scp through. VPN access is difficult to secure on a per-server basis, often being all-or-none.

    In this guide we will setup the Agilicus Zero-Trust Network Access to directly access arbitrary SSH servers. The users will see them as being directly Internet connected. The users will have zero configuration (after the initial setup). Users can be individually authorised on a per SSH server basis. Additionally, users can be federated for identity by any upstream identity provider, allowing an external vendor to be identified by their own corporate Azure Active Directory, an independent contractor via their Google login.

    The data flow is such that the SSH TCP session is intact from the client to the server: the hostkeys are unaltered, SSH anti-tamper mechanisms are unperturbed. SFTP just works.

    d6c678de ssh data flow

    The end user can use any SSH client (ssh command line, mobaxterm, putty, etc), with no complicated config to remember. The system administrator can gate access on/off per user, and, see an audit trail of who has accessed what, when, from where.

    SSH Access Setup

    Note: you can use a site-to-site VPN via IPSEC, or use the onsite Agilicus Connector for each pool of servers. These instructions assume the latter.

    1. CREATE ORGANISATION

    Your Organisation lets you setup your identity providers, your DNS name (CNAME), and control your users.
    See SIGNUP

    2. SETUP IDENTITY

    You can enable Google, Apple, LinkedIn as check box items. You may also wish to enable Azure Active Directory
    Also setup initial users and group membership.

    3. CREATE CONNECTOR PER SITE

    Each pool of servers needs a method to reach it. This can be a site-to-site VPN, or an on-site connector. Install a connector now, this may be on each SSH server, on 1 of the servers that can reach the others, on a machine in the same network, its up to you.

    4. CREATE SSH RESOURCE

    The SSH resource has a unique name, a upstream host-name, and upstream port. Configuration will be automatically created for desktop clients such as OpenSSH or Putty.

    5. ASSIGN PERMISSIONS

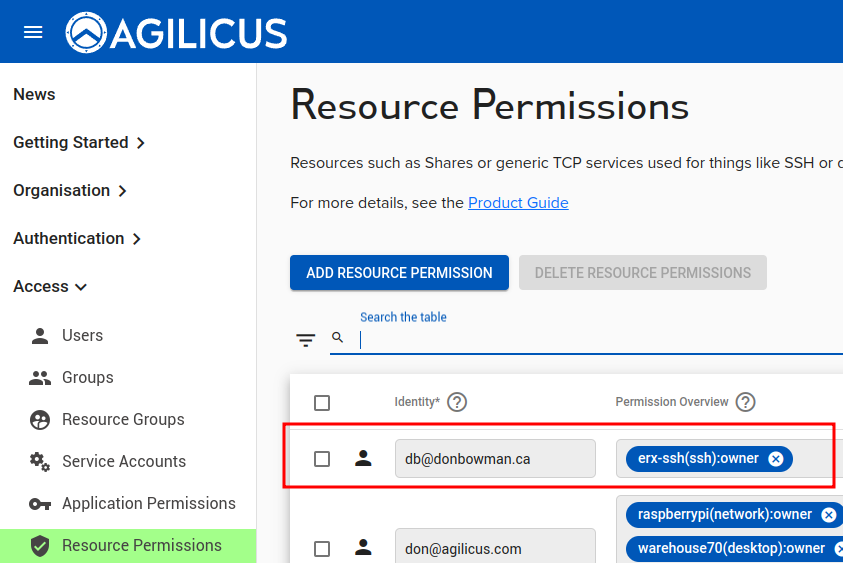
    We must now assign ‘Owner’ permission to each user or group that should be able to connect. See “Resource Permissions” for more information.

    SSH Resource Setup

    4 steps:

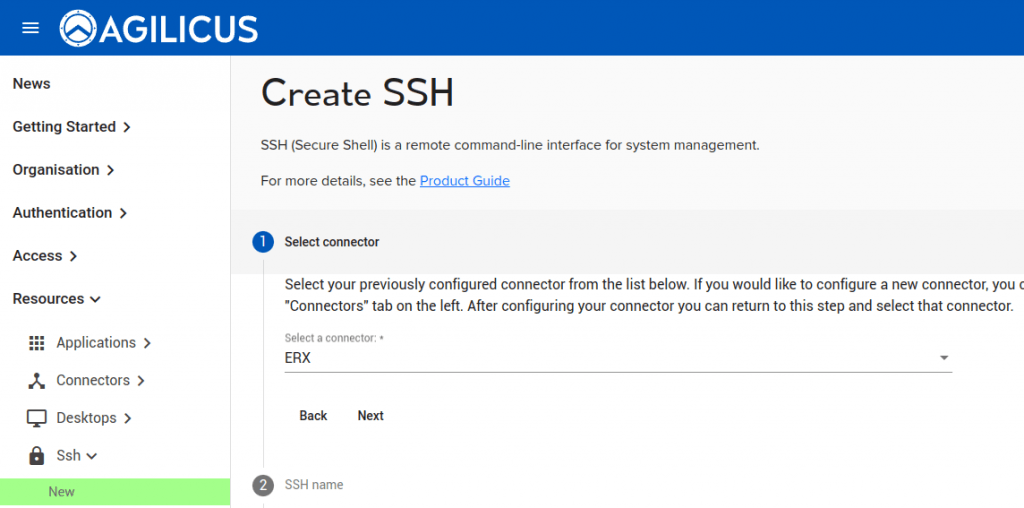
    1. Select the connector (the site on which the underlying SSH resource exists)
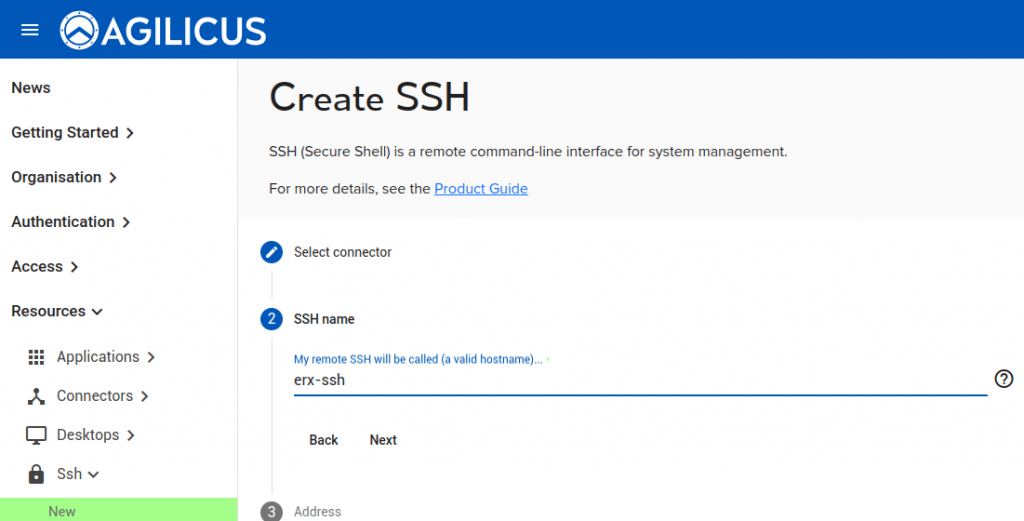
    2. Create a name for the SSH resource. This will appear as a valid hostname and must be unique within your sub-domain. Feel free to use a pattern, e.g. ‘site-host-ssh’.
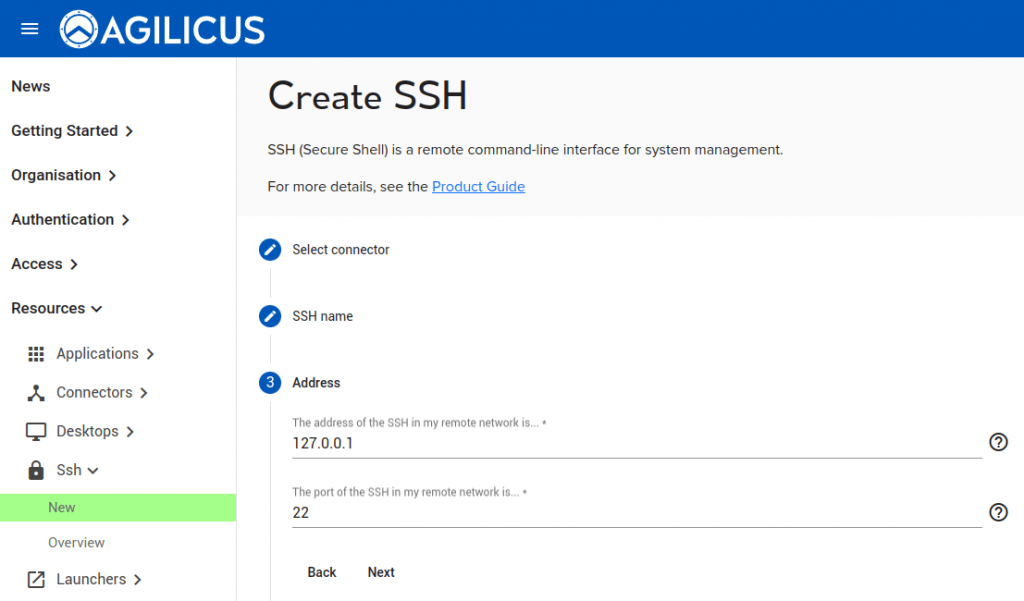
    3. Select the hostname/IP and port that the SSH server is on in that remote network.
    4. Assign permissions (who can use this SSH resource)
    aa436223 image
    1920e382 image
    20441f67 image
    ab42d7ba image

    The underlying SSH resources will also show up under Network Resources.

    Automatic Sign-In (cached credentials)

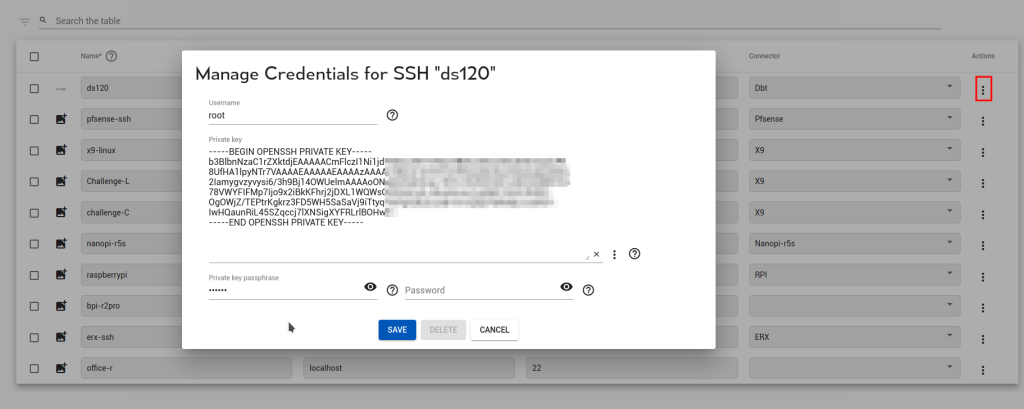
    In some cases you wish end-users to be able to sign in via the web interface, but do not wish to share the credentials with them. For this purpose Agilicus has a secure credential store and key or password stuffing. You may configure this during the creation of a new SSH resource, or, later on the existing resource as below.

    Note: the SSH key cannot be retrieved from the system. Once you have configured it, it is one-way encrypted, if you wish to change it later you may, but you must keep your own copy.

    e8c31ed8 image

    Using the SSH Resource

    If you have not done so, install the Agilicus Launcher on your desktop (Windows, Linux Mac) from profile (https://profile.__MYDOMAIN__). The Launcher support runs on demand, it is not a service. It will automatically configure OpenSSH (Windows, MAC, Linux), or Putty (Windows).

    Note: The Launcher will configure OpenSSH if the file ~/.ssh/config exists. If you have not used SSH before, you might need to create this file.

    At this stage, you can ssh directly to the server, using the name you gave above. For example, if in step 4 you called the SSH resource “foobar”, you can type ‘ssh foobar’. This might bring up a browser to identify you and/or perform multi-factor authentication. The data flow is as shown below.

    Zero-Trust SSH Data Flow
  • Forwarding

    Forwarding

    forward

    Forwarding

    The Agilicus AnyX forwarder allows moving TCP from site to site in a mesh, ignoring firewalls and NAT.

    Concepts

    A Network Resource is an arbitrary network IP address and port. This might be a Remote Desktop, a Database, an ERP system. Typical access control is done via network access control lists. To expand this via cryptographic-based zero-trust networking, the Agilicus system can expose the Network Resource via a Connector and then provide authentication and authorisation based security on it onwards to other users or systems.

    A common use case for Forwarding is a need to have a Network Resource available from one site to another. As an example, consider a small company. It has two offices. Each office has a typical small business router and a few staff. One of the sites runs a database which is used by a desktop application.

    8477e0e4 network resource forwarding

    In this case, consider the following approach:

    1. Install Connector on site with database (on the database server or another)
    2. Install Connector on site needing access (on the desktop running the application, or another)
    3. Create a Network Resource for the database. Attach it to the proper Connector
    4. Create a Forwarding Resource on the site needing access. Join the two.

    To keep the terminology straight, a ‘network’ is the destination. It is where traffic *leaves* the Agilicus mesh, and onwards to the ultimate resource. A ‘forwarder’ is the ‘source’ or ‘ingress’, its where traffic enters the Agilicus mesh.

    Thus if you had a Linux device you wanted to be able to ssh to unattended from a synology NAS, you would install a connector on the Synology, a connector on the Linux server, a network would be created attached to the Linux connector with ‘localhost:22’, and, a forwarder would be created attached to the synology connector listening to e.g. localhost:2222

    You will be asked a few questions:

    1. destination IP/hostname. This is the hostname or IP as resolvable by the connector installed on the site with the database. It will typically be the same as you would enter in your desktop application.
    2. destination Port. Same as 1
    3. Source IP/hostname. This is typically left blank(all), meaning the host with the connector will allow any local network host to use it. If you wish to lock it down to the local desktop consider entering ‘localhost’ here. By default this is ‘localhost’ (meaning the application wishing to connect must run on the same host as the Connector). You may change this to ‘0.0.0.0’ (meaning any host in the same network may connect.
    4. Source Port. This is typically left blank (meaning same as destination). In some environments you may wish to use a different port here (for example, if the destination port is privileged, <1024, since the Connector runs unprivileged, you may e.g. use 80 for the destination port and 8080 for the source port)
    65734922 image
  • Content Security Policy

    Content Security Policy

    content-security

    Content Security Policy

    A Content-Security-Policy is a header which instructs a browser how to interpret & allow or deny various types of active content (images, fonts, frames, …). It helps mitigate certain types of attacks including Cross-Site-Scripting (XSS) or data injection.

    Concepts

    A Content-Security-Policy is a header which instructs a browser how to interpret & allow or deny various types of active content (images, fonts, frames, …). It helps mitigate certain types of attacks including Cross-Site-Scripting (XSS) or data injection.

    The Agilicus Web Application Firewall allows setting and editing this header. You can see it on the ‘Define’ tab of the application. 3 macro-settings may be applied:

    • clear — remove (unset) the Content-Security-Policy
    • strict angular defaults — this is a set of defaults suitable for an Angular application compiled with AOT and subresource-integrity
    • lax angularjs defaults — this is a set of defaults suitable for an older AngularJS application (including unsafe-inline)

    Once you set one of these buttons you may then edit the individual types.

    In addition to the check-box settings, a set of ‘hosts’ may be configured. This can include ‘data:’ , ‘*’, ‘https:’, ‘https://example.com’, etc. For more information see Content Security Policy (CSP) in the Mozilla Web Docs.

    Additional Information

  • Users

    Users

    cyber-insurance-compliance

    Users

    A User is an identify which can authenticate against the Agilicus AnyX platform

    Concepts

    2bbe30a4 identity flow

    User

    A “User” is an identity which has a set of authorisations, a set of permissions. A user may be identified by one or more Identity Providers (e.g. Azure Active Directory, Google, Apple, etc.)

    Users’ may be collected into groups, and, groups behave the same as a user for permission purposes. Groups may also aggregate other groups.

    Identity Provider

    An Identity Provider authenticates a user. It may do this with a password, with biometric, or with any trustworthy means. Agilicus acts as an Identity Provider for your applications.

    Upstream Issuer

    An Upstream Issuer is an Identity Provider that is federated in to the Identity Provider. This might include Apple, Google, Azure, Okta, Auth0, etc. The Upstream Issuer acts to authenticate a user.

    Configuration

    See Identity & Authentication Methods.

    See Azure Active Directory.

  • Command Line API Access

    Command Line API Access

    e448f7f1 multi screen

    Command Line API Access

    Some Web Applications can also be accessed as RESTful API’s. An example would be Prometheus, Grafana, Kibana, etc.

    Command Line API Access

    Some Web Applications can also be accessed as RESTful API’s. An example would be Prometheus, Grafana, Kibana, etc.

    In this model, you create an ‘application’ in the system, and, when accessing via the Browser, are challenged to sign-in and provide an access token. To make this convenient for command-line access and other programmatic access, there are a set of techniques we can use.

    Download

    Open Profile to download and install the launcher.

    We can now test as follows:

    ~/bin/agilicus-agent proxify --release-train stable --auto-http-proxy --issuer https://auth.dbt.agilicus.cloud /bin/bash

    This will give us a shell with https_proxy set (the –auto-http-proxy) and we can now run curl -k https://myresource.MYCNAME. The first time, the user will be prompted with a web browser popup to confirm identity. Subsequent runs will be automatic.

    NOTE: In order to use the ‘http proxy’ you must currently disregard TLS identity failure (since it does a local MITM to inject the access token). This restriction will be removed in a subsequent update.

    The ‘proxify’ command sets some well-known environment variables and then runs a sub-process. A participating application can either use the AGILICUS_HTTP_PROXY (use this as an HTTP proxy and configure it appropriately), AGILICUS_ACCESS_TOKEN (add this as an HTTP Header ‘Authorization: Bearer $AGILICUS_ACCESS_TOKEN’), use the auto variable (https_proxy, used by many runtimes).

    For Java-based runtimes, you may need to set the http.proxyHost and http.proxyPort variables.

    agilicus-agent proxify --help
     Run a sub-process (script etc) with environment variables set to HTTP proxy
     Environment variables set include:
     AGILICUS_ACCESS_TOKEN : you can add this in to 'Authorization: Bearer $AGILICUS_ACCESS_TOKEN'
     AGILICUS_HTTP_PROXY : a URI in the form of http://localhost:port that will accept a CONNECT verb and add bearer-token
     https_proxy : (if auto-http-proxy is set) if you are using golang, libcurl, etc, proxy will automatically occur. 
     Example: agilicus-agent proxify --issuer https://auth.MYCNAME -- my-script arg1 arg2
     Usage:
       agilicus-agent proxify [flags]
     Flags:
           --auto-http-proxy                 If true, export https_proxy, used by libcurl, golang, …
           --cfg-file string                 A path to a file containing the configuration
           --check-update-time-seconds int   Specify the interval to check for a new release (default 14400)
           --debug                           Enabled debug logging
       -h, --help                            help for proxify
           --issuer string                   The OpenID connect server from which to get a token (https://auth.MYCNAME)
           --no-upgrades                     Do not try to run upgrades
           --noauth-local-webserver          Log in using a different device
           --release-train string            specify image release train (default "stable")
  • Zero-Trust Desktop Access

    Zero-Trust Desktop Access

    remote-desktop-style

    Microsoft Remote Desktop

    If you have Windows servers (or desktops) you need to access from any user, on any device, from anywhere… This is what you need

    Microsoft Remote Desktop

    Most of your applications are now modern, responsive web apps. However, you still have some native Desktop applications. You need to be able to access them remotely, safely, simply. You need to be able to grant access to specific Desktops to specific users, but, they may not work for you. Your Desktop may run in a site without a public IP, or a configurable firewall allowing safe inbound access. Perhaps your house, perhaps a branch office.

    In 10 minutes you can have 1-click remote access to that Desktop. With no configuration onsite, no change to the Desktop or the firewall.

    Via Remote Desktop Protocol, or via VNC.

    Via a Native Client, or via a web interface.

    Desktop Access Setup

    c4228795 zero trust desktop access.embed

    Note: you can use a site-to-site VPN via IPSEC, or use the onsite Agilicus Connector for each pool of servers. These instructions assume the latter.

    1. CREATE ORGANISATION

    Your Organisation lets you setup your identity providers, your DNS name (CNAME), and control your users.
    See SIGNUP

    2. SETUP IDENTITY

    You can enable Google, Apple, LinkedIn as check box items. You may also wish to enable Azure Active Directory
    Also setup initial users and group membership.

    3. CREATE CONNECTOR PER SITE

    Each pool of servers needs a method to reach it. This can be a site-to-site VPN, or an on-site connector. Install a connector now, this may be on each SSH server, on 1 of the servers that can reach the others, on a machine in the same network, its up to you.

    4. CREATE DESKTOP RESOURCE

    Each Desktop host will require a Desktop Resource to provide the coordinates. This will include a name, and hostname/IP. The Hostname/IP will be in the internal coordinates.

    5. ASSIGN PERMISSIONS

    We must now assign ‘Owner’ permission to each user or group that should be able to connect. See “Resource Permissions” for more information.

    6. CONNECT

    From https://profile.__MYDOMAIN__, you may open the Remote Desktop. By default this will launch your native remote desktop client (e.g. mstsc). You may also install the Launcher from the Profile, will give you an icon on your regular operating system start menu.

    Detailed Desktop Creation

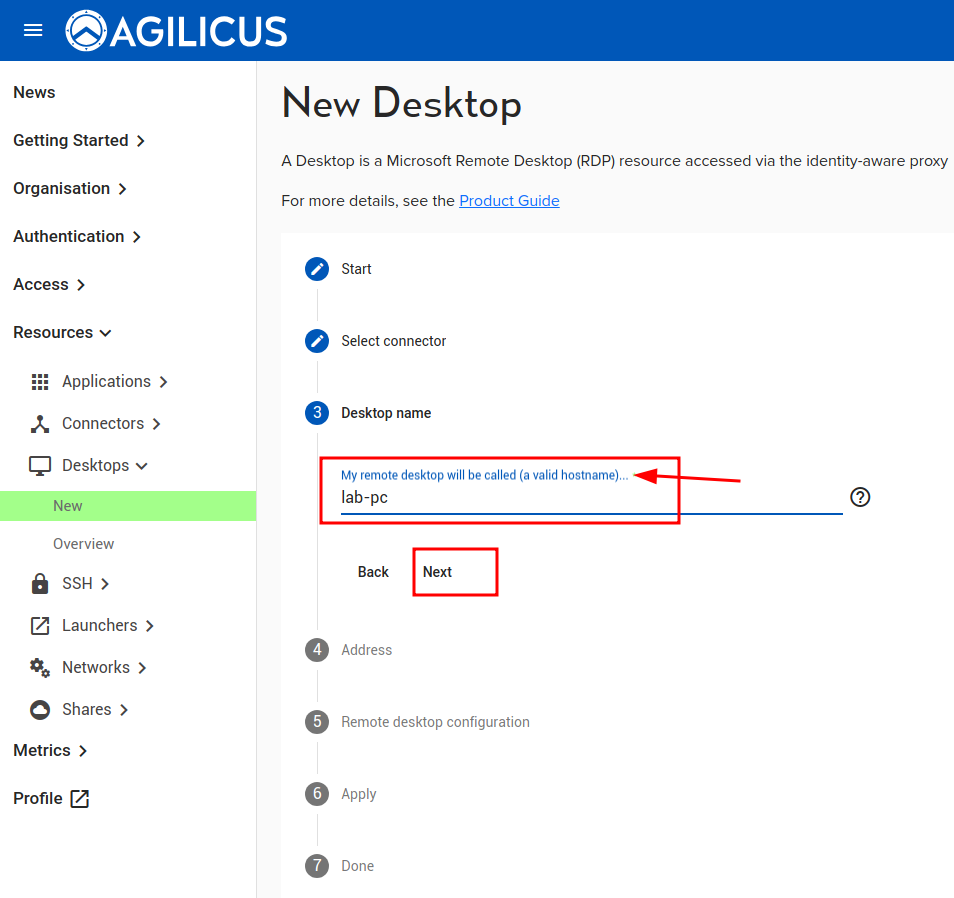
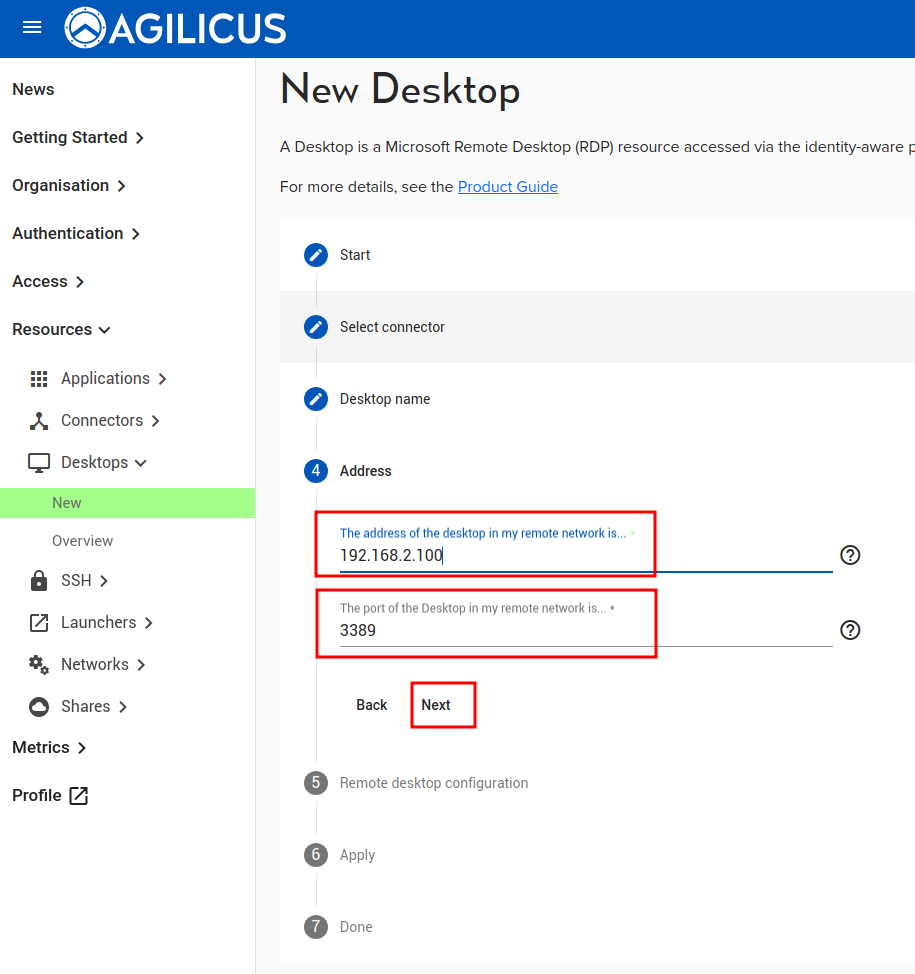
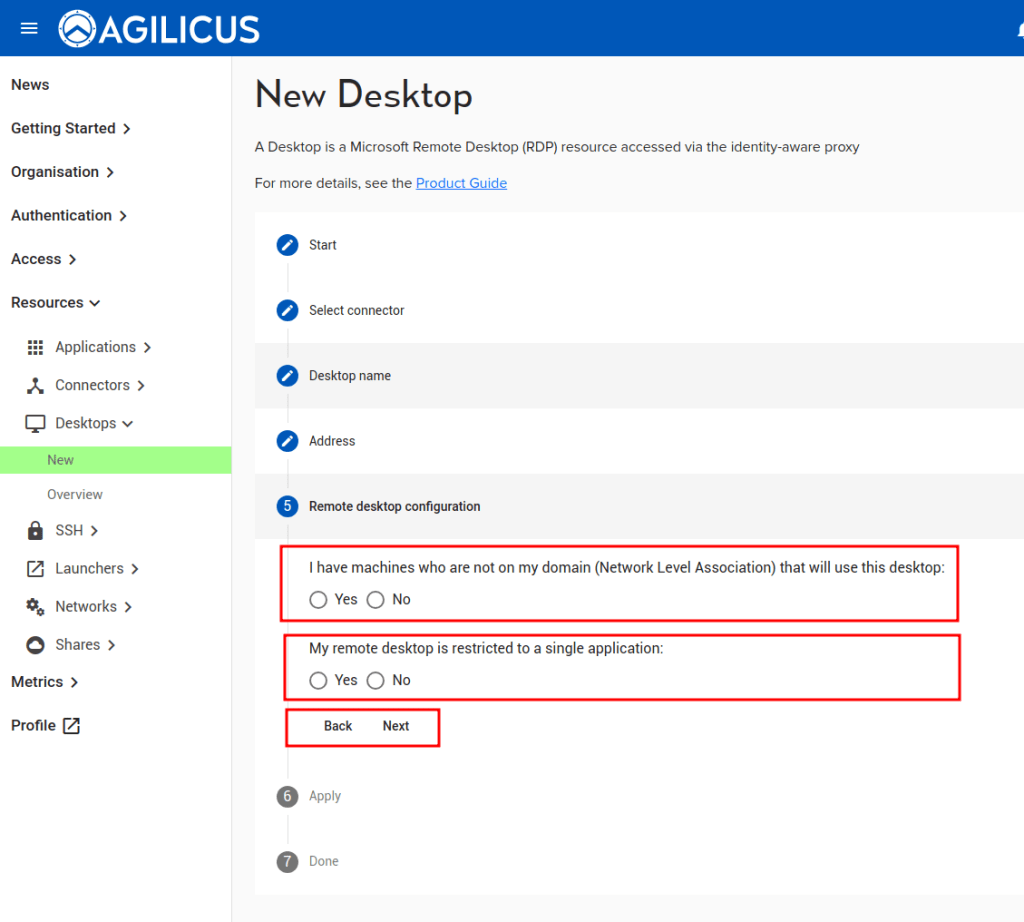
    87da6413 image

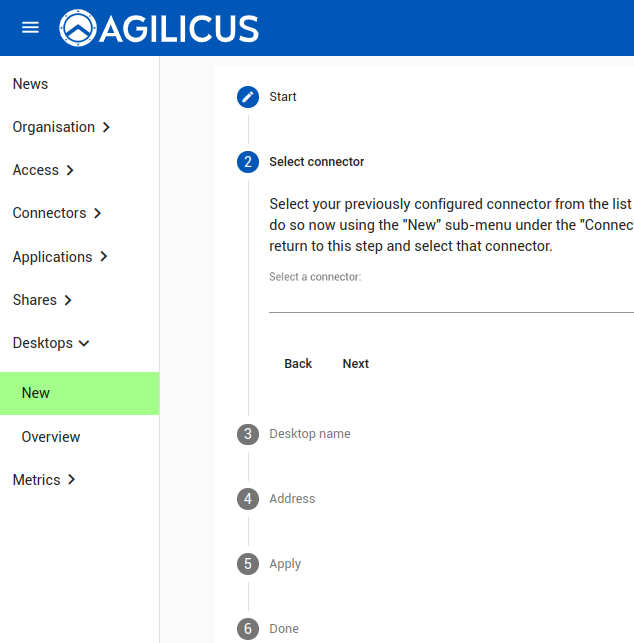
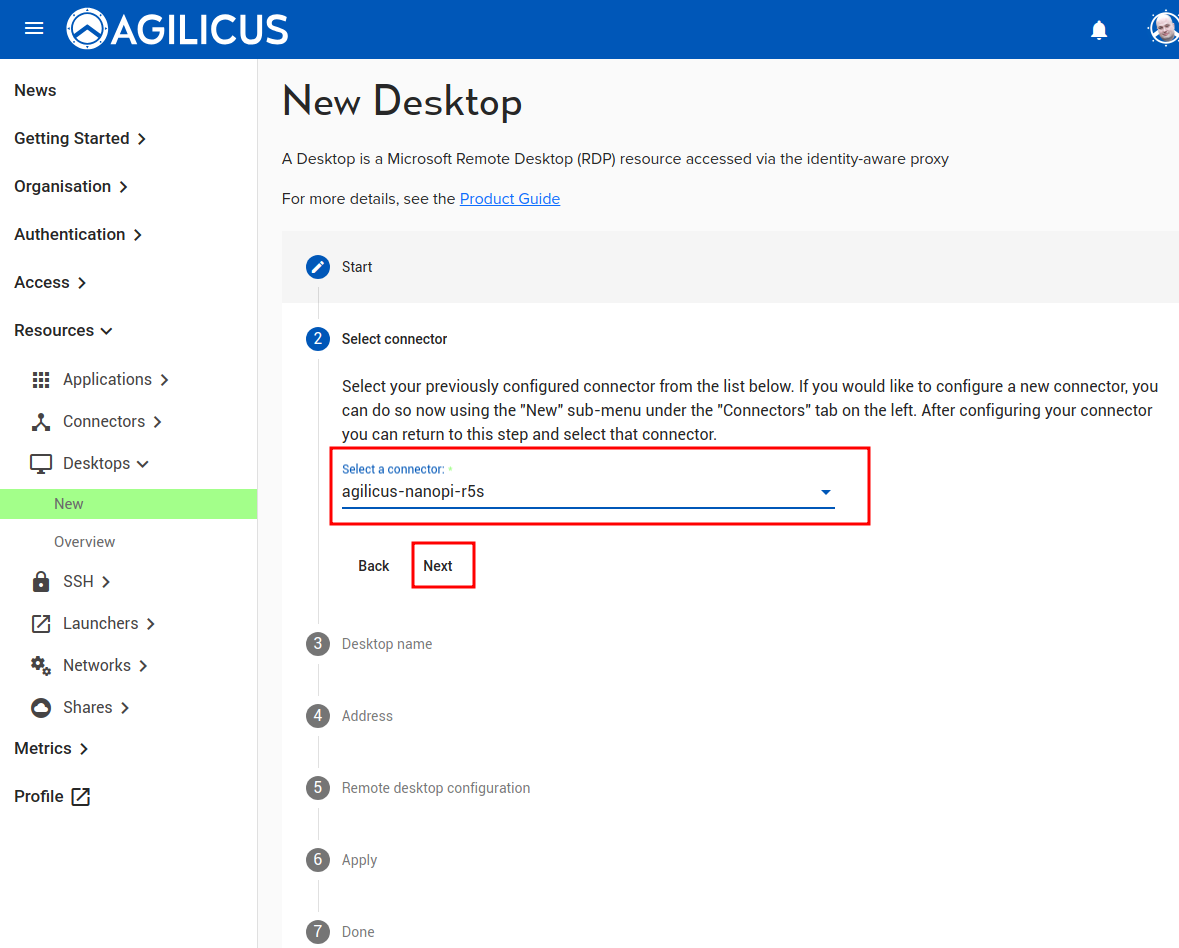
    The ‘Desktops/New’ asks 3 questions:

    1. Connector. This you will have already setup, you need 1 per site (or more if you wish, e.g. 1 per host)
    2. Name. This will be the ‘name’ you assign permission to, it will show in the audit, the end-user will see it
    3. Hostname/IP. This is how you would address the Desktop within the (private) site.

    Once you have completed these steps, as an Administrator you will be offered the opportunity to download an RDP file. This will open in your native Remote Desktop application (on all platforms). The Desktop will become available approximately 1-2 minutes after you apply the config. (This is to test the configuration)

    You may now assign permissions (by group, or by user). Each user who has access will see, in https://profile.MYDOMAIN, an icon for the same Remote Desktop. They may also install the Agilicus Launcher which will create start menu icons automatically.

    The detailed steps and screen shots are shown below.

    Some versions of Microsoft Windows (e.g. Windows 10 Home) do not support Remote Desktop Server. You may try a different OS, you may try VNC, or, there are some workarounds.

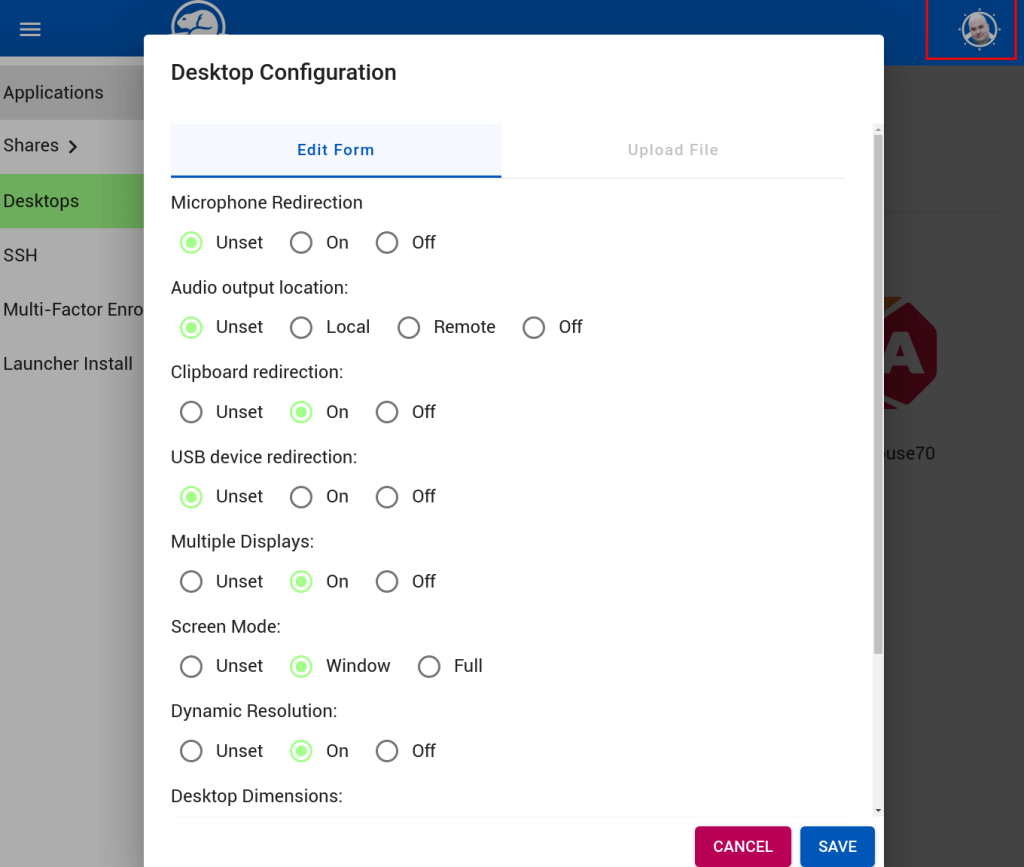
    Connection Parameter Override

    End users may wish to configure specific overrides regarding their local displays, resolution, clipboard, etc.

    The configuration options are found in their Profile (https://profile.__MYDOMAIN__), under their account icon.

    Users may choose to passthrough their microphone or audio output, clipboard (cut and paste), usb devices.

    Some remote desktop servers have multiple displays, these can be passed through if desired.

    The user may select dynamic resolution (e.g. they can resize the current window and it will resize the remote), or a specific dimension.

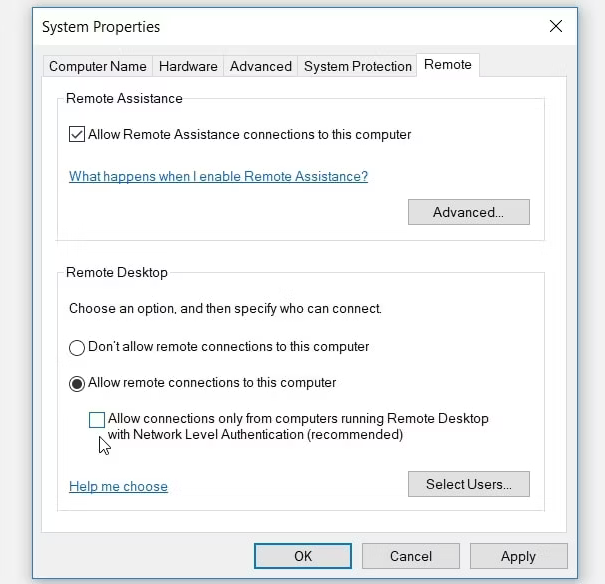
    NOTE: You may need to change the Network Level Authentication on the server

    Disabling-and-Re-Enabling-NLA-Settings-Via-System-Settings
    1. Press Win + R to open the Run command dialog box.
    2. Type sysdm.cpl and press Enter to open the System Properties window.
    3. Navigate to the Remote tab.
    4. Uncheck the Allow connections only from computers running Remote Desktop with Network Level Authentication (recommended) box.
    5. Press Apply and then press OK. From there, restart your PC to save these changes.
  • Resource Groups

    Resource Groups

    group

    Resource Groups

    Resource Groups

    Resource Groups are a means of applying a common permission across a set of resources (connectors, applications, shares, etc).

    Common uses for Resource Groups are:

    • all resources on a site
    • all resources of a type
    • all resources of a manufacture
    • all resources used by a specific Agilicus Launcher

    A Resource Group may contain other Resource Groups, allowing nesting. Each Resource Group can contain 0 or more Resources.

    A common overall strategy is to use Groups (of users) assigned by role, assigning permission of these Groups to Resource Groups by role/location/device-type etc.

  • Launchers

    Launchers

    e05afe22 start

    Launchers

    The Agilicus AnyX Launcher acts to integrate the desktop environment with the online, browser environment. It can act to:

    Launchers

    The Agilicus AnyX Launcher acts to integrate the desktop environment with the online, browser environment. It can act to:

    • mount a share
    • open a remote desktop
    • SSH to a host
    • Run an executable

    Install Browser Extension

    A browser extension is available which simplifies the integration between the desktop and the browser. Install from the Chrome Web Store.

    Once installed, in the users web Profile, they may directly mount a share, open a local application, open a remote desktop with native tool.

    Install Desktop Integration

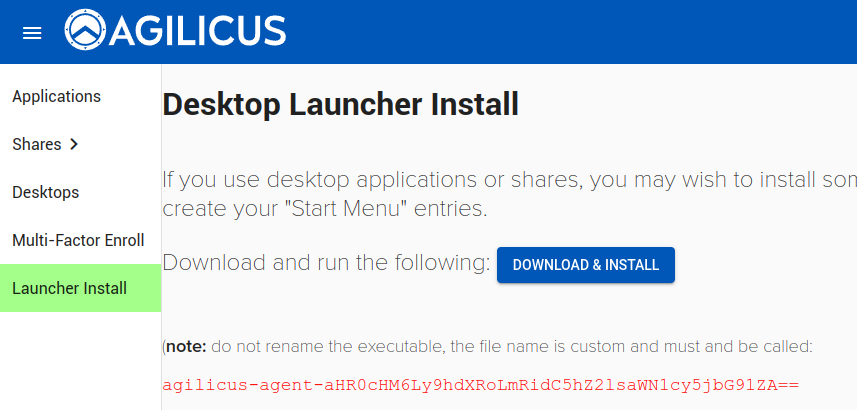
    The desktop integration is installed from Profile. Navigate to https://profile.__MYDOMAIN__. Once signed in, see the Launcher menu, select the ‘Install’ button. This will download an executable to be run.

    LAUNCHER FILE NAME

    Note: the launcher download is named specifically for each user. Do not rename the file before running.
    On a MacOS device running Safari, it is possible that the browser will append a ‘.html’ to the file name during the download, please remove this before running.

    Desktop Application Launcher

    A launcher is a method of encapsulating all of the resources a desktop ‘fat client’ needs to operate.

    Imagine a desktop ERP system. It needs a Share mounted in a specific location. It needs a TCP forwarded for a database. The desire is the end user can click a single icon and launch it, optionally being challenged for multi-factor authentication.

    To use, first configure the individual resources (e.g. a Share, a TCP Forwarder, etc.). Give them unique names. Now, add a Launcher. The end user will see this appear as an Icon on their start menu. When launched, the application given will open, and the resources are guaranteed to be present. The user may first see a browser open to challenge their identity if it is not known.

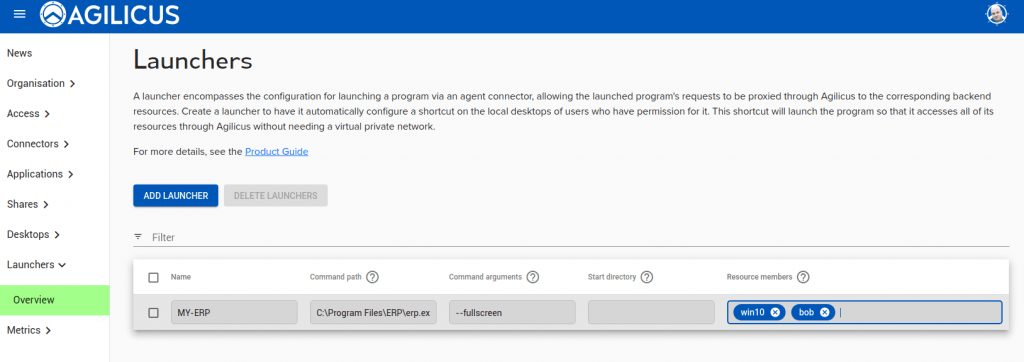
    1fc85365 image

    Launcher Network Configuration

    When using the launcher, it uses the resource members of the launcher in order to route connections.

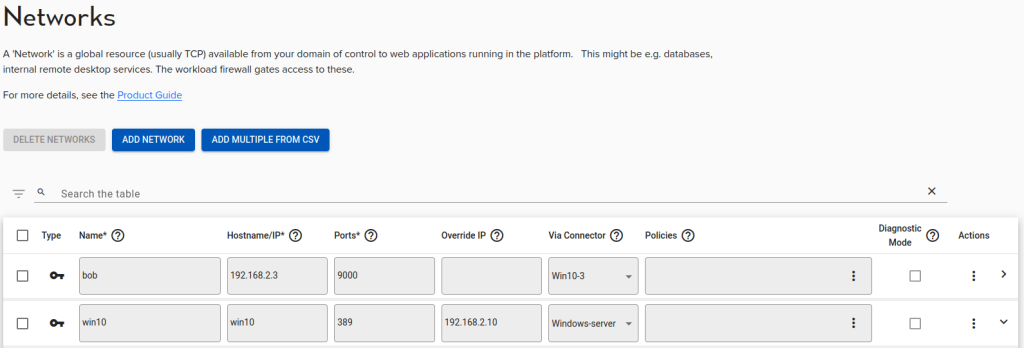
    In the example above, the MY-ERP launcher has the networks bob and win10 attached to it. When the MY-ERP application is launched, if it attempts to connect to any of the hostnames or override IPs in the launcher’s networks it will route them to the connector they are attached to.


    In this example, If the ERP client connects to win10, 192.168.2.3, or 192.168.2.10 the launcher will route the connection to the appropriate connector.

    NETWORK COLLISIONS

    In order for the routing to work correctly, it is important that none of these overlap. In this example, the launcher will reroute connections to ‘192.168.2.3’, ‘win10’ and ‘192.168.2.4’. If for example two different networks had the same hostname then the launcher can’t route these connections appropriately. This is also the case if the override IP for one network matched the hostname or Override IP for another.

  • Authentication Rules

    Authentication Rules

    52f05c70 books

    Authentication Rules

    Authentication Rules are a type of Conditional Access. They are logically part of the authentication flow, after the user has proven identity.

    Authentication Rules

    Authentication Rules are a type of Conditional Access. They are logically part of the authentication flow, after the user has proven identity. These rules can augment the logic with things like:

    • has provided multi-factor authentication
    • is in / not in IP ranges
    • application properties
    • user properties
    • device properties

    The system has a set of policy presets. These operate like macros, overriding the current rules and then leaving them free to configure.

    Theory of Operation

    The Authentication Rules are a set of Conditions (things we measure) and Actions (things we do).

    Conditions

    Conditions include any field in any Object in the system. The generic Object types include:

    • User
    • (Application) Client
    • Issuer
    • Login Session

    Details

    • Clients.application == name of the Authentication Client
    • Clients.id == ID of the Authentication Client
    • Clients.issuer_id
    • Clients.mfa_challenge
    • Clients.single_sign_on
    • Clients.name
    • Clients.org_id
    • Clients.organisation_scope
    • Clients.secret
    • User.id
    • User.external_id
    • User.enabled
    • User.status
    • User.first_name
    • User.last_name
    • User.email
    • User.provider
    • User.org_id
    • User.type
    • User.created
    • User.updated
    • User.auto_created
    • User.member_of.external_id
    • User.member_of.enabled
    • User.member_of.status
    • User.member_of.first_name
    • User.member_of.last_name
    • User.member_of.email
    • Issuers.id
    • Issuers.issuer
    • Issuers.org_id
    • Issuers.upstream_redirect_uri
    • Users.multi-factor_challenge_type
    • Login.session.number_of_logins
    • Login.session.number_of_failed_multi_factor
    • Login.session.single_sign_on_time
    • Login.session.user_is_authentication
    • Login.session.user_is_authenticated_by_upstream
    • Login.session.user_is_authenticated_by_cache

    Presets

    Default

    You should choose this option for strong security and convenience for your users. Using a single identity source of truth among many applications enables maximal ease of use, while enabling multi-factor-authentication ensures that anyone without physical access to their device(s) cannot compromise the account. You will always be able to revoke a user’s access at any time and audit their usage of any applications or services. Details: Multi-factor authentication can be enabled per client, by default it will follow a user’s preference A user’s session is shared between apps unless that app’s client has Single Sign-On set to ‘never’ A user’s session lasts up to 7 days Multi factor authentication must be used to log in after every 30 days if a multi-factor authentication method has been configured

    Permissive

    You should choose this option if the data you need to get to your employees needs to be protected, but is not of a particularly sensitive nature. This option enables low barrier to entry to get as many users as possible onto the system with as little administrative overhead as possible. You will always be able to revoke a user’s access at any time and audit their usage of any applications or services. Details: Multi-factor authentication can be enabled per client, by default it will follow a user’s preference. A user’s session is shared between apps unless that app’s client has Single Sign-On set to ‘never’ A user’s session lasts up to 14 days Multi factor authentication must be used to log in after every 30 days if enabled

    Strict

    You should choose this option if you need the minimum ‘blast’ radius from a compromised device. By reducing the sharing of sessions between applications, minimizing multi-factor authentication duration and requiring frequent logins you can guarantee that in the event an employee’s device is compromised they cannot access anything other than what the employee is currently logged into. You will always be able to revoke a user’s access at any time and audit their usage of any applications or services. Details: Multi-factor authentication can be enabled per client, by default it will follow a user’s preference A user’s session is not shared between apps unless that app’s client has Single Sign-On set to ‘always’ A user’s session lasts at most 1 day Multi factor authentication must be used to log in every 7 days

    Example Authentication Policy

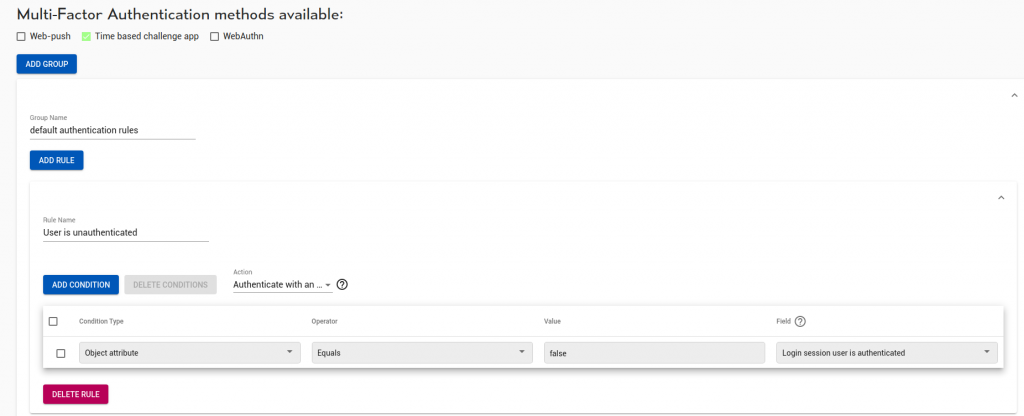
    Below is the expanded ‘strict’ example, applied to an organisation with solely Time-Based One Time.

    First, groups. Rules in a group are evaluated until a match occurs. All groups are evaluated.

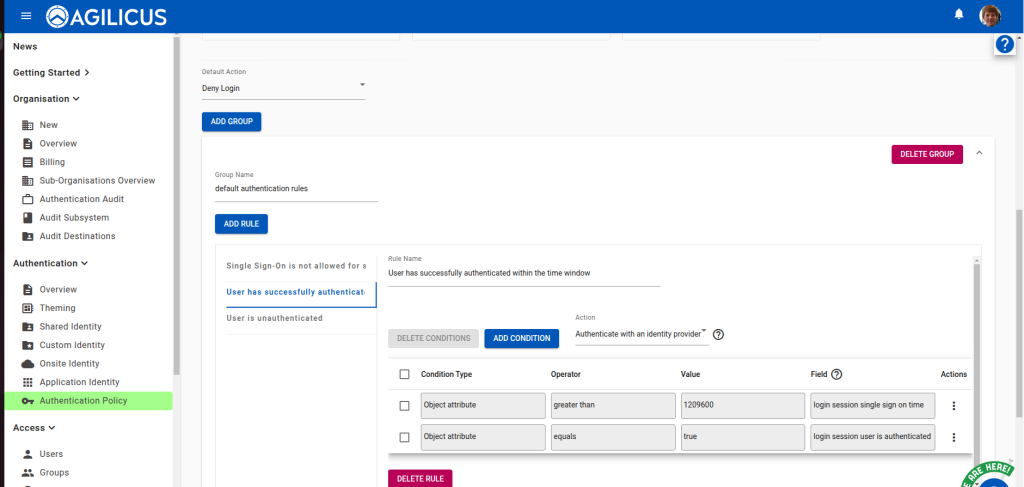
    In this example, our first group is called ‘default authentication rules’. Inside it, the first rule:

    “If Login.session.user_is_authenticated == False then Authenticate”

    forces the user to get credentials.

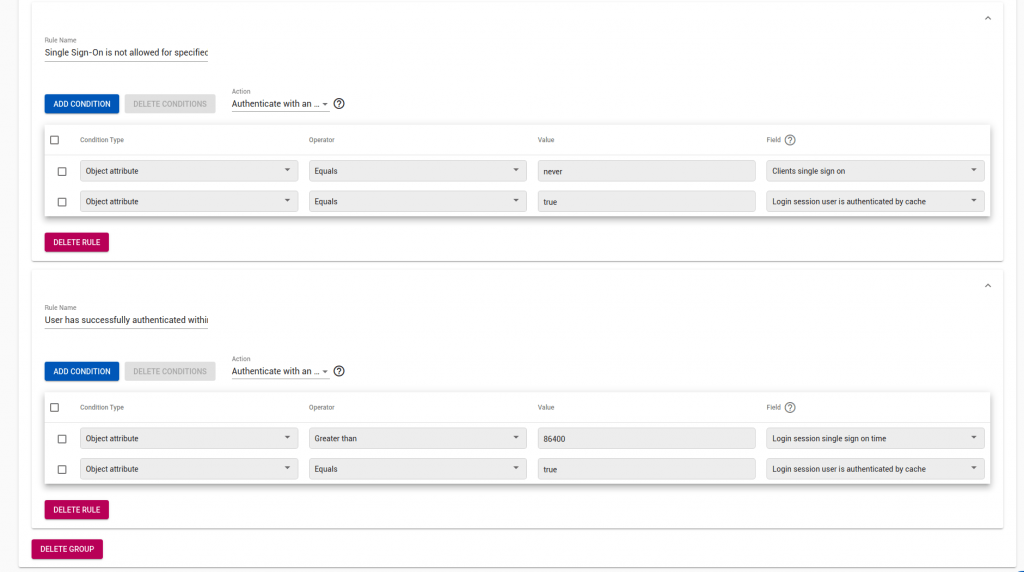
    Next, we disable single-sign-on and caching for strong-authentication clients, this forces the user to provide credentials each time to these sensitive apps.

    “If Clients.single_sign_on == never && Login.session.user_is_authenticated_by_cache then Authenticate”

    Now we check for > 1 day old (86400 s) cached credentials, and disallow

    “If Login.session.single_sign_on_time > 86400 && Login.session.user_is_authenticated_by_cache then Authenticate”

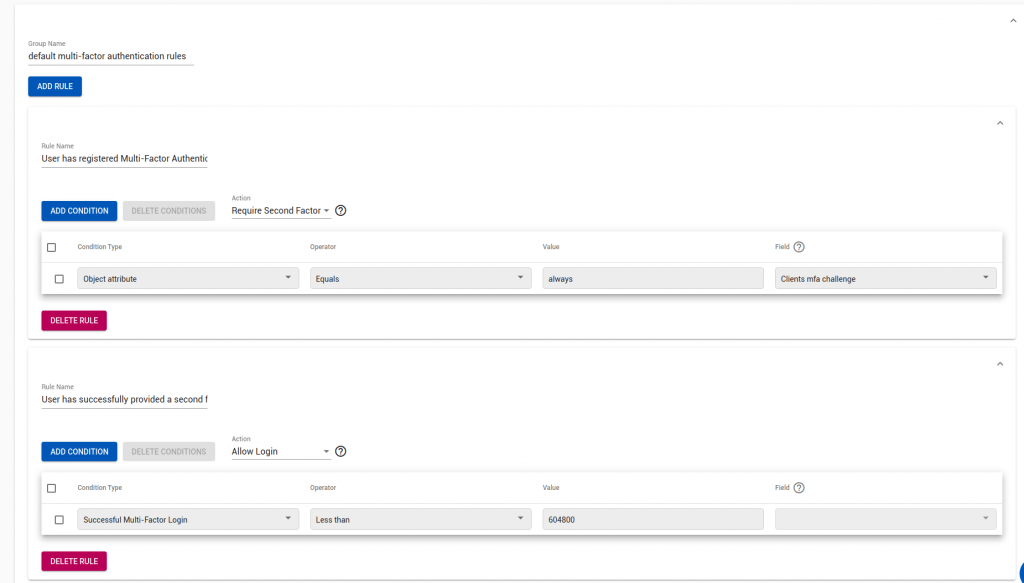
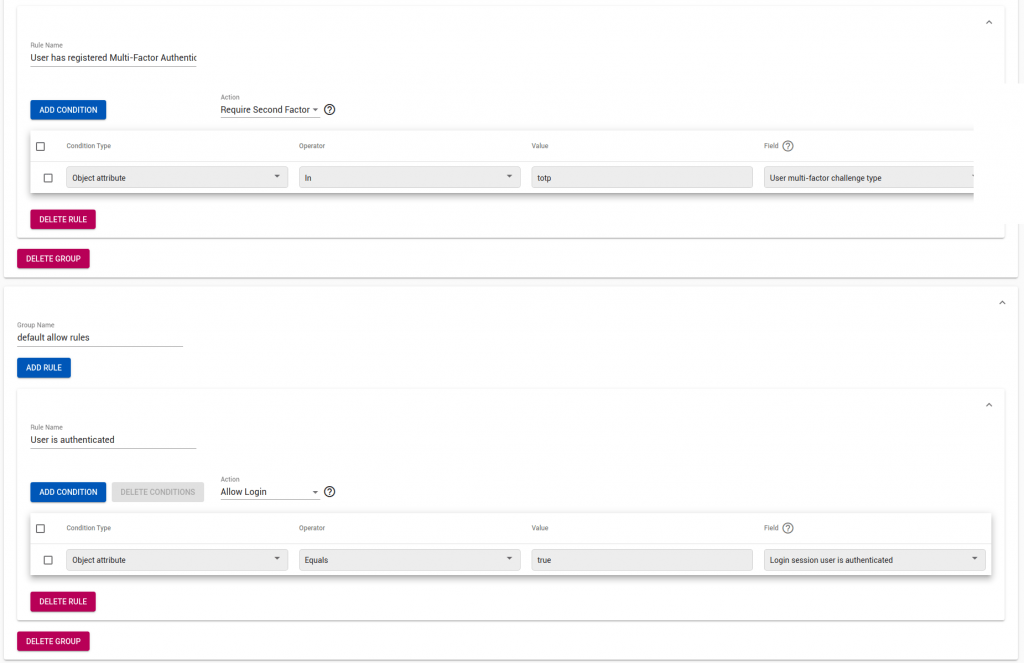
    Now, for any authentication client which forces a 2nd factor:

    “If Clients.mfa_challenge == Always then Require 2nd Factor”

    “If User.multi-factor.challenge_type in totp then Require 2nd Factor”

    d2724907 image
    03a001c7 image
    0fbea856 image
    eba74c13 image

    JSON API Example

    The above ‘strict’ example looks as below in the API:

    {
        "default_action": "deny_login",
        "issuer_id": "no_issuer",
        "name": "strict",
        "org_id": "no_org",
        "policy_groups": [
            {
                "metadata": {
                    "id": "no_id"
                },
                "spec": {
                    "name": "default authentication rules",
                    "rule_ids": [
                        "1",
                        "2",
                        "3"
                    ]
                }
            },
            {
                "metadata": {
                    "id": "no_id"
                },
                "spec": {
                    "name": "default multi-factor authentication rules",
                    "rule_ids": [
                        "4",
                        "7",
                        "5"
                    ]
                }
            },
            {
                "metadata": {
                    "id": "no_id"
                },
                "spec": {
                    "name": "default allow rules",
                    "rule_ids": [
                        "6"
                    ]
                }
            }
        ],
        "rules": [
            {
                "metadata": {
                    "id": "4"
                },
                "spec": {
                    "action": "allow_login",
                    "conditions": [
                        {
                            "condition_type": "type_last_successful_mfa",
                            "input_is_list": false,
                            "inverted": false,
                            "operator": "less_than",
                            "value": "604800"
                        }
                    ],
                    "name": "User has successfully provided a second factor within time window",
                    "org_id": "no_org",
                    "priority": 1
                }
            },
            {
                "metadata": {
                    "id": "6"
                },
                "spec": {
                    "action": "allow_login",
                    "conditions": [
                        {
                            "condition_type": "type_object_attribute",
                            "field": "login_session.user_is_authenticated",
                            "input_is_list": false,
                            "inverted": false,
                            "operator": "equals",
                            "value": "true"
                        }
                    ],
                    "name": "User is authenticated",
                    "org_id": "no_org",
                    "priority": 1
                }
            },
            {
                "metadata": {
                    "id": "2"
                },
                "spec": {
                    "action": "authenticate",
                    "conditions": [
                        {
                            "condition_type": "type_object_attribute",
                            "field": "clients.single_sign_on",
                            "input_is_list": false,
                            "inverted": false,
                            "operator": "equals",
                            "value": "\"never\""
                        },
                        {
                            "condition_type": "type_object_attribute",
                            "field": "login_session.user_is_authenticated_by_cache",
                            "input_is_list": false,
                            "inverted": false,
                            "operator": "equals",
                            "value": "true"
                        }
                    ],
                    "name": "Single Sign-On is not allowed for specified clients",
                    "org_id": "no_org",
                    "priority": 1
                }
            },
            {
                "metadata": {
                    "id": "1"
                },
                "spec": {
                    "action": "authenticate",
                    "conditions": [
                        {
                            "condition_type": "type_object_attribute",
                            "field": "login_session.single_sign_on_time",
                            "input_is_list": false,
                            "inverted": false,
                            "operator": "greater_than",
                            "value": "86400"
                        },
                        {
                            "condition_type": "type_object_attribute",
                            "field": "login_session.user_is_authenticated_by_cache",
                            "input_is_list": false,
                            "inverted": false,
                            "operator": "equals",
                            "value": "true"
                        }
                    ],
                    "name": "User has successfully authenticated within the time window",
                    "org_id": "no_org",
                    "priority": 1
                }
            },
            {
                "metadata": {
                    "id": "3"
                },
                "spec": {
                    "action": "authenticate",
                    "conditions": [
                        {
                            "condition_type": "type_object_attribute",
                            "field": "login_session.user_is_authenticated",
                            "input_is_list": false,
                            "inverted": false,
                            "operator": "equals",
                            "value": "false"
                        }
                    ],
                    "name": "User is unauthenticated",
                    "org_id": "no_org",
                    "priority": 1
                }
            },
            {
                "metadata": {
                    "id": "5"
                },
                "spec": {
                    "action": "do_mfa",
                    "conditions": [
                        {
                            "condition_type": "type_object_attribute",
                            "field": "user_mfa_preferences.spec.challenge_type",
                            "input_is_list": true,
                            "inverted": false,
                            "operator": "in",
                            "value": "[\"totp\"]"
                        }
                    ],
                    "name": "User has registered Multi-Factor Authentication",
                    "org_id": "no_org",
                    "priority": 1
                }
            },
            {
                "metadata": {
                    "id": "7"
                },
                "spec": {
                    "action": "do_mfa",
                    "conditions": [
                        {
                            "condition_type": "type_object_attribute",
                            "field": "clients.mfa_challenge",
                            "input_is_list": false,
                            "operator": "equals",
                            "value": "\"always\""
                        }
                    ],
                    "name": "User has registered Multi-Factor Authentication",
                    "org_id": "no_org",
                    "priority": 1
                }
            }
        ],
        "source": "default-catalogue",
        "supported_mfa_methods": [
            "totp"
        ]
    }
    

    Authentication Session

    Authentication sessions identify users to Agilicus automatically so that they need not log in every time they try to access the system. This session is tied to a given browser/device. When users accesses the system from a new browser, or a new device, they will be prompted to log in. If their session has expired, users will be prompted to re-authenticate.

    A session expires according to the authentication policy rule which controls its lifetime. The rule, expressed in seconds, constrains for how long the session is valid.

    For the policy shown in above screenshot, session is valid for 1209600 seconds, or 14 days. Users will be required to reauthenticate every 14 days. This particular rule fires for users who have authenticated, but whose session was created more than 1209600 seconds ago. The action is Authenticate, meaning that when the rule matches, users are forced to authenticate.

    Configuring Maximum Session Duration

    To configure the maximum session duration, either apply a new preset, or edit the “User has successfully authenticated” rule’s “login session single sign on time” condition. For the preset, configure the “Sessions valid for” field.

    For the existing rule, choose “configure condition”.

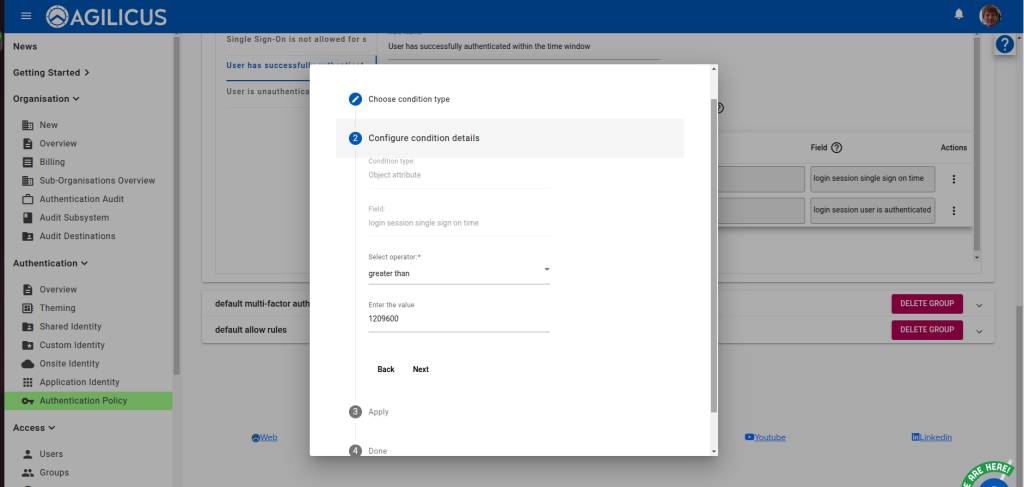
    Then edit the value in the “Configure condition details” section. Do not change its operator.

    Note that the minimum effective value is 86400 seconds, or one day.

  • Microsoft ClickOnce

    Microsoft ClickOnce

    secure web app

    Microsoft ClickOnce

    Microsoft ClickOnce is a technology which merges ‘web’ with ‘desktop’ applications. The user is presented with a web page, which downloads an initial manifest, which in turn downloads/synchronises the remainder of the application.

    Microsoft ClickOnce

    Microsoft ClickOnce is a technology which merges ‘web’ with ‘desktop’ applications. The user is presented with a web page, which downloads an initial manifest, which in turn downloads/synchronises the remainder of the application.

    Typically a ClickOnce application will, once loaded, start consuming resources from its (http) Origin (e.g. REST API’s, databases, etc).

    Setup a ClickOnce application as any other Web Application. Then, on each Desktop that will access it, follow the below instructions.

    4292a6ea image

    Agilicus Agent

    1. Download the Agilicus Agent (Windows) to the Downloads
    2. Run without arguments. Enter your domain (e.g. the CNAME you setup during the sign-up phase)
    3. If a browser pops up, sign-in as normal

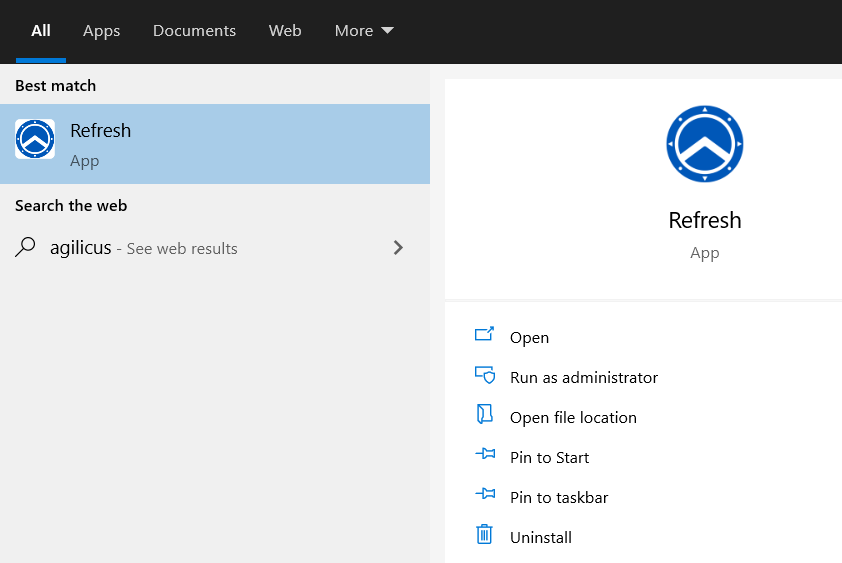
    At this stage you are done. The user will see a new menu item on their Start Menu (called ‘Refresh’), they can run this any time the Administrator has added new applications that have for some reason not synced. They can also run this to resynchronise Shared fileystems, including re-supplying a second-factor authentication challenge.

    13e8f51b image

    Chrome Extension

    70da432a image

    Agilicus recommends installing the Agilicus ClickOnce Chrome Extension. This makes the end-user experience ‘native’, no interaction is required. The user will open https://DOMAIN/ as normal. This DOMAIN will be wrapped by the Agilicus’s OpenID Connect Proxy, which enforces authentication and authorisation in advance and hands it off to a previously installed Agilicus Agent which will interact with Chromes Native Messaging. The net effect will be “click” and “run” occur automatically with no user interaction, with single-sign on.

    Most Chrome users can install the Extension from the Chrome Web Store. If for some reason you do not see the extension, below are the instructions to side-load it. Install and enable the extension.

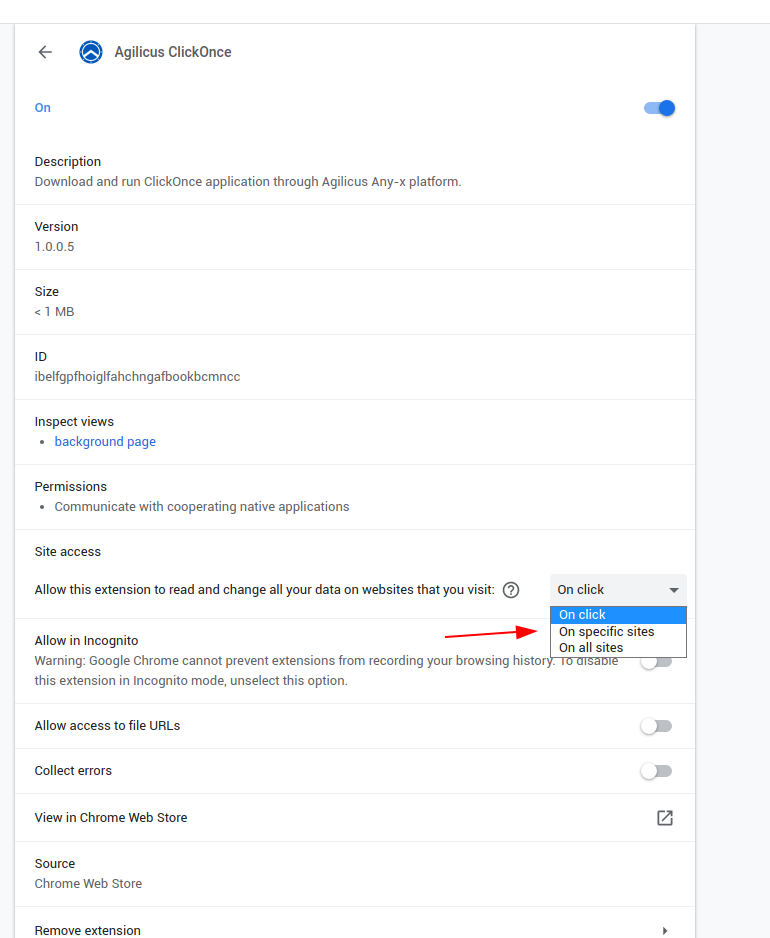
    By default the extension may (depending on your settings) only enable on Click or on specific sites. You may check the extension settings as at right.

    Chrome Extension Side-load (Optional)

    Note: you only need these instructions if you wish a newer version than published, or you cannot see the entry in the Chrome Web Store.

    dd0fa44a image
    1. Download the Extension from www.agilicus.com to your desktop
    2. In Chrome, open ‘chrome://extensions’ in a new tab
    3. Drag the file from your desktop into the Chrome page
    4. Install the Registry key from www.agilicus.com
    5. Restart the Chrome browser

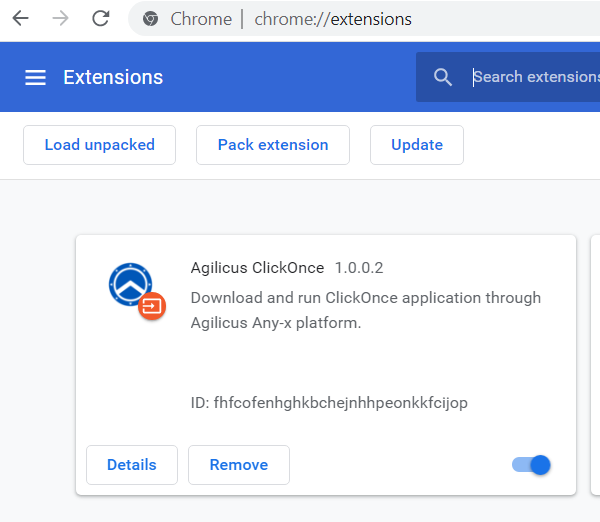
    When done, you can check the Extension is installed on the chrome://extensions page (image shown to right).

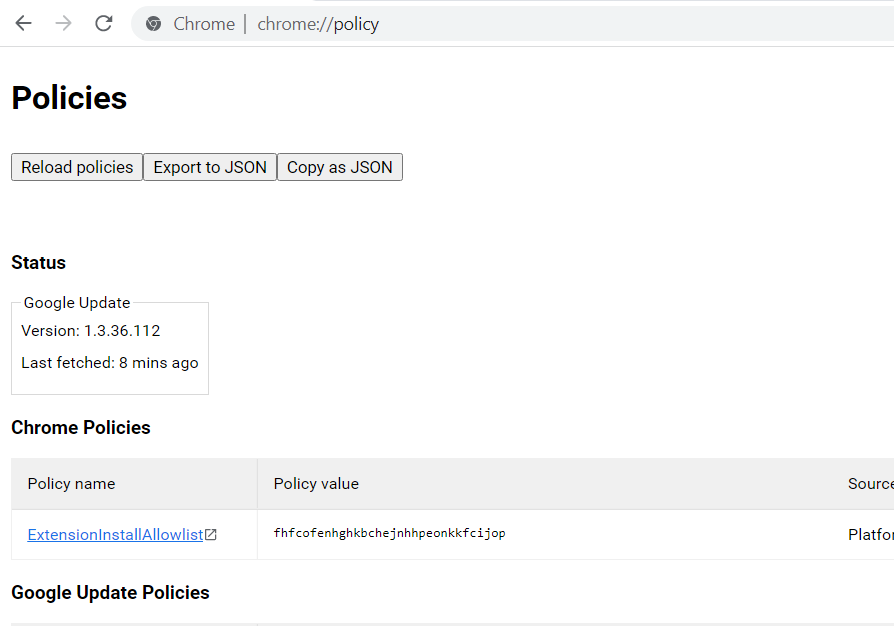
    To diagnose if the Registry ‘allow’ key is set, you can navigate to ‘chrome://policy’ and you should see a policy installed as below image under ExtensionInstallAllowlist

    b583300b image

  • Sign in With Microsoft

    Sign in With Microsoft

    cyber-insurance-compliance

    Sign in With Microsoft

    4cf6458a image

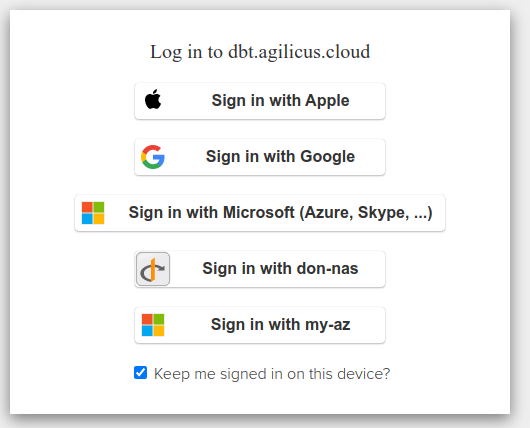
    On initial product signup you may be offered the ability to “Sign in with Microsoft (Azure, Skype, …)”. This option is a zero-configuration setup, and will allow you to assign users from any Microsoft certified source. This includes your own Active Directory, but also can include XBox Live, Skype, hotmail, etc.

    Once you have signed up, you have a choice. You can continue to use this pre-setup shared Identity Provider. Or, you may configure the system to use your own Azure Active Directory.

    The pro/con of each approach are discussed below.

    b5901263 image

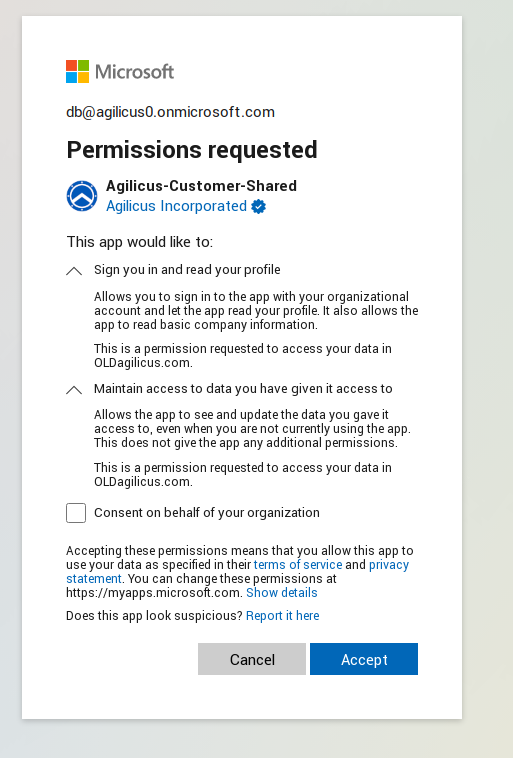
    As an administrator, you will be granting access to this shared Microsoft Issuer. The first time you sign in you will see a screen as below.

    In it, you are requested to

    This screen requests 2 permissions:

    1. “Sign you in and read your profile”. This is granting the Agilicus platform to the following information, called ‘profile’ in OpenID terminology (for more information see Section 2.4 “Scope Values” of the OpenID Connect specification).
      • First Name
      • Last Name
      • Email
    2. Maintain access to data you have given it access to. This is commonly called a ‘refresh’ token, and it allows the platform to cache access so you can sign in a second time on the same device without re-authenticating.

    There is a 3rd box, ‘Consent on behalf of your organisation’. Checking this will ensure that end users are not asked these questions.

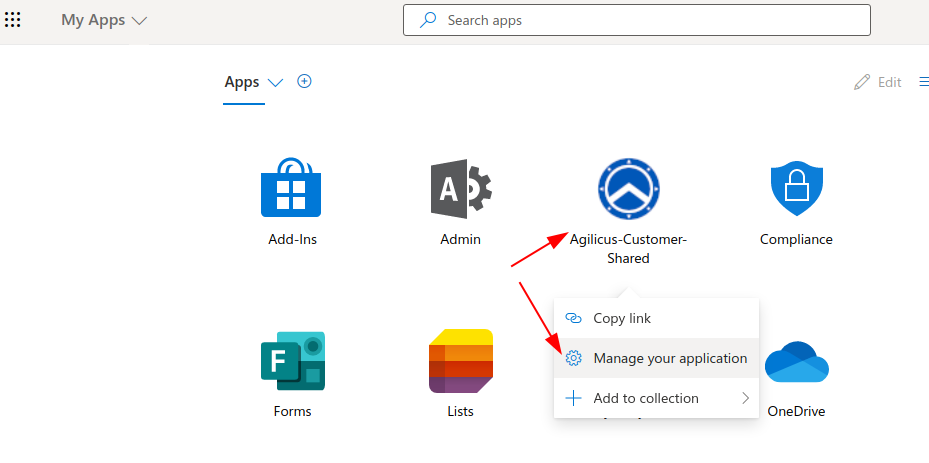
    You may revoke access any time at https://myapps.microsoft.com/

    ad10f88e image

    Consideration: Theme & Branding

    If you use the shared Identity provider you can set the theme & branding information on the initial Agilicus screen. However, once the user chooses ‘SIgn in with Microsoft’ there is no option to set branding information. The end user will see a a generic Microsoft screen.

    Consideration: Auto Create users

    In the event you create and assign your own Azure Active Directory Application for Agilicus you can use ‘auto create’ users. In this model you may choose to auto-trust. “If my Active Directory trusts the user, so will Agilicus”.

  • Theory of Operation: CNAME + DOMAIN

    Theory of Operation: CNAME + DOMAIN

    3c720137 undraw domain names re 0uun

    CNAME + DOMAIN

    Use your own domain name with Agilicus AnyX.

    Setup Planning: Domain Name (CNAME) Setup

    b8441575 image

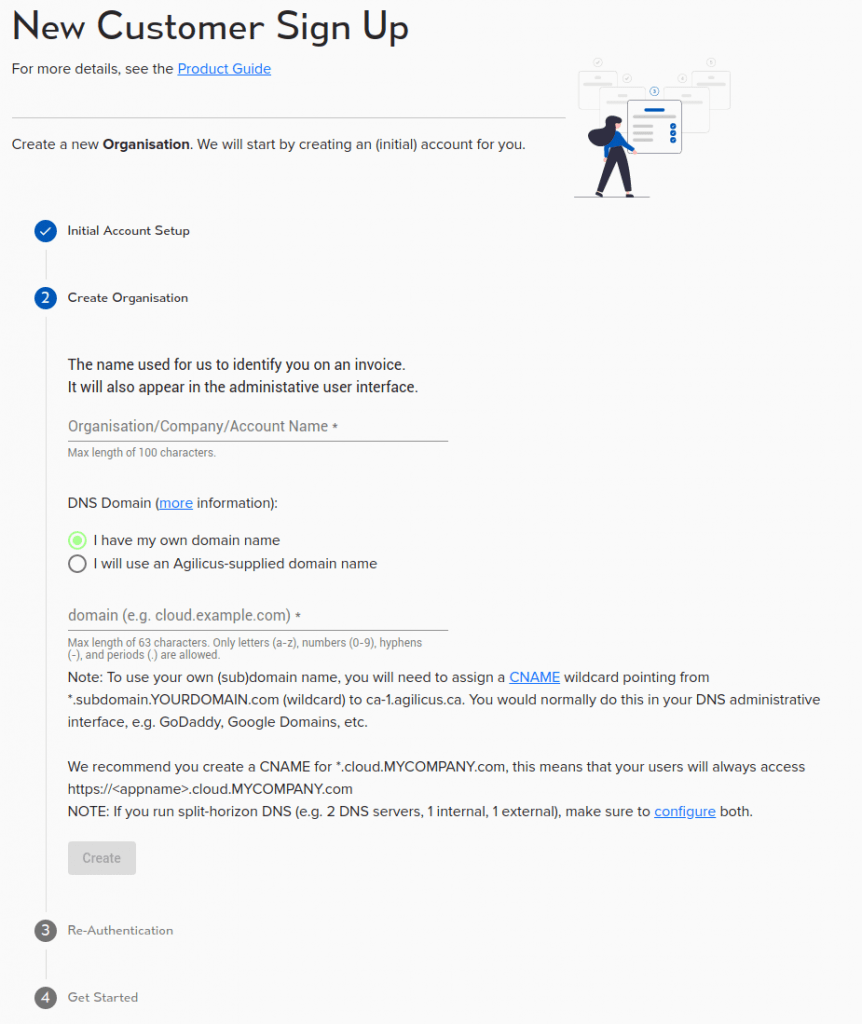
    When creating a new Organisation through the Signup process, you are asked 2 questions:

    1. “Organisation/Company/Account Name”
    2. “DNS Domain”

    On the “DNS Domain” you have 2 choices:

    1. “I have my own domain name”
    2. “I will use an Agilicus-supplied domain name”

    The “Organisation/Company/Account Name” is used for billing purposes, and for metrics. It does not appear to the end-users of your company.

    The ‘DNS Domain’ is used by all users (administrative and end-user). Notably,

    • https://admin.DOMAIN 🠒 the administrator will sign-in here to configure and update the system
    • https://auth.DOMAIN 🠒 for any sign-in activity, the user will be redirected here during the sign-in process according to the OpenID Connect specification
    • https://profile.DOMAIN 🠒 end-users can see a ‘launcher’ of all applications in the organisation, and adjust their multi-factor authentication preferences
    • https://APPNAME.DOMAIN 🠒 for each application you configure, a public URL will be created via its name and the domain you choose.

    If you choose to use an Agilicus-supplied domain name, we will attempt to use your organisation name in conjunction with agilicus.{cloud|net|org}.

    If you choose “I have my own domain name”, the administrator and end users will never see our domain. We recommend this option. In this model, you are delegating a sub-domain of your own to our system to manage on your behalf. So for example, you can say “*.cloud.MYDOMAIN” is managed.

    For the domain, if you choose to provide your own sub-domain, you must first put an entry in your Domain Name Server (DNS) to prove you own it, and to allow us to host content on it. This is done by creating a CNAME record with a wildcard. In your DNS, create a CNAME report from *.subdomain.yourdomain to ca-1.agilicus.ca. For more information about the Hows and Whys of a CNAME, see “Internet Redirect & Alias: The CNAME“. NOTE: this is a wildcard.

    406482f2 image
    Example Setup with Google DNS

    For example, we recommend using “cloud” as the subdomain. If your company web-page is “www.example.com”, you will create a CNAME of *.cloud.example.com, pointing to ca-1.agilicus.ca. You and your users will now be accessing applications as https://appname.cloud.example.com/.

    If you use a domain we supply, this can be very quick for you to get going. If you use your existing domain its simpler for your users, and, can help train them to avoid spearphishing by only using your corporate domain. The choice is yours.

    An example setup using Google DNS is shown. This will vary slightly depending on your DNS provider. If you wish to test the setup of your CNAME, we recommend using dig, as below. You may also use a web-based service such as dnslookup.online. Lookup anyname.subdomain.yourdomain.

    $ dig -t cname foo.cloud.zero-trust.ca
    ...
     ;; QUESTION SECTION:
     ;foo.cloud.zero-trust.ca.    IN  CNAME
     ;; ANSWER SECTION:
     foo.cloud.zero-trust.ca. 3600    IN  CNAME   ca-1.agilicus.ca. 

    Once you select CREATE it will take approximately 30-60 seconds to setup an environment. During this time our system is created a Federated Login system (allowing authentication against your Identity Providers), SSL certificates (100% of what we do is encrypted), and some other database setup for Audit Logging etc.

    NOTE: Split-Horizon DNS

    If you run split-horizon DNS (e.g. a name server internally which serves different answers than externally), you will need to make the same changes in both systems. This can happen e.g. if you use Microsoft Active Directory on premise as a DNS server, and a public DNS server externally.

    NOTE: Testing

    You may test your newly added CNAME using an Agilicus API. In your browser, navigate to:’https://api.agilicus.com/v1/resolve/?type=CNAME&name=auth.SUBDOMAIN.DOMAIN‘. So, for example, if you chose ‘cloud’ as the subdomain, and your main domain was ‘mycompany.com’, you would openhttps://api.agilicus.com/v1/resolve/?type=CNAME&name=auth.cloud.mycompany.comThis will return some text like:
    {“AA”:false,”AD”:false,”Answer”:[],”Authority”:[{“data”:”ns71.domaincontrol.com. dns.jomax.net. 2019051401 28800 7200 604800 600″,”name”:”mycompany.com.”,”type”:6}],”CD”:false,”Flags”:[“QR”,”RD”,”RA”],”QR”:true,”Question”:[{“name”:”auth.cloud.dsai.mycompany.com.”,”type”:5}],”RA”:true,”RD”:true,”Responder”:”8.8.4.4″,”Status”:3,”TC”:false}You may also use a tool such as dig:dig -t cname auth.dbt.agilicus.cloud
    ; <<>> DiG 9.16.15-Ubuntu <<>> -t cname auth.dbt.agilicus.cloud
    ;; global options: +cmd
    ;; Got answer:
    ;; ->>HEADER<<- opcode: QUERY, status: NOERROR, id: 15521
    ;; flags: qr rd ra; QUERY: 1, ANSWER: 1, AUTHORITY: 0, ADDITIONAL: 1
    ;; OPT PSEUDOSECTION:
    ; EDNS: version: 0, flags:; udp: 65494
    ;; QUESTION SECTION:
    ;auth.dbt.agilicus.cloud. IN CNAME
    ;; ANSWER SECTION:auth.dbt.agilicus.cloud. 1800 IN CNAME ca-1.agilicus.ca.;; Query time: 168 msec
    ;; SERVER: 127.0.0.53#53(127.0.0.53)
    ;; WHEN: Sun Oct 17 18:24:14 EDT 2021
    ;; MSG SIZE rcvd: 82

  • Agilicus Launcher (Desktop)

    Agilicus Launcher (Desktop)

    start

    Agilicus Launcher

    Agilicus Launcher Desktop Configuration

    Jump directly to platform specific installation instructions are shown below for Microsoft Windows, Apple OSX, Linux.

    The Agilicus Launcher provides a means of interacting with the user for the purposes of:

    • launch a desktop application with wrapped networking
    • mount / update mount on a share
    • ssh proxy command
    • open native VNC or Remote Desktop client in one step

    It may be used standalone, or, directly integrated to a browser. This can be particularly useful to:

    • allow a system-administrator to manage applications and shares remotely via an API
    • provide multi-factor authentication on a Share
    • Automatically configure putty, openssh for SSH access
    • run a desktop application with wrapped networking

    When installed in this mode, the Launcher will update itself periodically as it is run. It will initially query the user, and, then, interact again as needed to refresh credentials.

    The user installation is very simple: download and run a single file. It will place an entry on the users’s menu called ‘Refresh’ as well as one icon per Launcher. The user can now launch individual applications via an icon. Or, if needed, the user can refresh their shared drives (optionally being forced to re-authenticate with multi-factor authentication) by selecting Refresh.

    Install

    Platform specific installation instructions are shown below for Microsoft Windows, Apple OSX, Linux.

    Microsoft Windows

    Microsoft Windows

    Note: Installation on Microsoft Windows does not administrative privilege.

    1. Open Profile

    Open Profile (https://profile.__MYDOMAIN__) in your browser. We recommend Google Chrome or Microsoft Edge since they support the Agilicus Launcher Extension interface.

    2. Install Desktop Integration

    Select ‘Install Desktop Integration’ button in top bar.

    3. Install Extension

    (Optional). Without the extension there is no browser ⇔ desktop integration, but the ‘Start’ menu can be used independently.

    4. Install Launcher

    Download and run. No configuration steps or questions are needed.

    Apple OSX

    Apple OSX

    Note: Installation on Apple OSX requires administrative privilege, but later running and upgrading does not.

    1. Open Profile

    Open Profile (https://profile.__MYDOMAIN__) in your browser. We recommend Google Chrome since it supports the Agilicus Launcher Extension interface.

    2. Install Desktop Integration

    Select ‘Install Desktop Integration’ button in top bar.

    3. Install Extension

    (Optional). Without the extension there is no browser ⇔ desktop integration, but the some local desktop tools such as ssh can be used independently.

    4. COPY code to clipboard

    select COPY to put a security code on your clipboard

    5. DOWNLOAD package

    Download the installation package

    6. Install package

    Install the installation package using defaults provided.

    7. Paste Code

    When prompted, right-click and paste the code you copied above.

    Linux

    Linux

    No administrative (root) permissions are required.

    1. Open Profile

    Open Profile (https://profile.__MYDOMAIN__) in your browser. We recommend Google Chrome since it supports the Agilicus Launcher Extension interface.

    2. Install Desktop Integration

    Select ‘Install Desktop Integration’ button in top bar.

    3. Install Extension

    (Optional). Without the extension there is no browser ⇔ desktop integration, but the some local desktop tools such as ssh can be used independently.

    4. Download Agilicus launcher

    Download the launcher executable

    5. Enable Execute Permission

    Either from the file browser or a shell, make the launcher executable

    6. Run Agilicus launcher

    No configuration options are needed.

  • Sign in With Apple

    Sign in With Apple

    8584ed0a image

    Sign in With Apple

    Some consumers may wish to use ‘sign in with apple’. This is not common, we recommend using Google and Microsoft since they are simpler to administer, and simpler for the end user to use.

    Sign in With Apple

    8584ed0a image

    In a “Sign In With Apple” flow, the user will supply an email-address they used to register their Apple account. This might be @hotmail, @gmail, etc. This is typically done automatically by their browser or device.

    Some users may have a different ‘appleid’ than the ’email’ on file with Apple.

    In the Agilicus system, the ‘Email’ that is shared (shown in the screen shot at the right) should be used in the “Users” screen to link the user.

    It is important that the user not use the “Hide My Email” option, since in that case there is no method to link the accounts.

    a7871a46 image

    NOTE: “Share My Email”

    It is critical that the user select ‘Share My Email’. This is required to link the account between the Apple system and the Agilicus system. The user will not receive any email.If the user inadvertently selects ‘Hide My Email’ or does not provide a Name, they must delete their account in the Apple account settings, and then sign-in again.The user might otherwise see an error such as to the right.

    If the user inadvertently selects “Hide My Email”, they must correct this through their Apple Account settings by removing the ‘Agilicus’ Application, and then signing in again.

    To check if you have inadvertently selected ‘Hide My Email”, you can check in your iCloud settings (via your Apple device). First, open iCloud. Then select ‘Hide My Email’. If you see an entry for ‘Agilicus’ this means you have declined to provide your identity for purposes of Authentication.

    80cf6d7c image
    123749b3 image
    95358e1b image

    In order to correct this, first remove the Apple ID Login. Once removed, you may sign in normally (remembering to keep ‘Share My Email’ selected).

    ca7a0978 image
    744c2391 image
    a2cd6d4c image
  • Usage Metrics

    Usage Metrics

    cyber-insurance-compliance

    USAGE METRICS

    Platform usage metrics are available showing top-users and overall active counts.

    Usage Metrics

    Platform usage metrics are available showing top-users and overall active counts. This is a graphical view of the audit information.

    From here you may see the top users by usage across a time horizon, optionally restricted to a specific resource.

    You may also see the number of active users you have over time.

    Examples of each report are shown in the below images.

    e4aa430f image
    d6d1609c image
  • Groups

    Groups

    New Application: Groups

    Groups

    Groups allow simplified user management, decoupling role permissions from resource adding.

    Groups

    The ‘Group’ concept exists in several locations in Agilicus AnyX. It can apply to users (giving the ability to simplify permissions), to resources (also giving the ability to simplify permissions), and, to the system level (given administrative distinctions).

    System Groups

    There are 3 system groups used to govern administration:

    ‘admin’: a global admin, can do any action

    ‘apps-admin’: can create / update any resource (SSH, Desktop, Share, …)

    ‘users-admin’: can add/delete users, assign permission to them.

  • Service Accounts

    Service Accounts

    8f897ca4 undraw server down s 4 lk

    Service Accounts

    A service account is a specific subset of permissions assigned to a non-human user. The most common use is the Agilicus Connector.

    Service Accounts

    0ec9a374 image

    A service account is a specific subset of permissions assigned to a non-human user. The most common use is the Agilicus Connector.

    Service accounts (typically) do not sign in via an OpenID Connect web-based identity-provider. Instead they use an ‘Authentication Document’ which is a cryptographic proof of identity and scopes combined, which is periodically refreshed.

    Service accounts behave the same as all other users for the sake of permission assignment.

    When you install your Agilicus Connector, a service account is created for it at that time. If you delete the Connector, you can delete the service account for it. WARNING: do not delete the service account if the Connector is still in use (it will stop functioning).

    Service accounts show up in the audits as any other user: all actions are audited individually.

    Service account’s have a name which is similar to an email address, in the format of:

    agent-connector-erx-service-account-kx4mfqwadgxbccz3axyrr9@serviceaccounts.agilicus.com

    The email address and authentication document may be downloaded as below.

    cb4a22de image

    If you download the authentication document, you will see something as below. This may be used in applications you write that use the Agilicus SDK.


  • Authentication Issuer – Custom Identity

    Authentication Issuer – Custom Identity

    fc240c96 undraw authentication re svpt

    Authentication Issuer – Custom Identity

    An Identity provider holds the user database, and, authenticates users against it. Agilicus supports any OpenID-Connect based identity provider. This includes Okta, Microsoft, Google, etc.

    Authentication Issuer – Custom Identity

    An Identity provider holds the user database, and, authenticates users against it. Agilicus supports any OpenID-Connect based identity provider. This includes Okta, Microsoft, Google, etc.

    Most customers will use the ‘Shared Identity’ feature which is zero-touch configuration. However, some will wish to implement custom rules inside their identity provider, requiring creation of a ‘new application registration’.

    To add a custom provider, select ‘add provider’

    a3513275 image

    You will see two choice: ‘Azure Active Directory’ (which will give you a guided walk through), or, ‘Other’. In other you will configure a row in a table.

    7ba4b661 image
    d17bf7ec image

    Once you have added the row, you have these columns:

    • name — what the user will see on the sign in page
    • issuer — the URI (e.g. https://login.microsoftonline.com/TENANTID/v2.0)
    • icon — from your theme, e.g. google, microsoft
    • client id — as given by your identity provider (e.g. TENANTID)
    • secret — as given by your identity provider
    • auto-create — if set, users will be created automatically in Agilicus if they can sign in via this upstream identity provider. Do not use with public providers.
    • type — Generic (or Microsoft for non-compatible extensions)
    • offline consent — if true, ask for consent to do refresh flow (aka offline)
    • request user info — if true attempt to fetch additional user info (e.g. group mappings)
    • issuer external host — leave blank typically
    • username key — blank (or e.g. username, email, etc)
    • email key — typically email
    • verifies email — if set the upstream provider forces verification of email address
    • redirect uri — the redirect URI to your Agilicus-provided authentication federation. Typically https://auth.ca-1.agilicus.ca/callback

    You may also use the action-button (3-dots) to configure group mappings, these will import groups from your upstream identity provider automatically


  • Authentication Audit

    Authentication Audit

    81a58e66 undraw to do re jaef

    Authentication Audit

    The Authentication audit provides a trail of all attempts by users (or service accounts) to prove their identity. This authentication process can have multiple steps, depending on authentication rules and upstream identity providers.

    Authentication Audit

    c3d3c97a image

    The Authentication audit provides a trail of all attempts by users (or service accounts) to prove their identity. This authentication process can have multiple steps, depending on authentication rules and upstream identity providers.

    Not all stages will have all fields available. Each step has a timestamp (in UTC), an ‘Email’ (user), ‘Source IP’, Stage, Event, and Application Name (authentication client).

    Authentication audits are also available via the API where additional columns may be extracted.

    user_id: stringThe system-local id of the user performing the action.
    upstream_user_id: stringThe id of the user in the upstream system, if available.
    org_id: stringThe id of the organisation of the issuer against which the user is authenticating.
    org_name: stringThe name of the organisation of the issuer against which the user is authenticating.
    time: date-timethe time at which the record was generated.
    event: stringThe event which generated the record. The meaning of the event depends on the stage where it occured.
    source_ip: stringThe IP address of the host initiating the action
    token_id: stringThe id of the token issued or reissued as part of the authentication.
    trace_id: stringA correlation ID associated with requests related to this event
    session: stringThe session associated with tokens related to this event. This can be used to tie the actions undertaking by requests bearing tokens with the same session back to the authentication events which created the tokens.
    issuer: stringThe issuer the user logged in to.
    client_id: stringThe client id of the web application, client, etc. that the user is logging in with. Note that this is not the id of the IssuerClient, but rather the id presented to the authentication system to identify that client. This corresponds to name in the IssuerClient.
    application_name: stringThe name of the application within the system the user is logging in to.
    login_org_id: stringThe id of the organisation that the user is logging in to. Note that this is disctinct from the org_id field, which is tied to the issuer. This id is tied to the application.
    login_org_name: stringThe name of the organisation that the user is logging in to. This corresponds to login_org_id.
    upstream_idp: stringThe name of the identity provider proving the identity of the user.
    stage: stringThe stage of the login process. This identifies where in the pipeline the event was generated.
    user_agent: stringThe user agent of the client used to perform the login.

  • Organisation

    Organisation

    90cf7af9 clickonce

    Organisation

    An organisation (tenant, project in some other systems) is a span of control, of permissions, of users.

    Organisation

    16cfb265 image

    An organisation (tenant, project in some other systems) is a span of control, of permissions, of users. Each organisation has:

    For sophisticated use cases, an Organisation can have sub-organisations. This allows delegating control or segregating use cases.

    Organisations can share users (e.g. the same user id can exist in multiple), but they will have unique permissions.

    Unique Identity Issuer

    In some cases you will wish a sub-organisation to have a unique set of ‘sign-in’ options (e.g. on-premise Microsoft Active Directory, or e.g. Sign-in with Yahoo, or a custom identity provider). This also allows a unique theme for the sign-in experience of that sub-organisation.

    Sub-organisation Authentication Policy

    Organisations with a unique issuer allow configuring a unique authentication policy for the sub-organisation. When you first access the Authentication Policy page for the sub-organisation, it will show that the policy is inherited.

    To apply your own policy, configure one of the presets:

    This will then allow you to further configure details of the policy, such as the allow Multi-factor methods:

    Audit Records

    Each organisation has a set of authentication audit records, indicating who has created an Identity Token (authenticated), from where, when, etc.

    Audit records may also be forwarded to external webhooks. This might include a 3rd-party SIEM or logging system.

    9bff47ae image
    2444eec2 image

  • Billing

    Billing

    b2448eca undraw pay online b 1 hk

    Billing

    Billing is managed directly in the Agilicus Platform and you can setup automatic payments from the Billing Tab. Payments are managed and processed through Stripe, no financial information is stored within the Agilicus platform.

    Billing

    Billing is managed directly in the Agilicus Platform and you can setup automatic payments from the Billing Tab. Payments are managed and processed through Stripe, no financial information is stored within the Agilicus platform.

    Your billing cycle will be 30 days in duration, and will be a function of when you first started using the platform. You may control automatic payment versus invoicing, and the email-address the invoice would go to. Here you may also see previous invoices.

    Within the ‘View/Update Payment Information’ screen (hosted by Stripe) you can see current payment method, add a payment method, and view existing invoices.

    Overall usage metrics (which drive the billing) are shown in the table at the bottom. These are instantaneous values, the invoice is based on the peak within the 30-day time interval.


    Stripe is a 3rd-party payment processor. You can learn more about Stripe by visiting their website.