Let your files go free (but not too free)
Shares
Securely sharing directories from individual servers or desktops has never been simpler. No VPN, no ransomware. No client to install.
Secure File Sharing
Securely sharing directories from individual servers or desktops has never been simpler. No VPN, no ransomware. No client to install.
Theory of Operation
General Steps
The Secure File Sharing is facilitated by an Agilicus Connector on the host(s) you have files you wish to access. Creating this is very simple, the only configuration option is a name.
Once the Connector is installed, you can later add new directories to share, modify who has access, and remove the share entirely, all from the admin user interface. The Connector will automatically keep itself up to date and pick up new configuration. Set it and forget it.
To create a new Share, you will walked through the steps in the Admin web interface. First, select the Connector you have previously installed. You may have multiple shares on the same Connector.
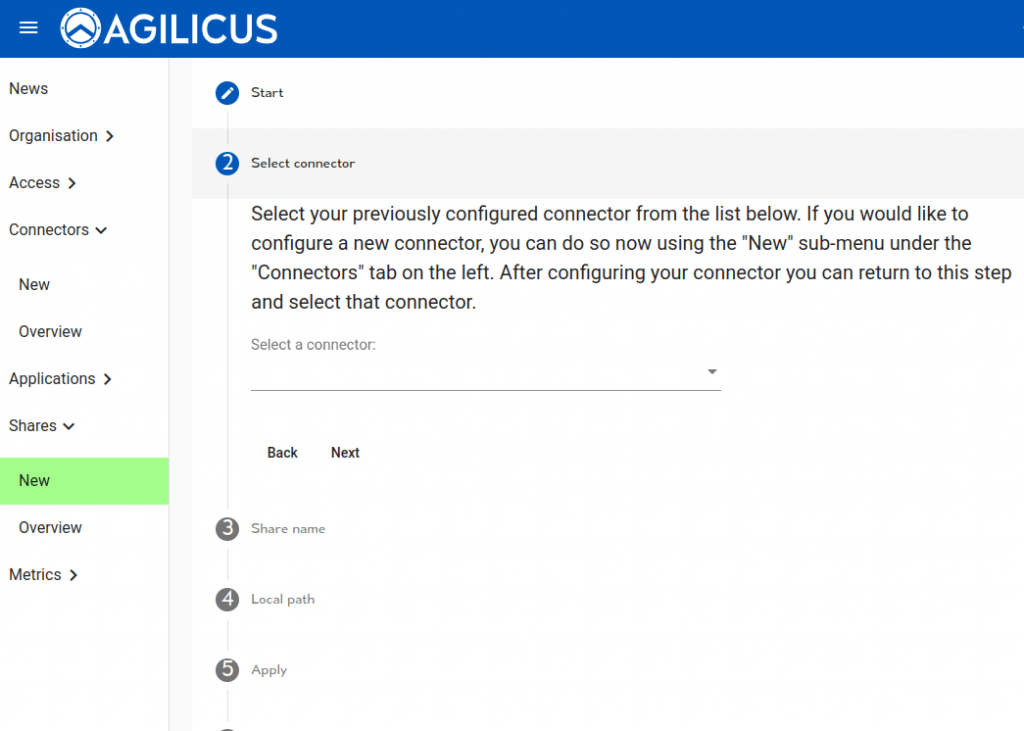
Now we give the Share a web URI name. This is something that will show up for the end-user, they will be given instructions to mount something like https://file…/NAME.
You must also configure a globally-unique name for this Share. You will see this in the Administrative interface, in the audit interface, etc. These may be the same if you wish.
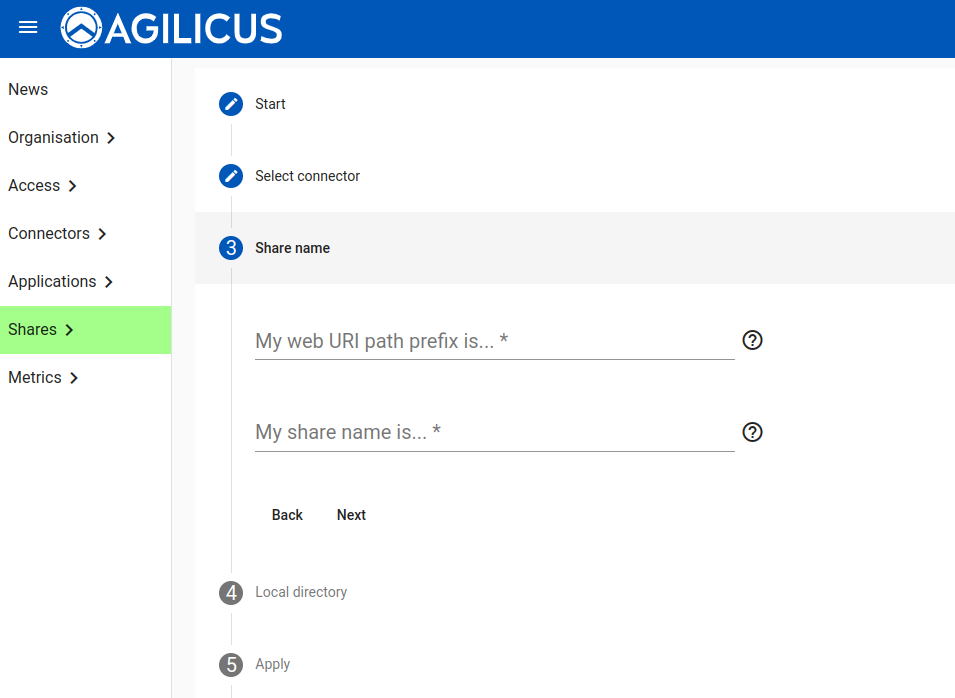
We will now supply a “Local directory”. This is the directory on the machine the Connector is installed on. See the note below on permission, it is important that the Connector have access to it.
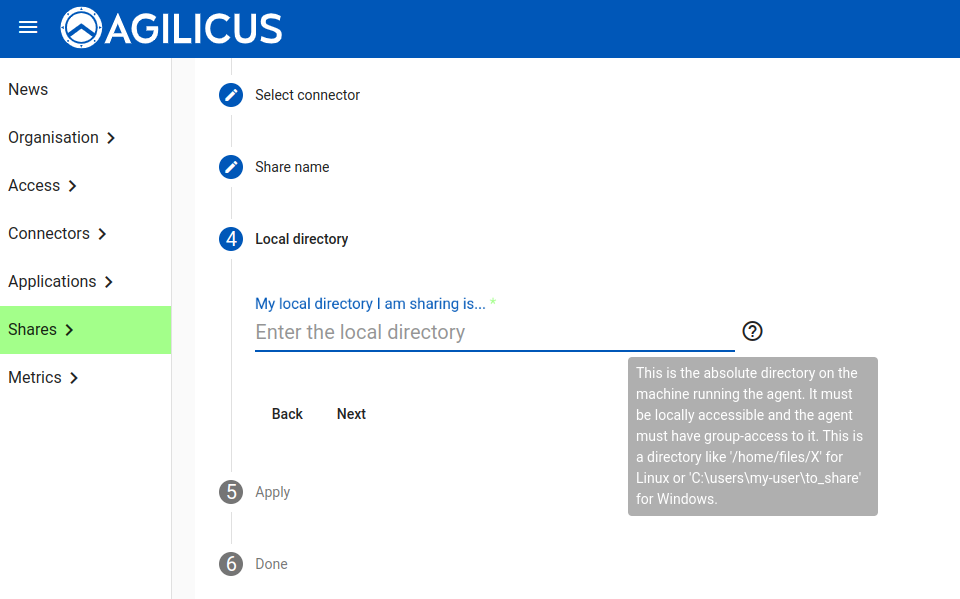
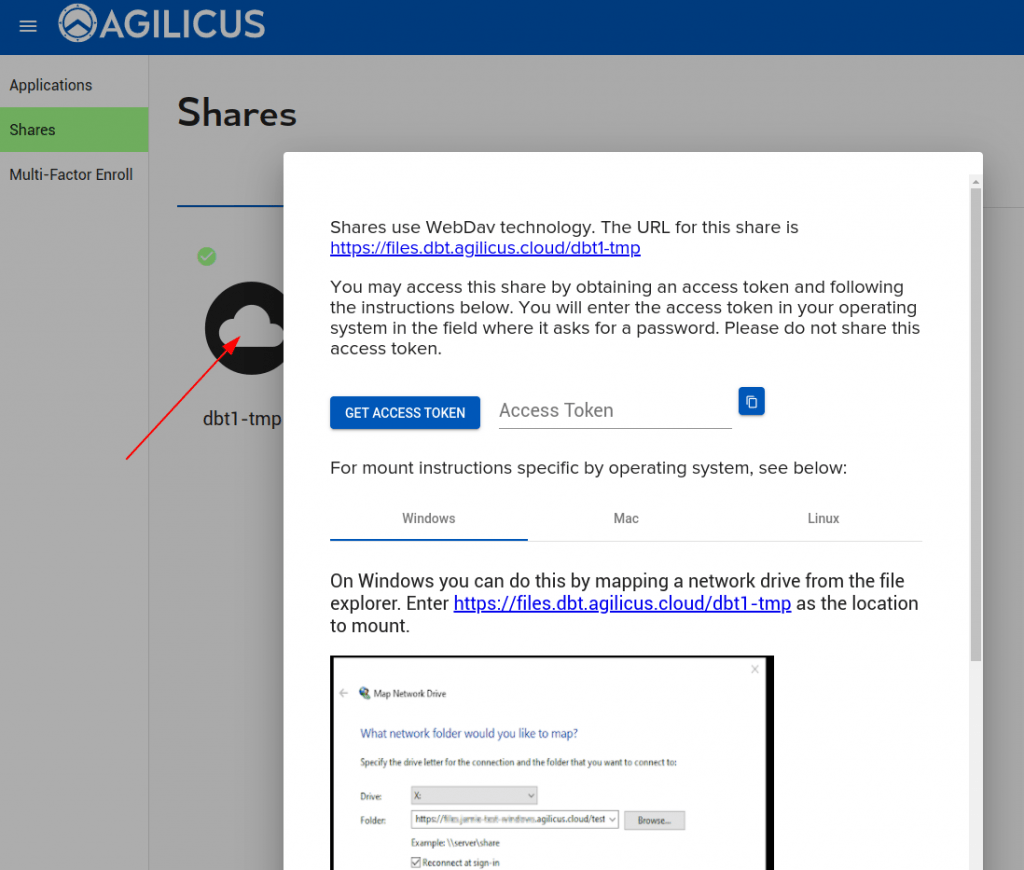
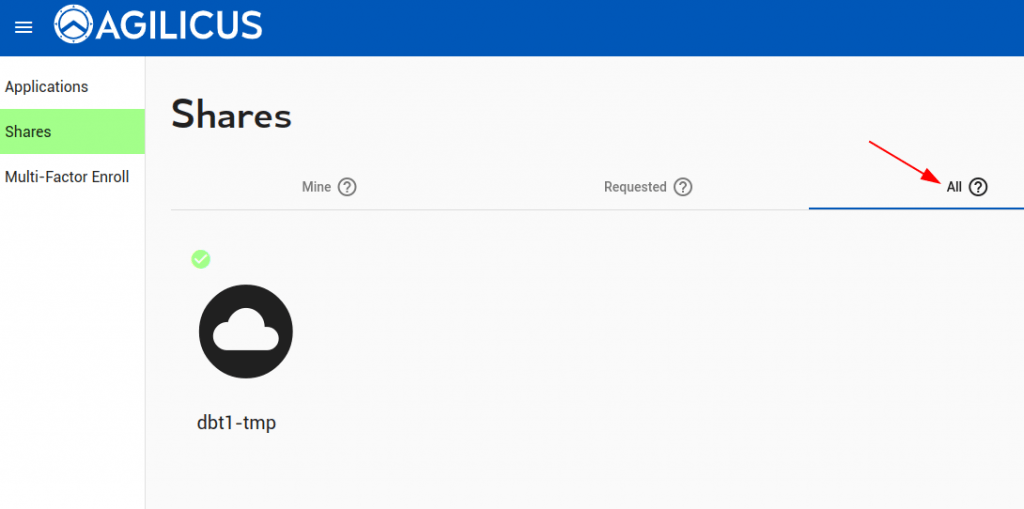
At this stage we are complete. As an administrator you will be given instructions on how to mount the Share, which you may use to test it is working correctly. Generally, each user in your organisation will use Profile in order to request and use a Share.
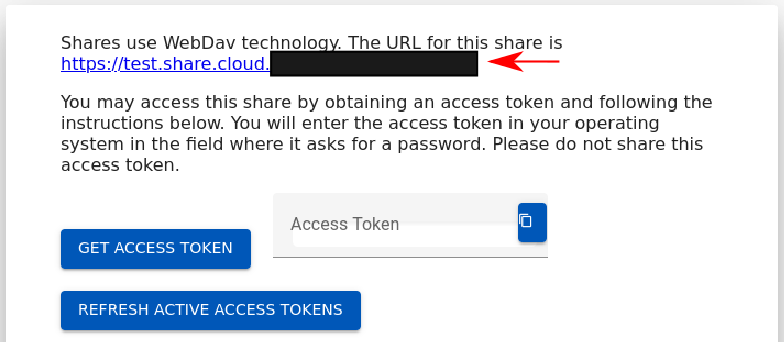
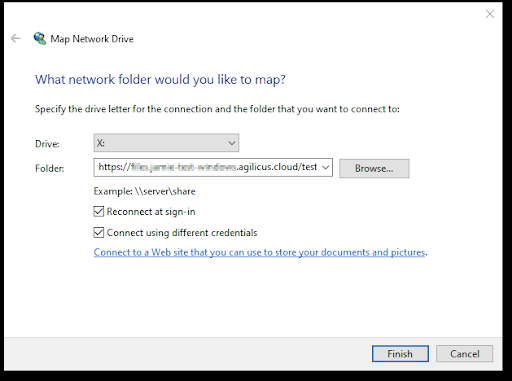
To manually mount the Share, there are 3 parameters:
- URL. This will look like https://files.__MYDOMAIN__/URI-NAME
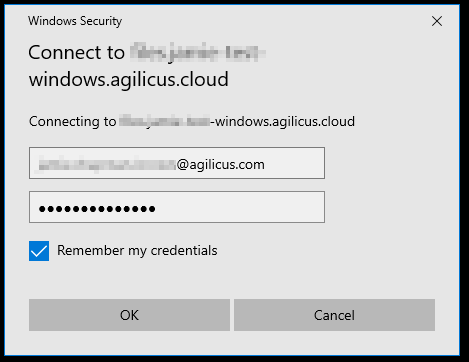
- Username: this will be the email-address you use with the Agilicus system (e.g. your Active Directory login, your Google Login, etc)
- Password: this will be an access token. This is generated for each user independently. End users may request access, or request an Access Token via Profile.
The Profile interface will give these parameters to each user.
Permissions, Access Control
Permissions work similarly to Applications. Each Share has 3 main permissions (Owner, Editor, Viewer). Users may be individually granted permissions per share, or, Groups may be used. We recommend Group-based access.
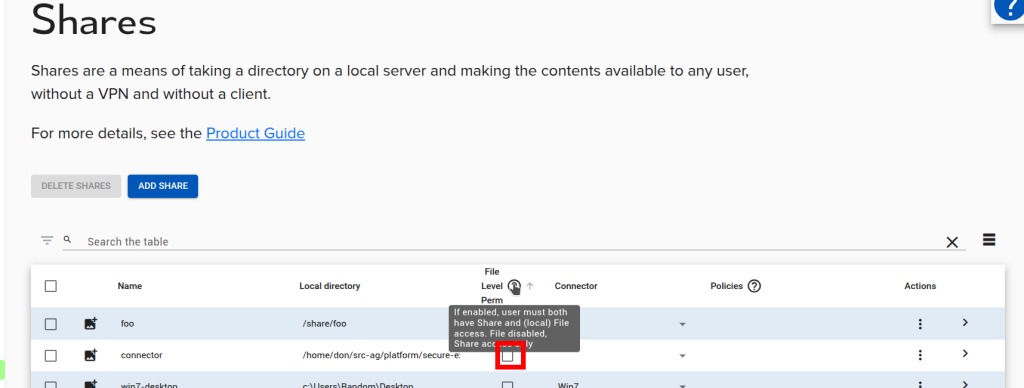
File Level Permission
By default, all files on a share are treated alike for permission (share-level permissions). However, you may enable per-file permissions. If this is enabled, the user’s SID or email are compared against the machine the connector is running on for permission on each file. This allows e.g. NTFS-level per file permissions. The user must have the permission to login locally to the machine for this to work.
NOTE ON PERMISSIONS
❗
Many Microsoft products (e.g. Microsoft Office) will create a Lock-file or a Temporary file in the same directory. This can be confusing when using a permission other than Owner.
For example, if the permissions are ‘Editor’, a user can update an existing file, but not delete it nor create new files. If they open a Microsoft Word file, they may see an error indicating that the temporary file cannot be created. Unless you are using a small set of well-known applications, we recommend using Owner permissions.
NOTE ON MAXIMUM FILE SIZE
❗
The default limit for maximum size on some Windows clients is 50MiB.
We recommend setting FileSizeLimitInBytes to a larger value, e.g. 500MiB. This is located in HKLM\SYSTEM\CurrentControlSet\Services\WebClient\Parameters
See https://learn.microsoft.com/en-us/iis/publish/using-webdav/using-the-webdav-redirector for more information.
This setting is on the client (where you will mount the share).
Access Request
Variable Expansion
In some cases you may wish the path to be templated, for example, mount /PATH/USERNAME. You may do that with string substitution. Variables may be expanded in the format of ${VARIABLE}. See Variable Expansion for syntax and supported variables.
Linux Specific
Permissions
The Agilicus Connector runs as an unprivileged system user. This means that, by default, it will not have permission to read files in a shared directory created by you. To give it access, create a group whose purpose is to group users who have permission to read and write shared files on the machine. Add the agilicus user to the group, then give that group permission to access the shared folder.
# Set up the shares group and add the agilicus user to it
sudo addgroup shares
sudo usermod -a -G shares agilicus

# Configure the share and all files within it to allow access to the shares group
sudo chgrp -R shares my-shared-directory
sudo chmod -R g+srw my-shared-directory

# Ensure files created by the connector and other users have the proper permissions
sudo setfacl -d -m g::rwx my-shared-directory
Windows Specific
Permissions
When installing the connector, by default it is installed as the ‘SYSTEM’ user. This user is typically appropriate for running a service, but there are times it may not have adequate permissions to access a specific folder for a share. When this happens you will see a ‘List Error’ trying to access the share from profile, and it won’t mount properly for end users. This can happen in particular when sharing from a network drive, where local permissions don’t grant access.
When this happens, it may be appropriate to assign it to a different user. This user might be a domain admin, a local admin or a separate user which you giver permission to access the folder being shared. This can be done by opening the Microsoft services applet, finding the ‘Agilicus Connector’ service, and changing the Log On option to run as a user with access to the share.
When you change the user which is running the connector, you must also ensure that the user running the connector has full read+write permissions to the “C:\Program Files\agilicus\agent” folder.
Manual Mount with Map Network Drive
A Share may be mounted using the Windows Explorer, just like any other Share. No special software needs to be installed. You will need the 3 parameters
Automatic Mounting
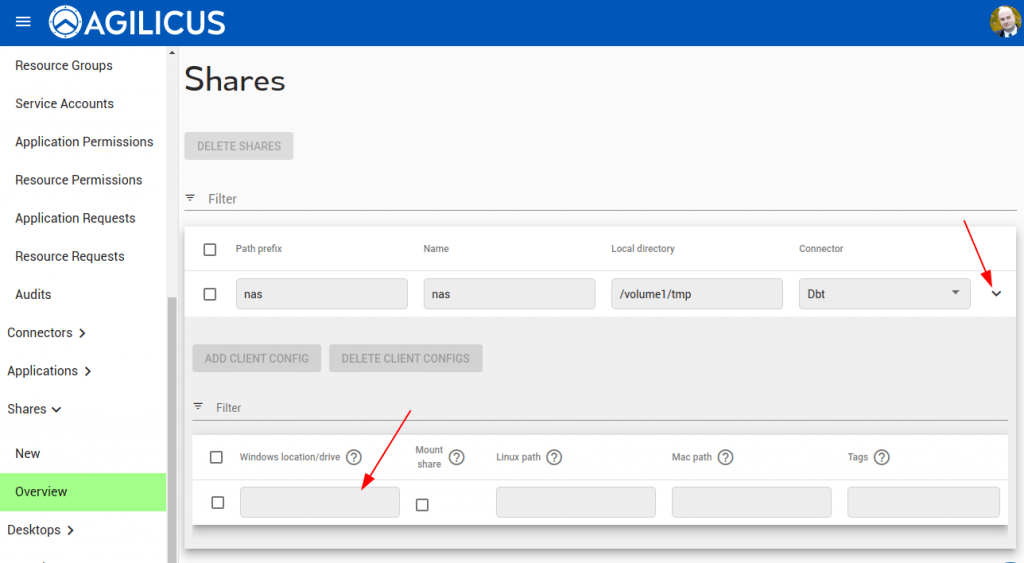
For end users with the Agilicus Launcher installed on the desktop, a Share can be automatically mounted/refreshed. This is particularly useful in conjunction with Multi-Factor authentication. In those mode, a ‘drive-letter’ or ‘mount path’ is configured as per below image, and the Share will automount for each user.
Linux Specific
For mounting a share automatically on Linux, fill in the ‘Linux path’ field on the client configuration shown above.
On Linux some extra setup is necessary in order to make automatic mounting work.
The davfs package needs to be installed with the non-root mount option enabled
On debian-based systems like ubuntu, you would run the following:sudo apt install davfs2
In the package configuration screen, choose the left option.
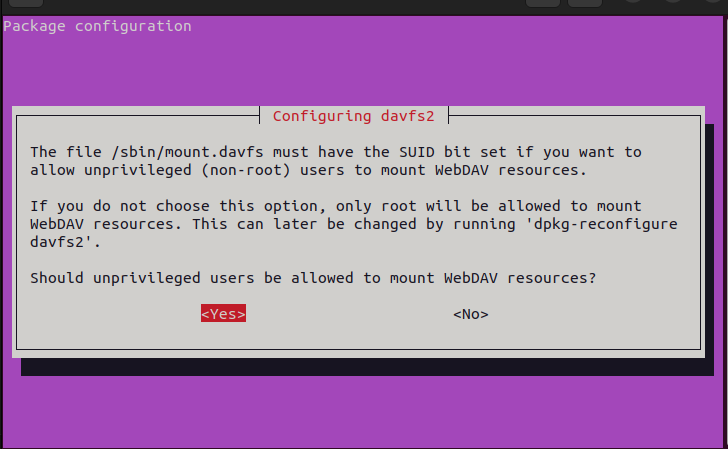
Next add you user to the davfs2 group:usermod -a -G group $USER
You will have to reboot for this to take affect.
Lastly, for each share add an entry into your /etc/fstab file matching the followinghttps://<YOUR SHARE URI> <LINUX PATH> davfs rw,user,noauto 0 0
This must match the uri for the share and the path configured to mount it.
From now on, whenever you run refresh on your desktop, the share will automatically mount!
Advanced Setup: Local Routing Performance
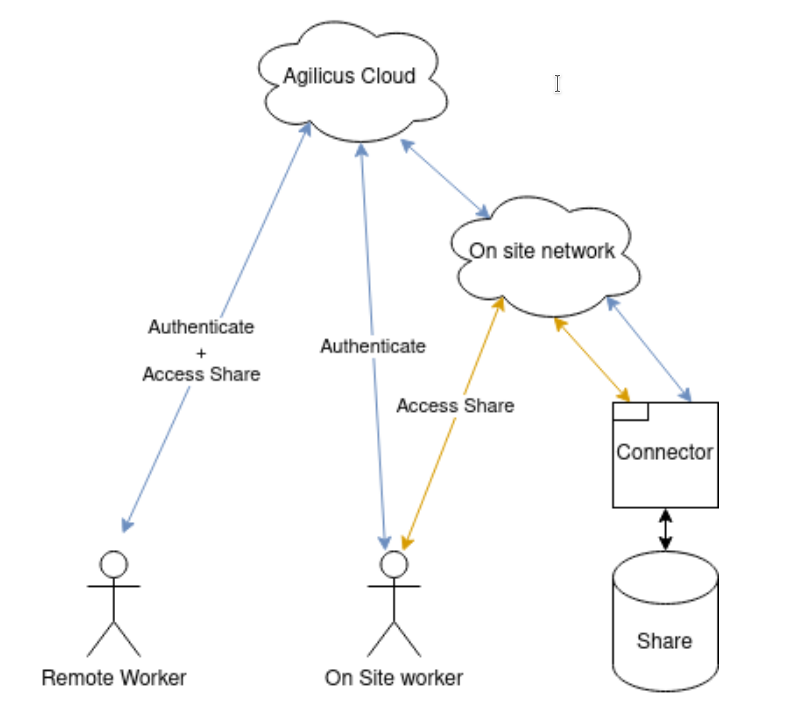
This is an optional section. It shows how to route traffic locally, from a machine with direct access to the connector facilitating the share. In order to achieve this, we rely on a local DNS (and split horizon DNS). The Connector will expose a local port (443) with the same hostname and certificate as externally.
In order to improve performance and decrease bandwidth usage, it can be useful to have your local users access a share directly, rather than over the internet. While this still requires the users to initially login to the Agilicus platform, it enables the network traffic for accessing the share itself to never leave the premises.
The end goal would look something like this at right.
To follow this guide, you have to already have a share created. Ensure that the share is working.
New shares will have the feature enabled to automatically support this task.
After you have your share working, you will need to ensure your site’s network is setup to access the share. By default, it will be exposed on port 443 (https) on the computer the connector is running on. If there is already a web server on that site, the connector could conflict and be unable to serve the traffic. In those cases, you will need to resolve the conflict and move either the agent or the website.
For each connector with assigned File Share resource, exposing its local server TCP port 443 simply requires enabling via the “Manage Routes” dialog:
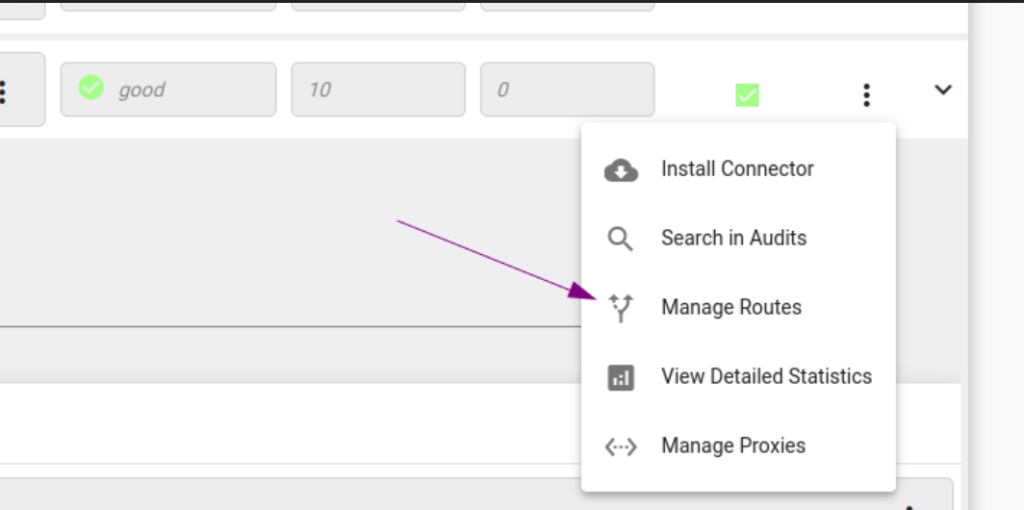
By default we can bind to all the local server interfaces. If there is a segmentation requirement, we can specify the IP address the connector should only bind to.

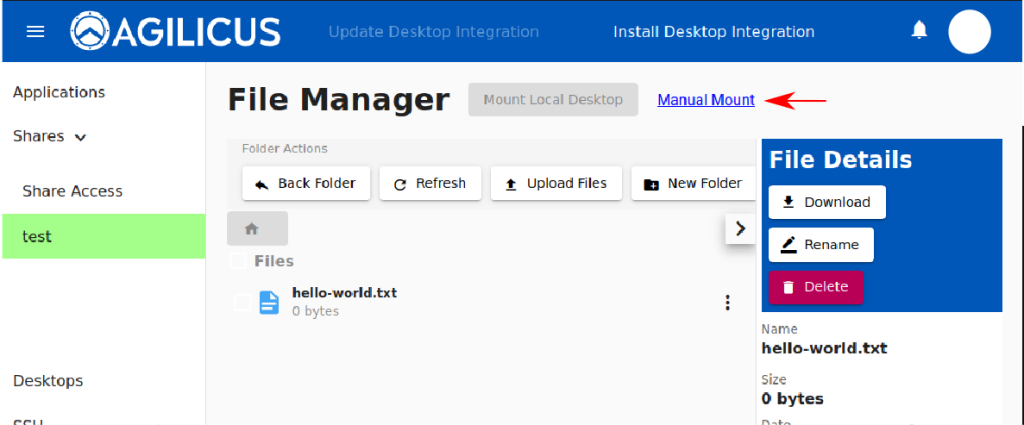
The next step is setting up DNS to resolve share addresses to the connector onsite. You will need to configure the local dns server to route the domains for Agilicus shares to the local connector. Agilicus shares follow the pattern: <share-name>.share.<your agilicus domain>. For example, if your share is named ‘accounting’, and your domain is ‘cloud.acme.org`, then the share would be `accounting.share.cloud.acme.org`. You can also see what domain your share is on in profile by clicking ‘Manual Mount’ and checking the URL.
There are two choices available for how you configure your local dns entries.
- Create a wildcard record *.share.<your agilicus domain> to direct all shares to the local connector. This will work correctly provided that all shares for your organization are available from this connector
- Create a record for each specific share.
Whether you choose 1) or 2) depends on your specific network layout and your dns server’s capability for wildcard entries.
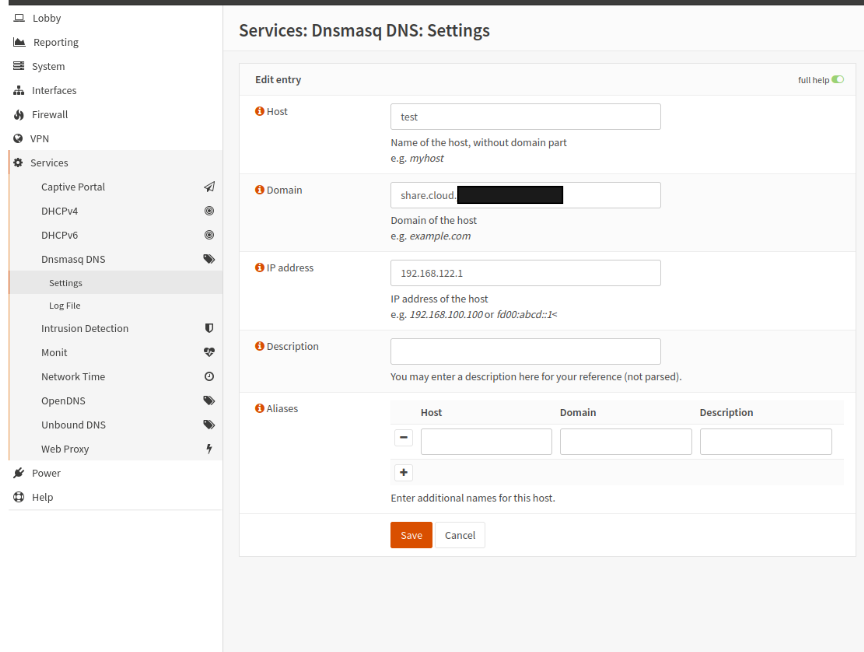
For example with a share named ‘test’, and the local connector on ‘192.168.122.1` a config in OPNSense would look like this.
