
Microsoft Group Policy update through time-limited Zero Trust remote access
Enable remote Active Directory policy management using the connector and Windows remote access to keep remote machines up to date.
Background
This procedure is designed to setup an occasional synchronization mechanism between a remote computer and the network Active Directory to enable group policy updates without the use of an always-on VPN.
This configuration provides an additional layer of security for remote access as it is both time-limited and protected through the Agilicus AnyX platform as well as authentication through the active directory platform. This means the Administrator can audit and control access through both the Agilicus AnyX platform, or through the Windows Domain Active Directory remote access logs.
This implementation minimizes the surface area for attack and ensures that credentials are always secure.
Once the procedure is done remote computers will check automatically for group policy updates, with an option to manually cause an update by selecting the ‘gpupdate’ launcher on the user’s desktop.
Enable remote Active Directory policy management using the connector and Windows remote access to keep remote machines up to date.
This set up of the following components is required for the deployment:
- – A connector
- – A share for distributing the certificate Revocation List (CRL)
- – A domain controller w/ certificate management
- – An SSTP server (Microsoft Remote Access configuration is provided)
Procedure
Set up a Connector on a Windows Server platform that will act as the Certificate Authority (CA). We recommend deploying locally on the Active Directory where a Connector may already be deployed. However, an alternate Windows Server platform with a dedicated Connector is acceptable.
Create a File Share resource.
Assign it to the Certificate Authority deployed connector. Name it ‘crl-share‘, and enter the local directory of your crl location. By default on Windows Server.
This is located at the following path: ‘C:\Windows\System32\CertSrv\CertEnroll’

Create a Network resource to access the SSTP tunnel we will be creating further on.

Create a Launcher resource. It will be used to create the Policy Update tunnel.
Name the Launcher resource ‘gpupdate’,
Assign it a command path of ‘%SystemRoot%\system32\WindowsPowerShell\v1.0\powershell.exe’
Under command arguments enter
C:\PROGRA~1\agilicus\scripts\agilicus-gpupdate-user.ps1 -domain domain.jamiechapmanbrn.com
Assign the both the share and the network that you created earlier to the Launcher resource under “Resource Members”

Install Microsoft VPN on the host server
Install Microsoft VPN on the host server (https://learn.microsoft.com/en-us/troubleshoot/windows-server/networking/install-configure-virtual-private-network-server)
Use the Select Server roles option to install ‘Remote Access’
Under Roll Services choose ‘DirectAccess and VPN (RAS)
After the installation has finished, open the ‘Routing and Remote Access’ tool
Right click the server, and select ‘Enable Routing and Remote Access’
In the setup wizard, choose ‘Remote access (dial-up or VPN)’
Choose an appropriate network interface
Select ‘No, use Routing and Remote Access to authenticate connection requests’
Configure the remote hosts to use either DHCP or a specified range of addresses
Right click the server and choose ‘properties’
Under Security, click Authentication Methods.
Ensure that ‘Microsoft encrypted authentication version 2 (MS-CHAP v2) is checked
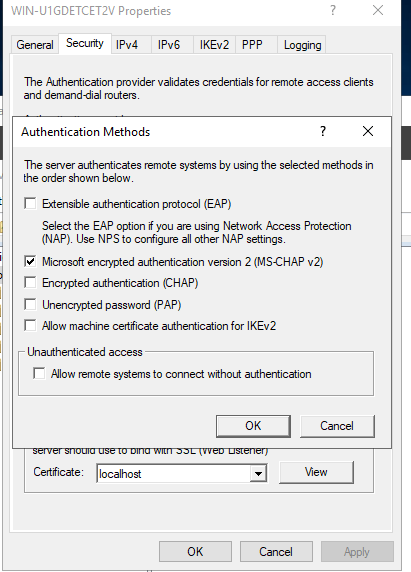
Enable dial-in access for users that are expected to be able to use the service
We will be coming back to this page when we have configured a local certificate for it to use.
For more details on installing remote access
https://learn.microsoft.com/en-us/troubleshoot/windows-server/networking/install-configure-virtual-private-network-server
Configure the Certificate Server
Configure the CRL location
Open the Certification Authority Application.
From the Certification Authority Application, right click the domain server, and click ‘Properties’.
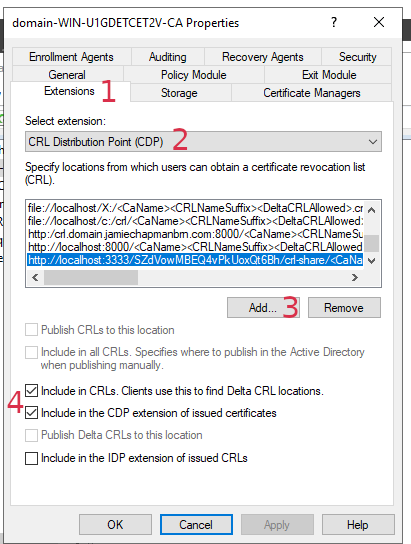
Click the ‘Extensions’ tab (1), and select the ‘CRL Distribution Point (CDP)’ extension. (2)
Click the ‘Add’ button (3), and enter the following: http://localhost:3333/<org-id>/crl-share/<CaName><CRLNameSuffix><DeltaCRLAllowed>.crl
You can find your organisation’s ID, by browsing to the portal, logging in, then click any resource. You will see your organisation ID in the address bar in your browser.
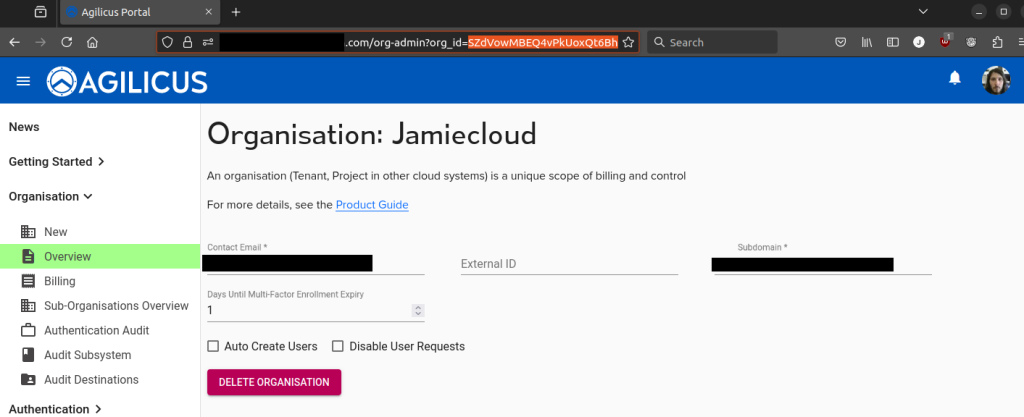
Ensure that the following two boxes are checked:
– ‘Include in CRLS. Clients use this to find Delta CRL locations.` (4)
– ‘Include in the CDP extension of issued certificates’ (4)
When you are finished, it should look like this
Enable host configuration for RAS and IAS access
Open ‘Certificate Templates’
Choose RAS and IAS Server
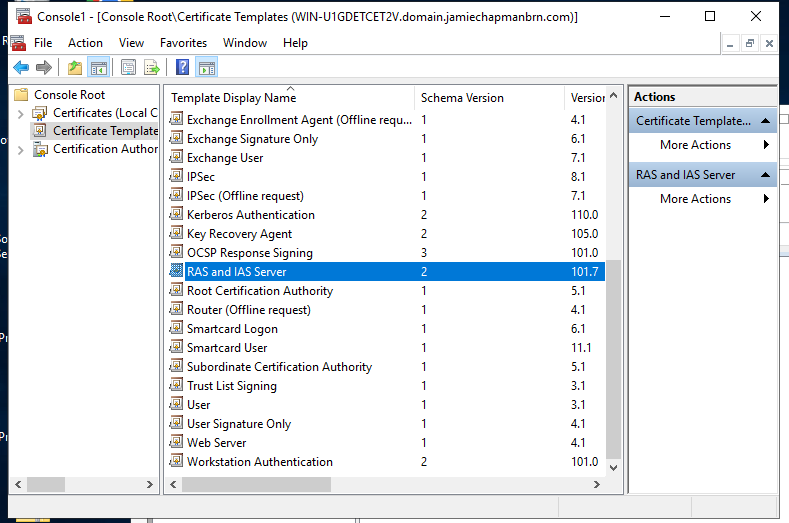
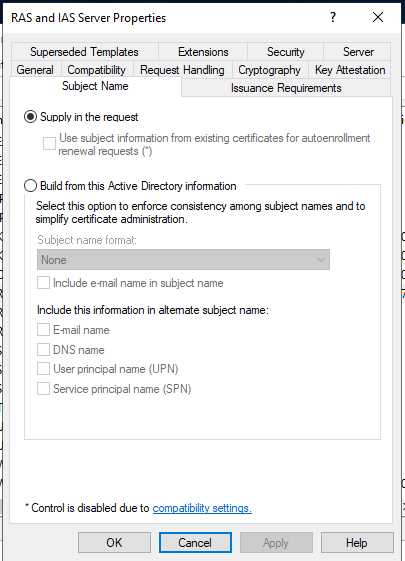
Select the ‘Subject Name’ tab. Choose ‘Supply in the request’
Issue the certificate for ‘localhost’
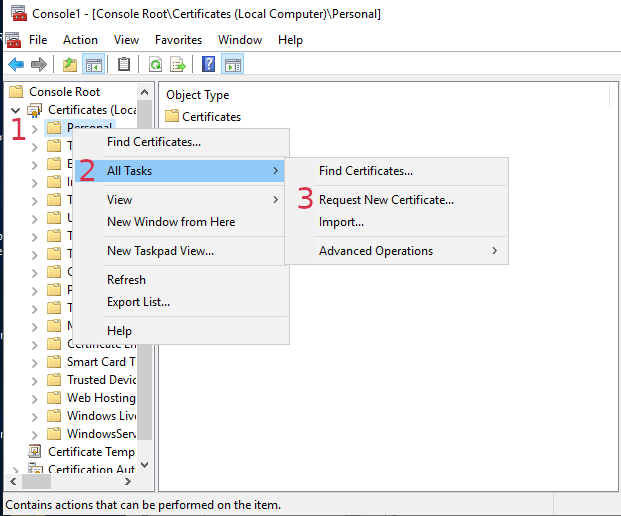
Open the ‘Certificates’ snap in. Choose ‘Local Computer’
Under Certificates, right click ‘Personal’
Select ‘All tasks’, then select ‘Request New Certificate’
Click next, then next again.
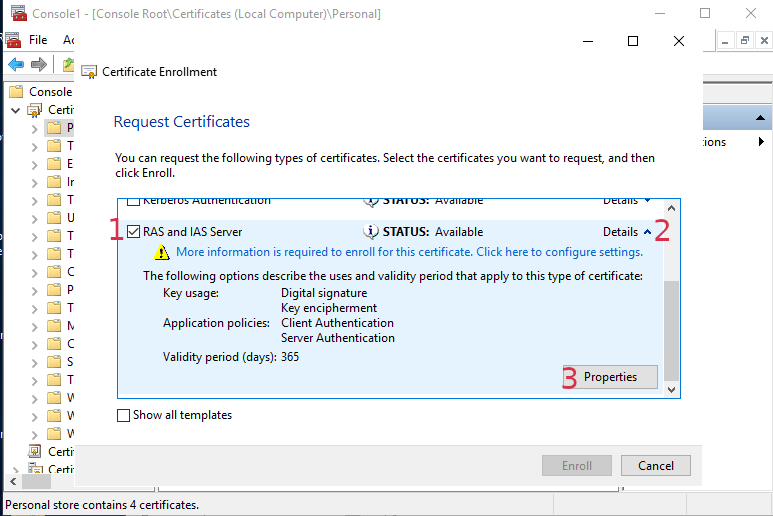
Choose ‘RAS and IAS Server’, drop down the ‘Details’ arrow, then click ‘Properties’
On this page, under ‘Subject name’ choose ‘Common name’. In the value box enter ‘localhost’. Click the Add button, then ‘Apply’. Click ‘OK’. Then lastly ‘Enroll’
Using the certificate you have created, go back to the Routing and Remote access properties, and choose the ‘localhost’ certificate
Client Setup
Users will need to be provisioned in the Agilicus AnyX platform, and granted access to the ‘gpupdate’ launcher via their Identity or Group membership.
Agilicus provides a helper script in order to configure the client machines to automatically update.
This script installs some helper scripts, and configures an automatic task to periodically update.
In order to run this script you will need to enable signed scripts on the machine
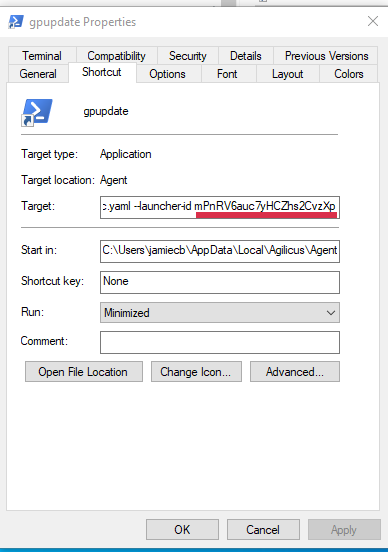
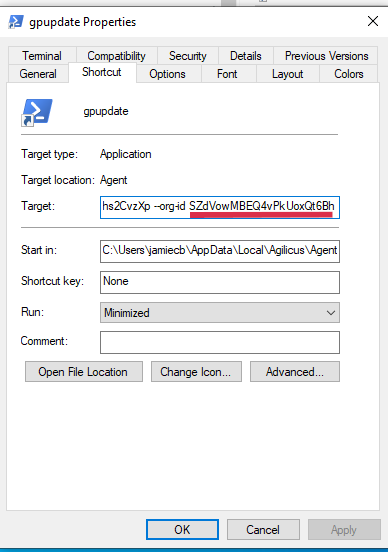
You will need to get the launcher id and organization id. You can find these by inspecting the gpupdate shortcut on your desktop. In the ‘Target’ section you will see a command line script. In the line is –launcher-id <gpupdate-launcher-id> –org-id <your-org-id>.
Download the sample installer script from here. Run the script on the target computer as administrator. specify the launcher_id and org_id parameters using the information from the earlier step.
