Blog

  • Dockerhub and pull limits: cache some insurance

    Dockerhub and pull limits: cache some insurance

    Like many of you we use an indeterminate number of dockerhub container pulls per hour. The base layers of something? The CI? Bits and bobs inside our GKE? One area of particular concern: we host applications from our customers, what base layers do they use?

    Our general strategy is to not use upstream containers, to build our own. For security. For control. But, the exceptions are, for well-known projects with strong security cultures. E.g. ‘FROM ubuntu:20.04‘ is allowed, ‘FROM myname‘ is not.

    We run our own image registry, it authenticates (via JWT) to our Gitlab. It works very well with our CI, with our production systems. So our use of the Dockerhub registry is probably minimal. But its hard to say, we run a lot of CI jobs, we run pre-emptible nodes in GKE, they can(and do) restart often. So we have some risk with the new Rate-Limits announced.

    GKE has a mirror of some images, and we do use that (both with a command-line to kubelet on the nodes, but also by injected into our CI runners in case they still use dind). Recently gitlab added some documentation on using registry mirror with dind. We inject this environment variable into the runner services just-in-case.

    DOCKER_OPTS: "--registry-mirror=https://mirror.gcr.io --registry-mirror=https://dockerhub-cache.agilicus.ca"

    Now its time to bring up a cache. First I create an account in Dockerhub. This gets us 200/6hr limit. Then, I create a pull-through cache. You can see the below code in our github repo, but, first a Dockerfile. I create a non-root-user and run as that. Effectively this gives us an upstream-built registry, in our own registry, with a non-root user.

    FROM registry
    
    ENV REGISTRY_PROXY_REMOTEURL="https://registry-1.docker.io"
    
    RUN : \
     && adduser --disabled-password --gecos '' web
    
    USER web

    And now for the wall of YAML. This is running in my older cluster which does not have Istio, the one that just exists to host our gitlab etc. I use my trick to share an nginx-ingress while using a different namespace, reducing the need for public IPv4. I give this a 64GiB PVC, a unique name (dhub-cache), I set some environment variables. And we let it fly.

    ---
    apiVersion: networking.k8s.io/v1beta1
    kind: Ingress
    metadata:
      name: dhub-cache
      namespace: default
      annotations:
        kubernetes.io/ingress.class: nginx
        fluentbit.io/parser: nginx
        kubernetes.io/tls-acme: "true"
        certmanager.k8s.io/cluster-issuer: letsencrypt-prod
    spec:
      tls:
        - hosts:
            - "dhub-cache.MYDOMAIN.ca"
          secretName: dhub-cache-tls
      rules:
        - host: "dhub-cache.MYDOMAIN.ca"
          http:
            paths:
              - path: /
                backend:
                  serviceName: dhub-cache-ext
                  servicePort: 5000
    ---
    kind: Service
    apiVersion: v1
    metadata:
      name: dhub-cache-ext
      namespace: default
    spec:
      type: ExternalName
      externalName: dhub-cache.dhub-cache.svc.cluster.local
      ports:
        - port: 5000
    ---
    apiVersion: v1
    kind: PersistentVolumeClaim
    metadata:
      name: dhub-cache
      namespace: dhub-cache
    spec:
      accessModes:
        - ReadWriteOnce
      resources:
        requests:
          storage: 64Gi
    ---
    apiVersion: v1
    kind: ServiceAccount
    metadata:
      name: dhub-cache
      namespace: dhub-cache
    automountServiceAccountToken: false
    ---
    apiVersion: apps/v1
    kind: Deployment
    metadata:
      namespace: dhub-cache
      name: dhub-cache
      labels:
        name: dhub-cache
    spec:
      replicas: 1
      selector:
        matchLabels:
          name: dhub-cache
      template:
        metadata:
          labels:
            name: dhub-cache
        spec:
          securityContext:
            runAsUser: 1000
            runAsGroup: 1000
            fsGroup: 1000
          serviceAccountName: dhub-cache
          automountServiceAccountToken: false
          imagePullSecrets:
            - name: regcred
          containers:
            - image: MYREGISTRY/dhub-cache
              name: dhub-cache
              imagePullPolicy: Always
              securityContext:
                allowPrivilegeEscalation: false
                readOnlyRootFilesystem: true
              ports:
                - name: http
                  containerPort: 5000
              livenessProbe:
                httpGet:
                  path: /
                  port: 5000
                periodSeconds: 30
                timeoutSeconds: 4
                failureThreshold: 4
              readinessProbe:
                httpGet:
                  path: /
                  port: 5000
                periodSeconds: 20
                timeoutSeconds: 4
                failureThreshold: 4
              env:
                - name: REGISTRY_PROXY_REMOTEURL
                  value: "https://registry-1.docker.io"
                - name: REGISTRY_PROXY_USERNAME
                  value: "MY_USER"
                - name: REGISTRY_PROXY_PASSWORD
                  value: "MY_USER_TOKEN"
              volumeMounts:
                - mountPath: /var/lib/registry
                  name: dhub-cache
          volumes:
            - name: dhub-cache
              persistentVolumeClaim:
                claimName: dhub-cache
    ---
    apiVersion: v1
    kind: Service
    metadata:
      namespace: dhub-cache
      name: dhub-cache
      labels:
        name: dhub-cache
    spec:
      type: NodePort
      ports:
        - port: 5000
          targetPort: 5000
      selector:
        name: dhub-cache
    ---
    apiVersion: v1
    data:
      .dockerconfigjson: MYINTERNALREGISTRYINFO
    kind: Secret
    metadata:
      name: regcred
      namespace: dhub-cache
    type: kubernetes.io/dockerconfigjson
    
  • Software Supply Chain Redux: npmjs shells your hosts

    Software Supply Chain Redux: npmjs shells your hosts

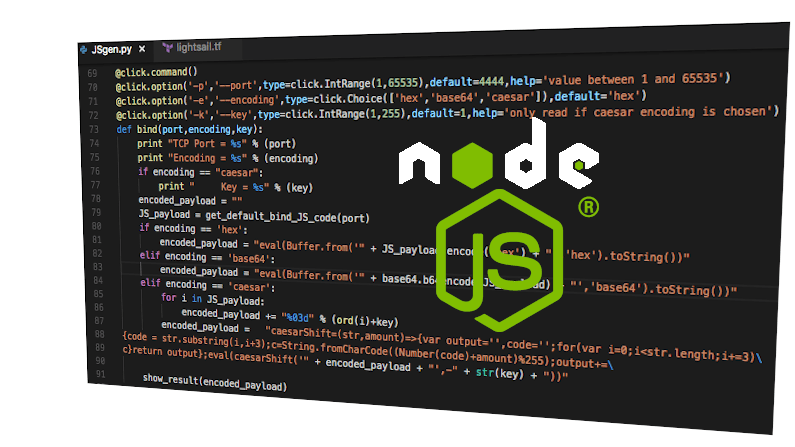
    In supply chain security risk in action: ESLint I showed how good packages could become bad, and get imported directly into your network, your workstation, your delivered software. In that case it was eslint, today it is four less well known packages.

    The four packages are:

    1. plutov-slack-client – claims to be a “Node.JS Slack Client” according to the information in the manifest 
    2. nodetest199 – no description
    3. nodetest1010 – no description
    4. npmpubman – claims to be “a simple implementation about Linux shell login” according to the information in the manifest 

    Now, its somewhat unlikely that you have added these to your project. However, more likely, some package you rely on was modified to import these.

    Today NPM has removed these packages, but, they’ve been around for a while. The iceberg theory suggests that, the 4 we know of, implies more are out there.

    The risk of importing bad software is expensive and complex to mitigate. The simple cheap things to do include SAST (we run npm audit in our CI as a voting stage, documented here), east-west and egress firewalls. Here, which terrifies you most:

    1. a reverse shell open on a developer workstation? (they have your source, maybe it commits something bad, steals it, …)
    2. a reverse shell open in your CI (you are building and signing the code here)
    3. a reverse shell open in your production (you are processing customer credit cards and home addresses)

    I didn’t put a 4) all of the above, but you can feel free to add it in your mind.

    The simplicity of these attacks coupled with the go-go-go development cadence of today suggests we are going to see much more of them. Diligence, inspection, technology: we’ll all need to be alert.

    As for the specific malware just released, well we can read the CVE which has some modest detail:

    All versions of plutov-slack-client contain malicious code. Upon installation the package opens a shell to a remote server. The package affects both Windows and *nix systems.

    Any computer that has this package installed or running should be considered fully compromised. All secrets and keys stored on that computer should be rotated immediately from a different computer.
    The package should be removed, but as full control of the computer may have been given to an outside entity, there is no guarantee that removing the package will remove all malicious software resulting from installing it.
    https://www.npmjs.com/advisories/1569

    And, the last bit is something we tend to forget. If this got in, it for sure did a lot of damage. Signing keys for your application? Credentials for your GCP or AWS? Service accounts? As a good proxy, assume that the developer workstation it was on, that the person who uses that has become actively malicious: if they had access, the attacker has access.

    Think this would never happen to you? You would never have a developer load ‘plutov-slack-client’? What about loadyaml ? Seems much more innocuous. Or, lodashs , a simple typo-squat. Would you catch that in all design reviews? What about if you are an end-user of software. Do you feel that all developers in all the companies all the way back up your supply chain are diligent enough?

  • Identity, Authorisation, Access: Microsoft Dynamics

    Identity, Authorisation, Access: Microsoft Dynamics

    OVERVIEW

    You are deploying Microsoft Dynamics. You have a set of choices to consider, relating to:

    1. How it will be accessed (direct Internet access, VPN, private network only)
    2. Which constituents of users will authenticate to it
    3. How users will authenticate to it
    4. The authorisation or roles of those users
    5. Related products (e.g. CRM Portals/PowerApps)
    6. Multi-Factor Authentication

    In “Zero Trust for the Digitally Disconnected” we propose a technique that means all applications are directly Internet connected (regardless of whether deployed as SaaS, in a DMZ, in a private cloud, public cloud, hybrid cloud, etc.). This gives maximal security and maximal ease of access.

    User Constituent Considerations

    • Full-time badged staff @mydomain only?
    • 2 or more related entities (e.g. @city, @region, @county, @library, @fire)
    • External contractors (e.g. @theatre)
    • Temps, contractors, other non full-time staff?
    • Channel Integration Framework (e.g. @ice-facility)

    The broader the base of constituents you can reach securely and simply, the more value you can extract from the Microsoft Dynamics deployment.

    If the sole use case is Full-time badged staff @mydomain, the simplest is to deploy using Azure Active Directory (if Microsoft Office 365 is already deployed), or to deploy Microsoft Active Directory Federation Services (ADFS) so that it is Internet facing. Both options allow creating “Authentication Clients” which allow external applications to do a set of claims-based identity authentication. Possible standards to use are OpenID Connect and SAML. Of these, OpenID Connect is a more modern Internet-style standard supporting both Identity and Profile, where SAML supports Identity and custom attributes to emulate Profile.

    I encourage you to think of other constituents and stakeholders for which a federated identity would be more appropriate. These can be identified by e.g. User@gmail, User@Library, other Identity providers, and securely Authorised, Simply.

    A video demonstrating what the user experience would be is available.

    User Authentication

    I would propose that you have zero users manually configured in Dynamics. All users would be available through a Federated login, with separated Authorisation. 

    Two modes of operation are available (called IdP-initiated, and SP-initiated). In the first, there is a single page for your organisation called ‘MyApps’, you sign into it, and it then has links to e.g. CRM which you follow, no additional login is shown.

    In the latter (SP-initiated), the user navigates to CRM, is not logged in, is redirected to the login experience, and returns.

    Both support single-sign-on, and are seamless. The SP-initiated is how more users are used to operating (e.g. go to gmail, go to google calendar, go to google docs) since they think of the application first.

    Initial Configuration

    In “Initial Setup — Active Directory” I show the initial setup steps that are required once Azure Active Directory or Active Directory Federation Services are deployed. 

    Note: if you do not have Azure Active Directory and do not have Active Directory Federation Services, there is still a simple method involving an Agent deployment that requires no changes to internal infrastructure.

    Other layered products may be built on or integrated into Microsoft Dynamics. An example is CRM Portals (PowerApps). These in turn might have a wider group of constituents, albeit with a more narrow role.

    The most convenient and secure method is to enable OpenID Connect. This post shows some of the details.

    For each application, a new “Authentication Client” is configured, and appropriate users & groups are given access by Role.

  • Take time to stop and sniff the mime type

    Take time to stop and sniff the mime type

    My first involvement with HTTP and web came in 1992. Challenged to create a MUSH as a means of delivering online education, the zeitgeist of the time of information and Internet came through and I built a browser and web server. I had never seen or heard of web before, the closest i had seen was Veronica and Gopher and of course Archie. Archie was access via telnet, and was kind of far from graphical.

    The HTTP 0.9 protocol was not yet known as that, and was exceptionally simple. You would telnet to port 80 on some host, type ‘GET /path‘, and it would return as-is. If you knew what to do w/ the result, you were good. Initially it was thought that only text would be used (no fonts, no css, no images), so this was fine.

    In the system I built (CALVIN, Computer-Aided Learing Vision Information Network), a C++-based fork+serve web server managed the file serving. All files were treated equally, the path you gave was the path it served. An X-Windows + Motif-based client with a simple HTML widget was the other end of this, running on a Decstation 3100. While implementing this I had an idea. Why not guess, based on the file extension, the type? This way I could handle an image and invent some sort of image-tag for HTML The img-tag had not yet been invented (and the specs, such as they were, were nowhere easy to find), I think i chose <image path> rather than <img src=path> which was later standardised.

    60063cdd content team

    So I forged ahead. I did some sort of strtok() on the file name, looked at the string after the dot, if it was jpg or gif or pnm, would render appropriately. Life was simple then. Got the project done, did the presentation, got the grade, got out. The X interface leaked memory like a sieve so the demo was short 🙂

    Fast forward to 2020. The standards evolved somewhat, and, a header called Content-Type now exists for this purpose. The server is responsible for telling the client how to interpret content. And, a well behaved client should never guess what to do based on the extension (sorry 1992 me). You see, since 1992, the web had become a less simple, less safe space. Malicious actors discovered they could send active content to be evaluated by Internet Explorer’s aggressive mime-type-guessing algorithm, and thus gain control of the desktop.

    HIstory suggests that, for each new security hole in HTTP, a new header is created. And, this flaw was no exception. Enter the X-Content-Type-Options header. In proper use, one adds:

    X-Content-Type-Options: nosniff

    to the HTTP response. The browser, on receipt, decides to listen to the server solely, and not its internal algorithm. Security achieved!

    Fast forward to today. As an experiment in magic proxy forwarding zero-trust mumbo jumbo logic, I exposed my printer to the Internet (only for authenticated users with valid roles, stop accusing me of helping the Mirai botnets out). And, to my chagrin, it didn’t really work, all pages were blank. On diging into it I find that, to my simple-minded-printer, all mime types are text/html, see below.

    curl -v http://printer/sws/util/cookie.js
    *   Trying 172.16.0.222:80...
    * TCP_NODELAY set
    * Connected to printer (172.16.0.222) port 80 (#0)
    > GET /sws/util/cookie.js HTTP/1.1
    > Host: printer
    > User-Agent: curl/7.68.0
    > Accept: */*
    > 
    * Mark bundle as not supporting multiuse
    < HTTP/1.1 200 OK
    < Connection: close
    < Content-Type: text/html
    < Content-Length: 621
    < Cache-Control: max-age=0, no-store, no-cache
    < 
    function CreateCookie(name,value,days) {
    	var expires = "";
    	if (days) {
    	var date = new Date();
    	date.setTime(date.getTime()+(days*24*60*60*1000));
    	expires = "; expires="+date.toGMTString();
    	}
    	document.cookie = name+"="+value+expires+"; path=/";
    }
    function ReadCookie(name) {
    	var nameEQ = name + "=";
    	var ca = document.cookie.split(';');
    	for(var i=0;i < ca.length;i++) {
    	var c = ca[i];
    	while (c.charAt(0)==' ') c = c.substring(1,c.length);
    	if (c.indexOf(nameEQ) == 0) return c.substring(nameEQ.length,c.length);
    	}
    	return null;
    }
    function EraseCookie(name) {
    	CreateCookie(name,"",-7);
    }

    And, the web-application-firewall exposes it with the security headers set properly. So now we get into, how to do this securely.

    Option 1, we delete the X-Content-Type-Options.

    Option 2, we remap the individual files to their mime-types.

    Option 3, we do the same mime-type-from-extension trick I did in 1992.

    Option 4, uh, don’t put the printer on the Internet.

  • The deep rabbit hole of email in cloud

    The deep rabbit hole of email in cloud

    Email. Its been around longer than most of your reading this. Its had its ups and downs in popularity as other messaging has come and gone, but remains a staple of the worlds communication. And, as a staple of communication, it has attracted a reasonable number of scammers and advertisers, phishing, etc. Up until a few years ago it was common to find open-relays, allowing anyone to spoof anything. But, anti-spam measures clamped down, and this subsided somewhat. One of those common measures is blocking port 25. And that is what we will discuss today.

    A customer came to me with a trivially simple need. “My application can only send email to my team, I need it to send (transactional) email to the world.” No problem, I got this, I’m wrangling millions of lines of open source, cloud this, api that, should be simple, right?

    Well, Google Cloud blocks port 25. And, you can’t send email (generically) without that TCP port. Hmm. Their recommended solution is to buy SendGrid/MailJet/MailGun SMTP services. I have no conceptual problem with that, but, none of them will federate their login to our domain, no 2-factor authentication. And that, my friends, I have a problem with. How can I offer a secure service to my customer if part of it is done insecurely? I would have to share the login w/ a team member in case something happened to me, if that person left the company how would I control it, etc. Its essentially writing a blank cheque against your reputation. Hmm.

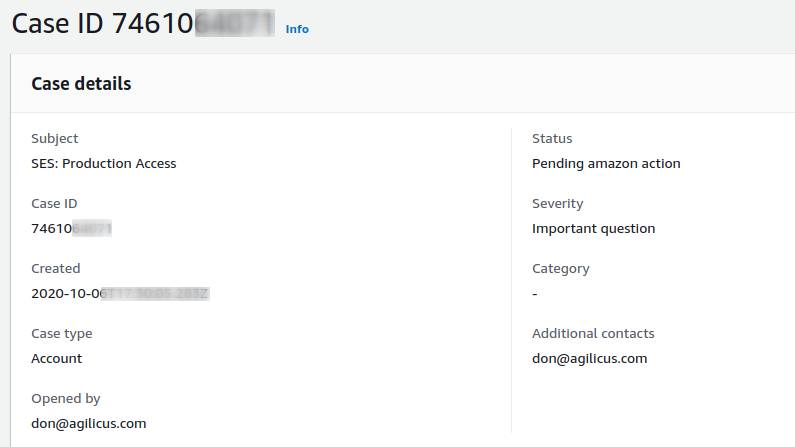
    So, as you might imagine, I took the path less travelled. Amazon has a service called SES. It purports to do what I want (verify a domain, send some email). And, I can federate the login to Amazon with my G (formerly Suite now Workspace as of this am) login. SAML SSO. This wasn’t too hard to set up, but its a bit surprising, these federated users behave differently, not showing up in the IAM, sort of hiding out on the edge with a concept called a Role. Anyway, both web interfaces opened, some XML metadata discovery documents exchanged, and we can login without a password.

    What’s this? Amazon won’t let me send email? Oh, its because they don’t know me (yet). I must open a Case and ask permission. I guess this is for the best, they don’t want someone showing up with a stolen credit card and some drive-by-spam.

    Once I have the Amazon SES setup, I will have to create an SMTP identity, something something mutual TLS transport, and something something SPIFFE SPIRE agent with Istio Service Mesh in our Kubernetes cluster, and, my customer should be happy. I’ll need them to add an SPF and DKIM record to their DNS and we’ll be good to go.

    Email. It only looks easy.

  • Delicious Dogfood: Cloud Native WordPress

    Delicious Dogfood: Cloud Native WordPress

    Agilicus upgraded our web site infrastructure, and there was only one way to go: full Cloud Native. Cloud Native means many small components, stateless, scaling in and out, resilient as a whole rather than individually. As a consequence, we made design decisions for database and storage. Let’s talk about that!

    First, WordPress. It has been around for a long time. WordPress architecture dates to an era when ‘Cloud’ meant a virtual machine at best. You ran a single WordPress instance, a single database, and the storage was tightly coupled to the WordPress. Fancy folk used a fileserver with the storage, and 2 WordPress instances with shared storage. But, you always had a few infinitely reliable and scalable components to deal with (storage, database). Very few native WordPress installs run at high scale, most instead use either headless CMS outputing static files, or front-ended by CDN’s and a double dash of hope.

    When I first started Agilicus I installed WordPress under Kubernetes (GKE), but only just. I had a cluster with non-preemptible nodes. I ran a mysql pod with a single PVC and a WordPress pod with a single PVC. Scale? Forgetaboutit. Resilience? Well, when the node went down, the web site went down.

    Clean sheet. We counsel our customers to run on our platform, why not re-imagine our web site, our front-door, our public face on the same platform? Eat the delicious dogfood!

    So, what does Dogfooding mean? It means no cheating. Remove all limitations. Make all the state scalable, cloud native. Simple single sign-on.

    The architecture of WordPress has a few complexities for a Cloud Native world:

    1. Plugins have unlimited, direct access to database and filesystem
    2. User can install plugins from web front-end
    3. Content is hybrid local-file and database
    4. Plugins modify content (e.g. scale images, compress css)
    5. Database must be Mysql, its hard coded in everywhere
    6. Login infrastructure designed for local storage in database

    OK, I got this. Let’s bring in a few tools to help. First, the database. For this we will use tidb. It presents a Mysql facade, is built on tikv which in turn is based on the Raft consensus algorithm. Raft is quite magic, and powers many Cloud Native components (etcd, cockroachdb, …). The Raft algorithm allows individual members to be unreliable, to come and go, but to have the overall set be consistent, reliable. Its bulletproof.

    To deploy tidb we will use an Operator, allowing us to scale the database up and down, upgrade it. Now we can upgrade the database without any running impact, add capacity. Brilliant!

    Now that the database is solved, in a Kubernetes, Cloud-Native way, on to the storage. This is considerably tougher, there is no Read-Write-Many storage in Google GKE. So, what can we do? I considered using Glusterfs. I’ve previously tried NFS. Terrible. Turns out there is a plugin for WordPress called wp-stateless. It causes all the images etc to be stored into Google Cloud Storage (GCS), and thus be accessible to all the other Pods (and the end user). Solved!

    Moving on, the plugin issue. For this I built my own WordPress container, it pre-installs (each time it boots) the known set of plugins. Then, it looks in the database for ones which were active, and re-installs those. Thus each time the container boots it forces the local filesystem into sync before coming online. Same approach used for the theme. Onwards!

    OK, the login. For this I wrote an OpenID Connect plugin that interacts with our Platform, bringing the roles forward. This means we have a seamless single-sign-on, secure. It logs in against accounts in our Platform which in turn are federated to upstream identity providers (G Suite in our case). Done!

    Last thing I wanted to accomplish, rather than the user see https://storage.googleapis.com/bucket/path for the images, I wanted them to be local (even though they are not). Now, we could make a CNAME and do this with Google Cloud Storage, but that doesn’t work with SSL/TLS. Since I have added our domain to the pre-load list for HSTS, we have no choice (as if I did anyway) but to use encryption. Instead, I added a simple config into our nginx, below:

    upstream assets {
        keepalive 30;
        server storage.googleapis.com:443;
    }
    location ^~ /www {
        proxy_set_header    Host storage.googleapis.com;
        proxy_pass https://assets/bucket$uri;
        proxy_http_version  1.1;
        proxy_set_header    Connection "";
        proxy_hide_header       alt-svc;
        proxy_hide_header       X-GUploader-UploadID;
        proxy_hide_header       alternate-protocol;
        proxy_hide_header       x-goog-hash;
        proxy_hide_header       x-goog-generation;
        proxy_hide_header       x-goog-metageneration;
        proxy_hide_header       x-goog-stored-content-encoding;
        proxy_hide_header       x-goog-stored-content-length;
        proxy_hide_header       x-goog-storage-class;
        proxy_hide_header       x-xss-protection;
        proxy_hide_header       accept-ranges;
        proxy_hide_header       Set-Cookie;
        proxy_ignore_headers    Set-Cookie;
    }
    

    The first block causes the nginx to know how to reach Google storage. The 2nd block, I used a prefix, /www/* is the static images from wp-stateless, and I forward them to my bucket in GCS. The proxy_hide_header are not really required, but they reduce the bandwidth to the end-user, so are helpful.

    OK, so what have we achieved? We now have WordPress, fully stateless, running under Kubernetes. We can scale them in and out, load balanced and health-checked by our Istio service mesh. We have our Identity-Aware Web Application Firewall ensuring security. We have simple single sign on. We scale the database and storage as needed, resiliently, scalably, reliably.

    All to deliver you, the people, these pithy notes. So, remember to subscribe (bell in the lower right) or via email.

  • Simplify Security: Split Identity and Authorisation with Zero Trust

    Simplify Security: Split Identity and Authorisation with Zero Trust

    Zero Trust. The key principle is, we split identity and authorisation apart. We move from a perimeter-based trust (e.g. VPN + firewall) to a user + asset-based model.

    The benefits might seem subtle, but they are transformative. We can now independently choose who we trust, what applications they can use, and what role they can have within those applications. This simple change is truly transformative. Now we can evaluate each thing in isolation. A new user? What can they do. A new app? Who can use it. We don’t need to re-evaluate all applications for each new one we launch. We don’t have a single choke-point VPN/Firewall with complicated segmentation rules. Instead we use cryptographic headers.

    One of the guiding principles of the Internet is the end-to-end principle. The end points are smart, the middle has one job: forwarding. This has proven to scale very well, going from a few academics on a few sites to billions of people using many different applications, content, etc. From 1 country to all countries. Zero trust brings the same thing to the corporate world, removing the stateful middle box of the VPN, bringing end-to-end. High scale, high security. High simplicity.

  • Web Application Security 101: Get the basics right

    Web Application Security 101: Get the basics right

    Web Application Security 101

    Web Application Security is complex to get perfect, but easy to get better than average. I have a thesis: if you have not tried to secure anything in the easy category, the security culture of your organisation suggests the more complex things won’t be done well either. One of the tools I use to assess this security 101 is the Mozilla Observatory. Sure, it doesn’t check everything, but if you have a 0 here, you likely are not putting in the effort anywhere.

    In this presentation (and video below) I talk a little bit about the “Do what I say” security concept for a web site owner. The ‘What I say’ is encoded as a set of Headers (Content-Security-Policy, XSS-*, Cross Origin Request, CAA). I show you how to go from bad to good in a small amount of effort.

    My call to action: Learn these Web Application Security 101 techniques. Apply them to a site you own or influence. Teach someone else about them. Let’s pay it forward.

  • Don’t let the browser pass you by: keep your server up to date

    Don’t let the browser pass you by: keep your server up to date

    Browsers are inhernently a consumer technology. As a result, they get updated frequently, for new features, for security. In 2018, the browser vendors agreed to drop support for TLS 1.0 and 1.1, in advance of an IETF recommendation update. In 2020 they followed through. TLS 1.2 is now the oldest version allowed (and it is 10 years old!). Encryption, like house guests and cheese, is not something you want sitting around too long.

    Recently I had a customer complain that Internet Explorer would not work on our products. I explained that it was because I cared about their security. It don’t want to recommend a nanny state, but, there is no safe way in 2020 to use Internet Explorer. No more than there is Netscape Navigator, or NCSA Mosaic. All great products in their day. Their day is in the past, put them in the Browser museum, hoist their shirt up to the rafters, whatever you do. But, don’t use encryption or banking or active content with them today.

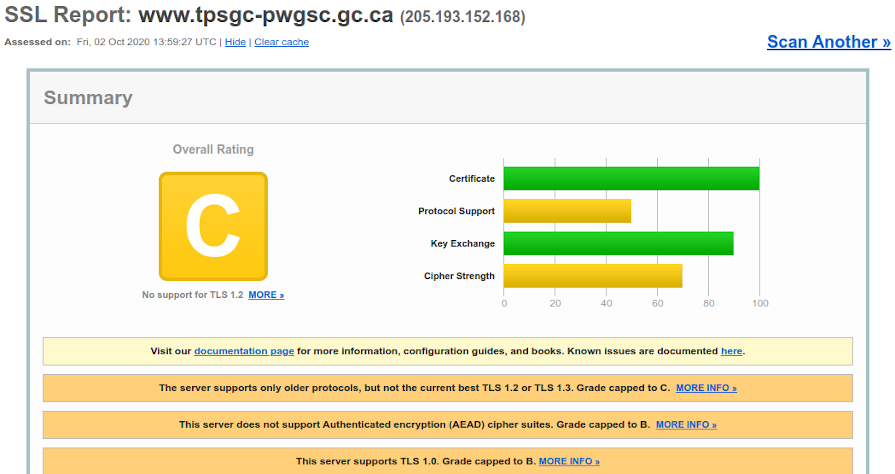
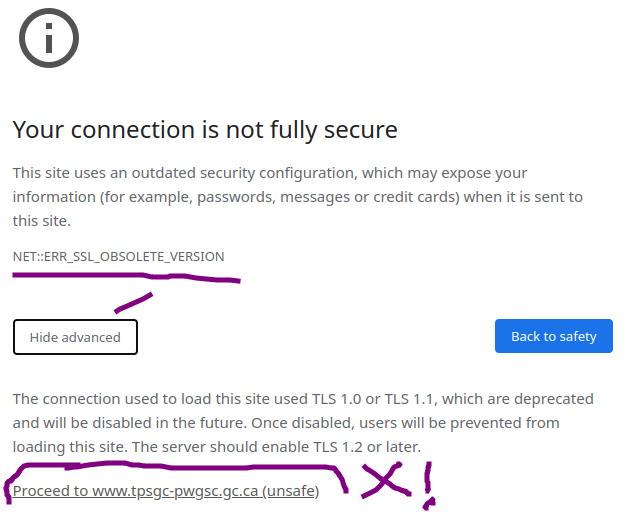
    Imagine my surprise when I was looking up something on data protection, and am unable to read the link on the Government of Canada website. They are serving it with TLS 1.0. I am unable to open this (since Chrome 86 won’t allow it). Now, I say unable, the actual error would allow me to override. Don’t. You don’t want to get in the habit of “this is very unsafe, do you want to anyway?”. Just assume that a website that has bad encryption is a rabid skunk-porcupine hybrid carrying a rusty blade. Back away.

    2ec5831e image

    As for the Government of Canada… get on this.

  • USE OF POSTMAN WITH OPENID CONNECT PKCE AND API

    USE OF POSTMAN WITH OPENID CONNECT PKCE AND API

    OAuth 2.0 (on which OpenID Connect is based) supports many flows. These are essentially different ways of using it, you will hear words like implicit flowPKCE flow, etc.

    As a web application, the gold standard is (usually) The Proof Key for Code Exchange (PKCE), specified in RFC 7636. It fixes the problem of needing a client secret (which cannot be safely shared into a web client).

    Many API’s, Agilicus’ included, use OpenAPI to specify how they function. Authentication of these is usually left out of scope, but, provided as a bearer token. This means that if you write a web application, you want to directly use the RESTful API’s, and you do so by first authenticating via OpenID Connect PKCE flow and remembering the access token.

    As a developer, you may use a tool like Postman, which allows you to interactively experiment with the API. Recently (as of v7.23.0, aka Canary) they have added this support. Let’s try.

    First, we install the Postman (v7.23.0 or later).

    Second, we get the OpenAPI Specification. Agilicus has this linked on the top right of our website as API. We select Get New Access Token.

    Now we we have a dialog popup. Postman has not implemented the discovery mechanism, so let’s take a look in another window how to find the answers. We’ll need callbackauthorization_endpointtoken_endpointclient IDscopes. Your auth endpoint in this curl will vary as your top-level domain. The callback in Postman terminology is the redirect URI, use urn:ietf:wg:oauth:2.0:oob.

    $ curl https://auth.cloud.egov.city/.well-known/openid-configuration
    {
      "issuer": "https://auth.cloud.egov.city/",
      "callback": "https://auth.ca-1.agilicus.ca/egov/",
      "authorization_endpoint": "https://auth.cloud.egov.city/auth",
      "token_endpoint": "https://auth.cloud.egov.city/token",
      "jwks_uri": "https://auth.cloud.egov.city/keys",
      "userinfo_endpoint": "https://auth.cloud.egov.city/userinfo",
      "revocation_endpoint": "https://auth.cloud.egov.city/token/revoke",
      "response_types_supported": [
        "code",
        "id_token",
        "token"
      ],
      "subject_types_supported": [
        "public"
      ],
      "id_token_signing_alg_values_supported": [
        "RS256"
      ],
      "scopes_supported": [
        "openid",
        "email",
        "groups",
        "profile",
        "offline_access"
      ],
      "token_endpoint_auth_methods_supported": [
        "client_secret_basic"
      ],
      "claims_supported": [
        "aud",
        "email",
        "email_verified",
        "exp",
        "iat",
        "iss",
        "locale",
        "name",
        "sub"
      ]
    }
  • Zero Trust: Connecting The Digitally Disconnected

    Zero Trust: Connecting The Digitally Disconnected

    OVERVIEW

    Your organisation has cascading sets of people it interacts with. In the core, there are full-time employees. They have badges, access cards, accounts, organisationally-issued hardware. They use the IT-managed hardware and software to achieve their job, including a VPN to access services remotely. You create IT-managed identities, often in systems like Google G Suite or Microsoft Active Directory.

    The next tranche of team members are contractors. Indeed, these users you might treat most no differently than the full-time staff. But some contractors are in specific job roles which do not require them to have IT-managed hardware or accounts. They may be specialists who work outside the building. These users might have no corporately-managed identity. Examples might include Transit drivers, Janitorial services.

    After these people we have team members that are even more digitally-disconnected. Seasonal temporary workers. Temporary consultants. Workers from affiliated but arms-length organisations. In a Municipal environment these could include lifeguards for the pool, workers with the Library system, or local Social Services providers.

    Traditionally these other tiers of users were ignored from an IT standpoint. Paystubs were delivered on paper, policies were posted on a bulletin board. Some organisations would use shared-accounts on Kiosk (shared) computers for online learning management systems.

    Covid-19 has accelerated the thinking around these users. How can we furlough users, tell them to “check the Intranet” for details on what has changed/when they can come back to work if they have no access to the Intranet? How can we ask them to use a mail-drop for their pay stubs or timesheets if we are asking them not to come in the building?

    Identity management (Authentication) and role-management (Authorisation) are the two key disciplines we need to improve if we are to solve the issue of connecting the digitally disenfranchised.

    Zero Trust Architecture

    A Zero Trust architecture allows us to have seamless access to any resource, from any device, for any user, from any network. And, does it more securely. Zero Trust splits the User Identity from the User Authorisation. It moves from a perimeter-based security practice to a fine-grained user & resource control.

    Zero Trust (as defined by NIST SP 800-207) is a term for evolving cybersecurity from static network perimeter-based security (e.g. VPN) to an architecture that focuses on the user(identity) and the resource(authorisation).

    The core requirements:

    1. Simple, secure, Identity. Make it trivial for you users to login with a single username/password, single-sign-on, multi-factor authentication.
    2. Decouple authorisation from Identity and from each Application.

    Once these are achieved you can simply, securely, move access to individual systems to the users who need them. Those digitally disenfranchised users can access that corporate Intranet, including if their employment has been suspended, including if they have no corporate email address, device, VPN.

    Evolving beyond the VPN

    For many years the VPN was the gold standard of remote security. You kept your inside network isolated except for a few users with curated software on managed devices.

    The VPN has a large cost. Managing the client software. It’s a stateful device, it does not scale well as we add users. It doesn’t behave well with foreign network firewalls. But, and most importantly in 2020, it nearly completely breaks remote collaboration tools. A VPN forces all traffic through the corporate network. So your video conferencing flows from your home to your company, and then back out to the Internet to the other people. In this model the corporate network becomes a choke-point: rather than scaling as you add staff, your performance drops off, the productivity goes down. Work from home has accelerated this problem.

    The VPN also was masquerading as a secure solution. Years ago every server had a well-known port and IP. VPN rules, in conjunction with a firewall, were written to try and segment, isolate all pairwise communication. Now that users are remote, mobile, we cannot know their IP. Some services have moved to SaaS and cloud, the IP is unknowable. Many organisations now have little or no network segmentation. The VPN has become a giant on-off switch rather than a precision allow/deny method. Once you VPN in, you are infinitely trusted, the opposite of zero-trust.

    Zero Trust provides a means for each connection to assert who its from, and to what it is going, with what requirements. This can be policed in a very fine grained fashion without the bandwidth or security challenges of the VPN. Treat each application as if it were on the public Internet, then secure it, no VPN is needed.

    Identity Evolved, Multi-Factor Authentication Simplified

    Identity is core to a person. They are the same person whether they use USER@gmail or USER@corp to identify themself. A core method of simply demonstrating identity is OpenID Connect. This secure, web-based protocol works with all devices. It is simple enough for the average consumer to use. You often see it as “Login with Google” or “Login with Facebook”.

    In conjunction with OpenID Connect, we propose federating multiple sources of Identity. These can include affiliated organisations (the Library, the Police), or social providers (Google, Facebook, Twitter).

    To confirm identity we propose ubiquitous, simple, multi-factor authentication. In a corporate world these are often done with RSA SecureID fobs, or USB Universal 2nd Factor devices like YubiKey or Google Titan.

    In this newly expanded Identity world these become expensive and complex. We propose instead using a device that all users have easy access to: their mobile phone.

    A mobile phone can support Web Push: the user will receive a push notification on their registered device “Is this you trying to login”. It can support Authenticator Apps (Twilio’s Authy, Google Authenticator, Microsoft Authenticator, etc) with QR-codes and PIN numbers. But, more interestingly, with the WebAuthN standard, it supports biometrics. This allows users to login securely, simply, with a fingerprint or face blink, in conjunction with the device they registered.

    To reduce or eliminate the provisioning cost we propose Trust-On-First-Use: the user is challenged to set up their multi-factor authentication the first time they login. This reduces risk, increases security, without increasing cost.

    Multi-factor, something you know with something you have, achieved, for no cost. Simple enough for a consumer. Strong enough for the corporation.

    Identity-Aware Web Application Firewall

    Each application has an intrinsic set of roles (admin, teacher, student, …). Adding a web-application firewall in front means we can police this access, using the identity of the user in conjunction with the identity of the application. Without configuring a complex Layer-3&4 firewall. Without introducing a VPN.

    The Web Application Firewall will then increase the security of the application by reducing common risks such as Cross-Site-Scripting, SQL Injection. The end result is more secure than the previous corporate-firewall-vpn-enclave. And simpler.

    Recommendation

    Every organisation has more users than they would believe who they need to securely interact with. It is uneconomical to treat them all as full time employees.

    Using a Zero Trust architecture, securely solving Identity including 3rd party Identity providers federated in, with simple, secure multi-factor authentication, and adding an external Identity-Aware Web Application Firewall can break the log jam.

    Make any application available to any user on any device, on any network today. Without a VPN. And increase your security while doing so.

  • Ding Dong: The VPN is dead. Split Identity and Authorisation to Simplify Security

    Ding Dong: The VPN is dead. Split Identity and Authorisation to Simplify Security

    This was a webinar I (almost due to technical difficulties) gave this week as part of MISA Ontario’s Webinar series.

    In it I cover a philosophy that allows you to reduce cost, increase security, and increase user engagement and satisfaction. All 3 at once. Sounds crazy?

    First I will convince you that:

    In 2020, I will
    Work on the device of my choice
    At the location of my choice
    Without $*@#$ VPN and password
    As a first class citizen
    regardless of my employment status

    Then I will convince you that Identity Management is a single system, not distributed, and, that Authorisation is separate.

    Next I will convince you that Ding Dong, the VPN is dead!

    I’ll then show you how you can make each user (regardless of how you are affiliated with them: contractor, temp, citizen, …) able to directly use each application (HR, training, recreation booking, library hours, …) without a VPN, without cost, without complaint.

    Don’t believe me? Change my mind! Video below, please feel free to subscribe to the YouTube channel, and then email me or add a comment with the good, the bad, the ugly.

  • Finding your Google ID and reclaiming your Gitlab account

    Finding your Google ID and reclaiming your Gitlab account

    At Agilicus we use OpenID Connect, Single Identity for everything, federated off of our G Suite. And, we also use Gitlab, locked to the same ID. Today I had the situation where a person returned, we had deleted their G Suite (Google) account. So, re-create the Google account, many tools locked onto the user name and were good. But gitlab has an extra link, the Google Account ID (from the ID Token).

    So, here is the solution, for posterity. And by posterity I mean you gentle reader.

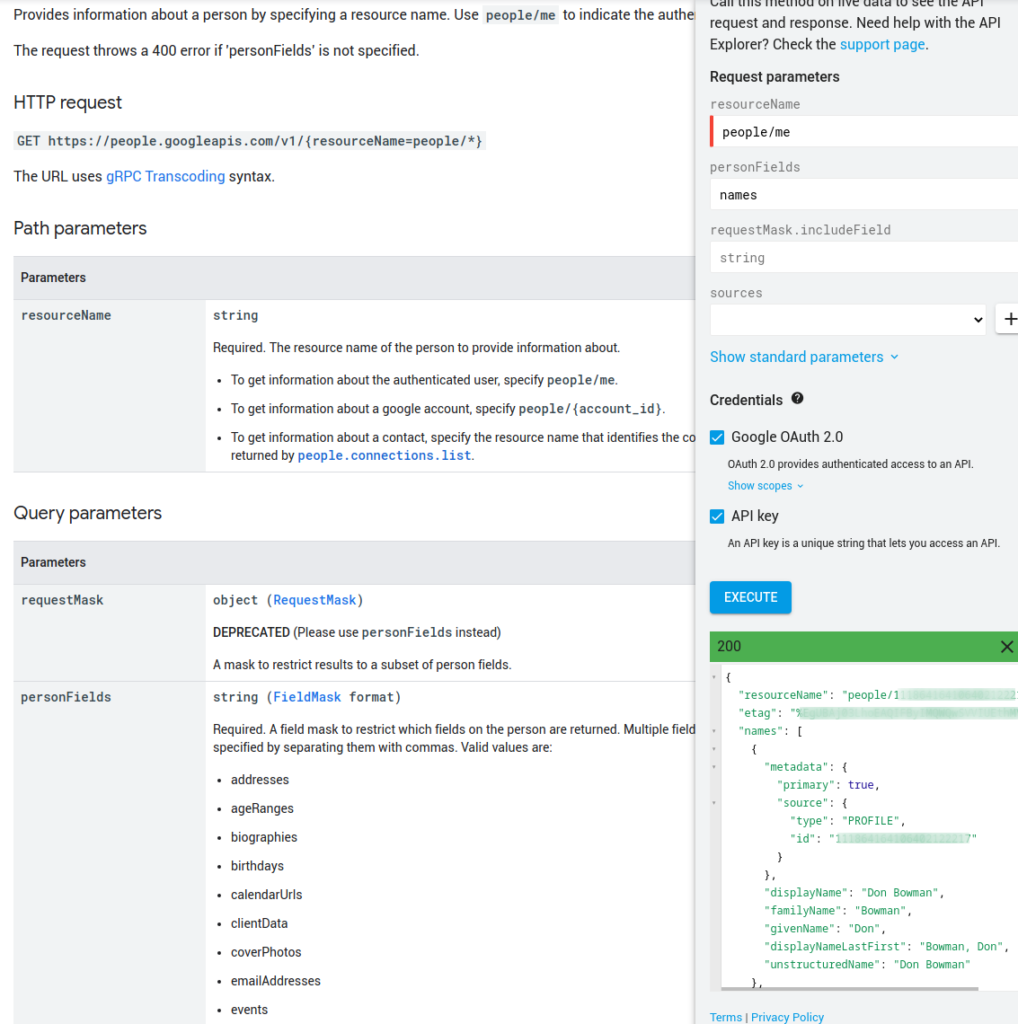
    Go to https://developers.google.com/people/api/rest/v1/people/get.

    Enter ‘people/me’ in the resourceName. Enter ‘names’ in personFields. Execute. Now, you will see a dialog asking if you want to grant permission to run this API. After accepting, you will see your ID, as below. This is your Google Account ID.

    Now, go to Gitlab. On the user, in the identities, add a google_oauth2 identity, and paste this ID (if you have one, change it). Now your user will be happy.

  • Email Strict Transport Security: Our First Report

    Email Strict Transport Security: Our First Report

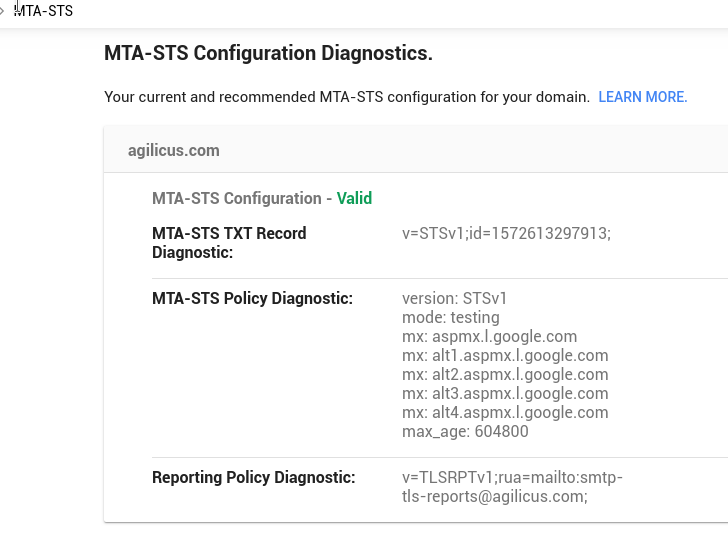
    In EMAIL STRICT TRANSPORT SECURITY WITH MTA-STS I wrote about the challenges of setting up Email Strict Transport Security (MTA-STS). Here at Agilicus we believe in encryption for all, so much so that we’ve placed our domains in the browser preload lists. But, that left a hole in good old SMTP, which I resolved with that setup using a new pod on Kubernetes to act as the server/agent.

    Today we received our first report, from Microsoft, showing that yes it is working. Good to know!

    {"organization-name":"Microsoft Corporation","date-range":{"start-datetime":"2020-08-25T00:00:00Z","end-datetime":"2020-08-25T23:59:59Z"},"contact-info":"tlsrpt-noreply@microsoft.com","report-id":"XXXX+agilicus.com","policies":[{"policy":{"policy-type":"sts","policy-string":["version:STSv1","mode:testing","mx:aspmx.l.google.com","mx:alt1.aspmx.l.google.com","mx:alt2.aspmx.l.google.com","mx:alt3.aspmx.l.google.com","mx:alt4.aspmx.l.google.com","max_age:604800"]},"summary":{"total-successful-session-count":2,"total-failure-session-count":0}}]}

  • Zero Trust Architecture: Published by NIST

    Zero Trust Architecture: Published by NIST

    Zero Trust. The general premise is you move from perimeter-based security to focusing on the user and the resource, forcing them to prove their identity to each other on each connection. Gone are the days of the VPN as a big giant switch moving you from infinitely untrusted to infinitely trusted.

    It sounds very esoteric and “Not for me”. But it is for you. If you have recently been working from home, and, if your company has a VPN, you know how bad that can be. Yesterday, for example, I had a standard video conference call (Google Meet) with a company. All 3 attendees were unable to join. The reason? They run a corporate VPN, this means that 100% of traffic flows from their house into the company. In turn, the company filters out all the nasty content (YouTube being the culprit here). So, when the VPN is connected, their Internet is broken.

    Do you wish you could use the device of your choice, wherever you were, and just have to prove who you were? You can for all your personal activities (your bank, your email), so why not your corporate?

    Well, the good folks at the US National Insititude of Standards agree. And they have published this architecture guide to help you on your implementation. https://nvlpubs.nist.gov/nistpubs/SpecialPublications/NIST.SP.800-207.pdf

    You know what’s even simpler than reading that? Call me. I’ll make it happen for you.

  • Brand Indicator Achievement unlocked: BIMI and you

    Brand Indicator Achievement unlocked: BIMI and you

    Brand-spoofing is the corporate equivalent of identity theft. No company wants consumers receiving messages purporting to be from them. No Microsoft/Google/Bill Gates/… are not giving out money, but, their logo looks so convincing in the email. If only we could ensure the logo is used correctly, have some sort of brand digital signature.

    Well, the Brand Indicators for Message Identification (BIMI) group set out to do this. I’ll paste their key value propositions below rather than paraphrase, but, tldr: its to make emails with logos more trustworthy. Having just enabled this for our domain, I can say it was easy. How much it will be worth to me in the long run? Not sure, but, why not enable?

    Key Value Propositions for Brands/Email Senders

    • Leverage the investment in your DMARC enforcement project to increase the value of your brand by displaying logos to your customers.
    • Automatically manage your logos ensuring the correct one is displayed

    Value prop for MBP/ What’s in it for the Mailbox Providers

    • Increased DMARC adoption means less risk to your users
    • Enhances the User Experience
    • Eliminates proprietary logo management programs or shoe-horned solutions

    Now this is on the esoteric end of security. Which means I’m all over it! So, why not head to the generator to build your own BIMI record. You will need your domain-name and your logo in Tiny SVG 1.2 format. It generates a simple DNS TXT record, something like:

    default._bimi IN TXT "v=BIMI1; l=https://www.agilicus.com/www/logo.svg"

  • Static Application Scanning Angular: Resolving lodash npm audit

    Static Application Scanning Angular: Resolving lodash npm audit

    Static Application Scanning (SAST) is the principle of looking for well-known security issues at compile time. it spans tools that look for common coding errors (super lints), tools that are dictionary-based (e.g. looking up CVE), and looking for well-known configuration errors.

    Our practice with SAST is to run it in our CI pipeline on build. This can sometimes be a bit irritating since the build will suddenly fail due to a newly-found error. But, its better than shipping that problem to our customers.

    So, lets give this a try with Angular 10. Brand shiny new.

    $ ng new --defaults npm-audit-angular
    $ cd npm-audit-angular
    $ npm ci
    $ npm audit
    ┌───────────────┬──────────────────────────────────────────────────────────────┐
    │ Low           │ Prototype Pollution                                          │
    ├───────────────┼──────────────────────────────────────────────────────────────┤
    │ Package       │ lodash                                                       │
    ├───────────────┼──────────────────────────────────────────────────────────────┤
    │ Patched in    │ No patch available                                           │
    ├───────────────┼──────────────────────────────────────────────────────────────┤
    │ Dependency of │ @angular/cli [dev]                                           │
    ├───────────────┼──────────────────────────────────────────────────────────────┤
    │ Path          │ @angular/cli > inquirer > lodash                             │
    ├───────────────┼──────────────────────────────────────────────────────────────┤
    │ More info     │ https://npmjs.com/advisories/1523                            │
    └───────────────┴──────────────────────────────────────────────────────────────┘
    ...
    found 281 low severity vulnerabilities in 1465 scanned packages
      281 vulnerabilities require manual review. See the full report for details.

    OK, that’s not good, we have 281 issues and we haven’t even started! Worse, at this writing, there is no fix (https://github.com/lodash/lodash/pull/4759 has been merged tho).

    So, the technique we can use… eyeball the error and assess whether we want to block our release. If we don’t, we can use better-npm-audit:

    $ npm install --save-dev better-npm-audit
    # edit package.json, insert audit script:
    {
      "name": "npm-audit-angular",
      "version": "0.0.0",
      "scripts": {
     ...
        "e2e": "ng e2e",
        "audit": "node node_modules/better-npm-audit audit -i 1523"
      },
    $ npm run audit

    So now we can run audit, we have (temporarily) ignored 1523, pending a new release. Now, once the new release comes up, we will run into the second problem: some packages we rely on will still pin to the unfixed version. So then we will use npm-force-resolutions.

  • Trust You? I Just Met You! How Trust-On-First-Use Can Increase Your Security

    Multi-Factor Authentication. You know you need it. But you find the cost of rolling it out is too high. Specifically, the operational cost of enrolling those 2nd-factor devices, assigning them to users, resetting them when forgotten, etc. So you do nothing and do not reap the benefits. Is there an alternative?

    Yes. We can instead employ a trade-off in security and cost called Trust On First Use. Imagine, a user is sent an email “Your account now has 2-Factor Authentication enabled. On your next login you will be forced to enroll”. We can reduce the risk by reducing the time window. Instead, that email might say “You must login in the next 24-hours and enroll”.

    So the tradeoff here is simple. We know multi-factor authentication dramatically reduces risk, permanently. And, we are trading off the risk that a bad actor is able to guess a password and log in during this time window. But, if they do, the person who’s account they are masquerading will discover (since they can no longer log in since they don’t have the 2nd factor).

    This can work for any type of 2nd-factor. It can be a software application (Time-based One-Time Password, TOTP, like Authy, Google Authenticator, etc). It can be a Universal 2-Factor U2F device (like a YubiKey, Google Titan). It can be a push-technology (Web Push Notification, SMS, a Messenger). The key here, the user is presumed trusted the first time (for some time window). They self-enroll. This skips the steps of the IT team having to manage enrollment.

    When your organisation rolls out Multi-Factor, they systematically reduce risk. The Trust-On-First-Use itself is not higher risk than not using multi-factor. Use this approach to get MFA rolled out today.

    Trust-On-First-Use is not appropriate for encryption (where a MITM attack can render it pointless), but I feel it works well for authentication of a person where you already have a single-factor, and, your alternative is to continue to have only a single factor.

    Every one of your users has a mobile device (trust me). All mobile devices support Web Push Notifications. You can use this, their browser, their device, as your 2nd factor. It costs you nothing, the convenience for the user is high.

  • Cross-Origin-Request-Sharing and You

    Cross-Origin-Request-Sharing and You

    Web applications used to be written as monoliths, the server and client intermingled. ASP.NET, PHP were typical of the type. There was no firm API between the presentation layer and backend. They were updated together. Gradually abstractions came in like Model View Controller, but the monolith remained.

    More recently people have started writing applications where the browser is a richer first class citizen. Platforms like Angular, React are typical of the type. As these became popular the older ‘Form/Submit’ model gave way to the Single Page Application. The browser gained the logic to make it richer, more reactive to the user, and, the backend shrunk to being a mere data gateway.

    And then we had an epiphany: why make any dedicated backend at all? Instead, have each application, running in the Browser, directly access a set of RESTful API’s. Great. Now we can evolve microservices without worrying about presentation. We can evolve presentation without worrying about data. And life was good.

    But, like all good things in life, risks became real and crooks became rich. Flaws were found. And, like all such things, standards emerged to codify and solidify best practices. And, for the direct-consuming-api-application, we invented Cross-Origin Resource Sharing (called CORS).

    CORS is a mechanism that uses additional HTTP headers to instruct the browser (and thus the web application) what ORIGIN(s) it may use, and how to access resources from a different ORIGIN. This is important since, once we broke up the monolith, the application is now fetched from a different ORIGIN than the data. We want to protect against evil JavaScript posting the secrets home to a command-and-control server. We want to allow the good application to fetch your profile. And CORS is how we do that.

    Once upon a time the same-origin policy was sufficient: where you came from was where you could talk. Now we need more.

    The first thing to be aware of is there is a new flow (called pre-flight), which uses an HTTP OPTIONS request. When your application (and thus your browser) first wants to use some new API it does a pre-flight check. If this fails, it assumes it is because of CORS, and logs this (but no more details). JavaScript is unable to tell why this failed so that it cannot fall back to other methods.

    Now, CORS is very complicated to get right. You can indicate if authentication is allowed (to prevent credentials from being leaked), you can indicate who can talk where. As a consequence there is fixed set of headers which are sent for CORS, and yours may not be in the list! A server must manually indicate if it wishes to allow authentication (or any header other than the standard set).

    Unlike its cousin the Content-Security-Policy, CORS is very simplistic in hosts. You get 1 or all. So you can say “example.com” or “*”. This can be challenging if you want a small set of origins to use your API. And by challenging I mean “write some complex logic on your server out scope of this presentation”.

    Do you need this? If you write an API you must implement CORS, you have no choice. Make it so!

    If you want to see how to use the Vary: Origin header to allow two applications in the same browser to work against the same API backend, see this post.

  • CORS’ing the complexity: idempotent and caching meets Vary: Origin for CORS

    CORS’ing the complexity: idempotent and caching meets Vary: Origin for CORS

    So I spent a bit of time debugging something this am, and I thought I would share. Its super detailed, so feel free to gloss over.

    There is a class of browser-security issues addressed by CORS. They are meant to prevent inadvertent (or malicious) cross-origin resource sharing. E.g. some javascript in your current web page posts a password.

    I am using Istio. It magically takes the CORS origin and rewrites it. So if you do a:

    GET /
    Origin: foo

    then it will respond:

    200 OK
    Access-Control-Allow-Origin: *

    *if* its configured for ‘*’ policy.

    Now, the problem is, I have two clients that are using OpenID Connect. They are fetching the keys for jwks validation. They run in the same browser. One of them does:

    GET /keys
    Origin: app-1
    

    the other does

    GET /keys
    Origin: app-2
    

    Unfortunately, the browser *caches* the 2nd response, returning the response app-1 got (with the wrong Access-Control-Allow-Origin) in it.

    Why? Well, let’s dive into some specs. Here we find the answer.

    If CORS protocol requirements are more complicated than setting `Access-Control-Allow-Origin` to * or a static origin, `Vary` is to be used. [HTML] [HTTP] [HTTP-SEMANTICS] [HTTP-COND] [HTTP-CACHING] [HTTP-AUTH]

    Huh. I’m supposed to add a ‘Vary’ header to these. But, sadly, I am not in control of these applications. What is one to do? RTFC for envoy?

  • The False Choice of Risk Versus Reach

    The False Choice of Risk Versus Reach

    Scroll to the bottom for the video covering this topic.

    Security features are often disabled because of interactions with older devices and software. There is a relationship between the cost of upgrading those devices and the cost associated with the risk you cannot mitigate without. Many view this risk as linear. If we draw a graph with risk on the left, and number of users on the bottom, we might think the graph looks like this. As we increase the users addressed, we are forced to reduce security to accommodate their older devices.

    However, this is a false view. In reality there is an 80:20 rule for most things, here no exception. Recognising that 80% of our users will be using Chrome or Firefox, and, that most of these will be on the last 1 or 2 versions, we can re-draw our graph. We can see that for a constant risk, we can reach the majority of our users. From here the risk grows more rapidly than the number of users reached since we are forced to start disabling features for ever increasingly small groups. Worse, those risks affect both groups (ones with new, and ones with old, software).

    This brings up the question, what is really on the table for any change, and, can we make it in strictly economic terms? If we can price the risk, put it in terms of $, it is easier to see, perhaps it is cheaper to upgrade old devices.

    Consider a hypothetical organisation. It has invested in the past in smart TV for the meeting rooms. These smart TV are no longer upgradable and only support TLS 1.0 with RC4. This causes the organisation to leave these older security standards enabled on its corporate services, increasing the risk for all users, all devices. Which would cost more? $1000/smart TV, or, a breach in data and the associated reputational damage?

    I would like to challenge another assumption, that this curve is linear to begin with. I suggest it’s more Z-shaped, and, that if we could truly assess it, we would design our process and procedures around the 2nd knee in the curve here. Anything passed it, those devices are not worth the risk of reaching.

    I gave one example above (TLS version), but there are many such design choices (upgrade of client-software, upgrade of upstream libraries such as jQuery, enabling 2-factor authentication, etc).

    Now, you may think this concept of expressing risk in $, and user-reach in $ to be abstract. But I assure you it’s real. It allows you to compare two things that are fungible, to decide where to best spend to obtain the maximal risk:reward ratio.

    Let’s try an example. Let’s open https://ssllabs.com/ssltest in another tab. Now, on the right hand side, let’s select one of the Recent Worst (or a Recent Best that is less than an A). Feel free to test your own site of course. If we scroll down, we will see the Handshake Simulation and the various client versions. The one I picked was www.surugabank.co.jp. As you can see, it received an F. Is this because of a desire to support old devices? Its doubtful, it seems this bank just doesn’t care.

    So let’s maybe select something with a bit higher score. For this I chose licensemanager.sonicwall.com. Here we can see that older protocols are indeed in use, albeit set up correctly. RC4, Weak Diffie-Hellman, TLS 1.0

    If we scroll down to the Handshake Simulation, we can see the reason. Many old devices are supported, and some force the use of weak parameters.

  • Secure the Cookie!

    Secure the Cookie!

    Cookies are a method by which a web server can convince a web client to remember, and return, some information. It’s technically a violation of the web since the HTTP protocol is intended to be idempotent. Some also consider it a violation of privacy.

    However, in this video we are not going to take a position on the good/bad/ugly of cookies. Instead we are going to focus on how to use them securely.

    First, let’s understand how long it will live. Cookies have a `expires` and `max-age` attribute. If you set either of these (to some time in the future), the cookie will survive a browser restart (a persistent cookie). If you don’t set it, it becomes a session cookie.

    So, we’ve just learned our first lesson: the more sensitive the data, the shorter the expiry should be to limit the damage.

    Second, let’s learn about the `secure` flag. How great is it to make security be a Boolean! Well, it’s not that great here. The Secure flag means ‘do not send unencrypted’ (in practise, only send over HTTPS). So we’ve learned our second lesson: always use Secure. No excuses!

    Third, let’s talk about the httpOnly flag. Well this is a weird one, its all HTTP right? Well, it turns out they mean more HTML-only. If httpOnly is set, we cannot read the cookie from JavaScript. You want this, it prevents Cross-Site-Scripting (XSS) type attacks where rogue JavaScript snoops around. If you have JavaScript that needs to read cookies, maybe try and solve that. Now, the httpOnly flag is not an absolute, there is a type of attack called Cross-Site-Tracing (XST). Purists will tell you to disable the TRACE method on your web server.

    Not content w/ httpOnly and Secure, the cookie committee created the SameSite flag.  Sometimes called First-Party cookies it allows a server to reduce the impact of a Cross-Site Request Forgery (CSRF) attack by forcing a cookie to only be sent with requests from the same domain. Not universally implemented, somewhat newer, support is still strong. Do your best to set this to ‘strict’. If you find that your POST fail, and you cannot fix your application, have a long discussion with yourself about `lax`.

    OK, that must be it, right. Wait, there’s more? The HostOnly flag specifies if a cookie can be used on subdomains. If you are doing single-sign-on across multiple sites, you want this set to the domain. For individual web applications, you likely want the domain field blank. A cookie with a domain attribute controls where it will be sent.

    Seem complex? Just do this:

    • Don’t use cookies unless you must
    • Don’t set expiry, or use a very short one
    • Use httpOnly always
    • Use Secure always
    • Use SameSite strict unless you can’t
    • Leave domain empty unless used for single sign on

    If you want to see an example of how you could use Lua OpenResty, a Web Application Firewall, to add some after-the-fact-security, have a look below!

    local headers = ngx.req.get_headers()
    if headers["x-forwarded-proto"] == "https" then
      local ck = require "resty.cookie"
      local cookie, err = ck:new()
      local fields, err = cookie:get_all()
      if fields then
        for k, v in pairs(fields) do 
          local ok, err = cookie:set({ 
            key = k, 
            value = v, 
            path = "/", 
            httponly = true, 
            secure = true, 
            samesite = "Strict" }) 
        end
      end
    end
  • The browser was the accomplice

    The browser was the accomplice

    Ebay has recently been in the press recently for port-scanning your home. It turns out they have implemented a device finger-printing and tracking tool called ThreatMetrix. This is intriguing because it means they are fingerprinting not just your browser, but also the rest of your OS (and theoretically your home). The rationale appears to be fraud dection (and the tool is from LexisNexis).

    But this got me thinking. A few years ago DNS Changers were all the rage as malware. These were little snippets of JavaScript that guessed you were too lazy to have changed the password on your home router. So they would do an HTTP post there, from your own browser, and try to change the name server, thus trapping all your traffic. I wonder what else lurks around that is protected only by the obscurity of running on your own desktop?

    It turns out lots of things. Its very common for developers to run Container Registries, random containers, tools, etc., and have no password on them. They are bound to ‘localhost only’ for security. I bet your mysql or postgtres or mongodb server is like that right now.

    The one that got most of my attention was SyncThing. Its a great tool to synchronise multiple machines together. And, its kind of magic, you just open http://localhost:8384/ and you are in and able to configure. Now, this is secure since of course its only available to you on your machine, right?

    But, now that we see that the browser is capable of treating it no differently than any other website, we worry. The firewall does nothing. What if I am enticed to click on something bad? What if some web site I use has an upstream <script> tag to a CDN that gets compromised? What if a malicious ad happens?

    Well, it would be bad. They could add a new endpoint to SyncThing and scoop up all your data there, in real time, always.

    Tinfoil hat here I come.

    Can I fix this with Cross-Origin-Request-Scripting (CORS)? No, that is just the destination. With the XSS headers? No, same reason.

    I guess maybe the site could create a cookie, set to httpOnly, and, if not present, refuse to talk. Turns out there is a technique, called CSRF, and some applications (including my worry here, SyncThing) have a header called X-CSRF-Token- for this purpose. Does everything on your network have this? Do they implement it properly? Can it be guessed? Is it not httpOnly? Hmm. Looking into SyncThing, it won’t fix the problem, it doesn’t use httpOnly, it does this:

    Set-Cookie: CSRF-Token-OFKBD=UWdyJsExyfFbC...

    So, better get a password.

    or better yet, get no password and use OpenID Connect.

  • Zero Trust and the NTT Hack

    Zero Trust and the NTT Hack

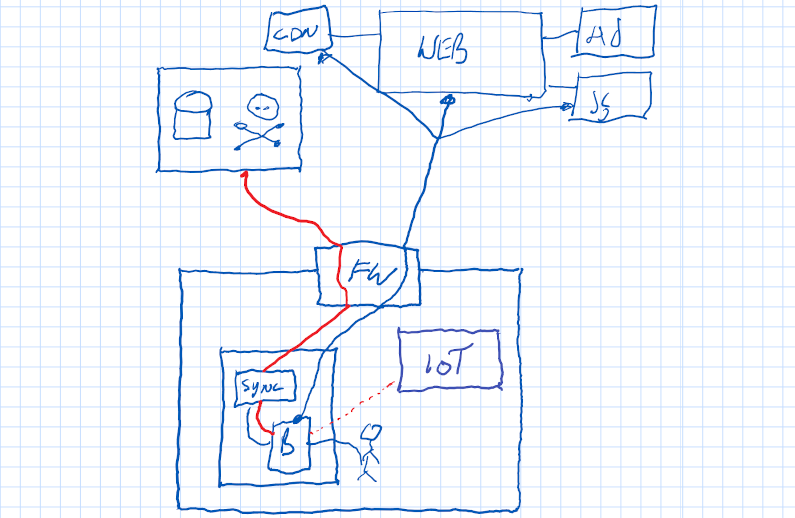
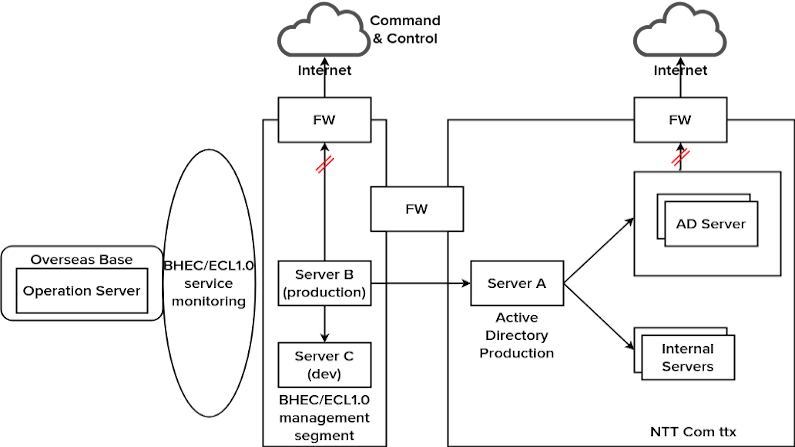
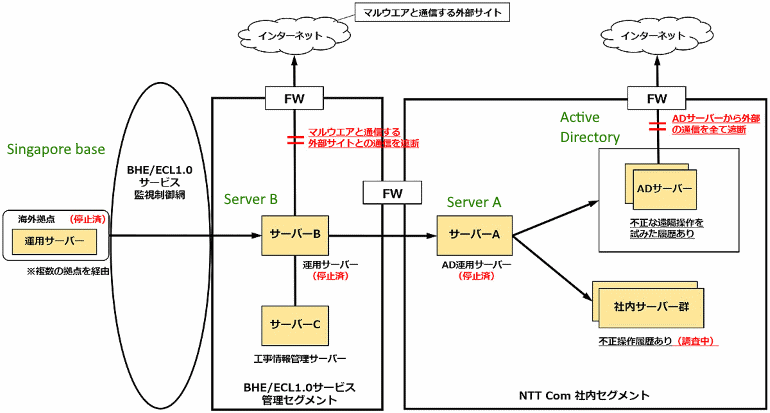
    The Japanese communications giant NTT disclosed they had been breached. I’ve taken the liberty of translating their diagram (above), with their original below.

    You can see what happened, some malware wiggled in to a development server on a remote network. It then wandered into the production Active Directory server in the main network. It was able to do this because firewalls are actually very trusting, typically just allowing all internal traffic.

    If we operated a Zero-Trust model, we would treat all of these servers as if they were on the public Internet. We would have re-thought the use of a firewall, and, instead, used identity-based connection management. It is not a panacea, it doesn’t fix everything. But it really helps lower collateral damage through east-west traversal.

  • Fixing the case of the Implicit Flow modification

    Fixing the case of the Implicit Flow modification

    Last year I met this web application. Let’s call it Hank. Hank was pretty, but not that smart. In particular, Hank was very prone to trusting what user’s told it. Earlier we learned about how Hank would just trust what a user entered, and then later use that against others. But that is not what we are talking about today. Today we are talking about how Hank would let a user modify some data and become an administrator.

    You see, the browser is a funny world. It tries very hard to protect its user from the threats that lurk on the web. But, it’s also not very trustworthy itself. Any user can modify data in it. You can’t have secrets, you can’t trust fields. You can’t have some variable ‘admin=true’ and expect the user to just behave.

    In Hank’s case it used a login method called OpenID Connect. Yes the very same one I’m a big fan of. But, Hank skipped some classes and used the Implicit Flow instead of the PKCE flow. Bad Hank. This would be fine if Hank just used the authentication and passed the token as-is to the back-end, but, Hank used some fields in the ID Token to indicate role (e.g. admin vs end-user). Worse, Hank’s back-end used the same fields but did not validate the ID Token. So a user could login, modify the resulting info, and pass it back to the back-end and become an admin. Naughty Hank!

    Now the correct solution here is sometimes called the 3-legged flow. In this model, the front end (the browser), sets up and finishes the login flow, but, the last step is it shares a code w/ the back-end which then goes and fetches from the authentication and retrieves the token. In this model we have a protected code base and can have secrets, we would often cipher the result and make a session cookie, making it impossible to modify in the front-end.
    So, how would you solve this? Send Hank in for some code surgery? That would be the best. But what if you don’t have the time or money? Can you let Hank loose on the Internet?

    Sure you can! The fix was complex, but, in the Web Application Firewall we intercepted the response to the back-end that had the fields in it that were prone to modification. Using the Access Token that Hank supplied, we then went and fetched the real values (in this example the user role), overwriting what the user supplied. We then ciphered with something the user doesn’t have access to (since its in the back-end), and returned it as a cookie. Later, on other requests, we would translate it back for the back-end.

    Fully transparent, fully secure. Now that you’ve read the story of Hank, I hope that you will read your OpenID Code Flows and look closely at PKCE or 3-legged. Don’t allow critical information to be modified in the browser and just trusted in the backend. Trust, but verify. Defense in Depth. Assume the browser is broken. Its just easier that way.

    As for the workaround in the Web Application Firewall? First we make the observation that we have already confirmed the validity of the Bearer token. Then, we put in a rule like this:

    local auth_header = ngx.req.get_headers()["authorization"]
    local str = require "resty.string"
    local aes = require "resty.aes"
    local ck = require "resty.cookie"
    local cookie, err = ck:new()
    local aes_256_cbc_sha512x5 = aes:new(session_secret, nil, aes.cipher(256,"cbc"), aes.hash.sha512, 5)
    local encrypted = aes_256_cbc_sha512x5:encrypt(auth_header)
    -- str.to_hex(encrypted),
    local ok, err = cookie:set({
      key = "agilicus_token",
      value = ngx.encode_base64(encrypted, true),
      path = "/",
      httponly = true,
      secure = true,
      samesite = "Strict"
    })

    Later we use that encrypted cookie overriding what the user can provide. We also do an east-west call (replicating what the browser did and trusted), but in the back-end where they cannot modify:

    local http = require "resty.http"
    local httpc = http.new()
    local auth_header = ngx.req.get_headers()["authorization"]
    -- Initialise response to 500, override if we logout
    ngx.status = 500
    if auth_header then
      ngx.say("Error: cannot log out, Host or Authentication header is not set")
    else
      local domain = x.."."..y.."."..z
      local uri = "https://auth."..domain.."/token/revoke"
      local token = string.match(auth_header, "[^ ]+ (.*)")
      local res, err = httpc:request_uri(uri, {
      method = "POST",
      body = "token="..token.."&token_type_hint=access_token",
      headers = {
        ["Content-Type"] = "application/x-www-form-urlencoded",
      },
      keepalive_timeout = 1,
      keepalive_pool = 1
    })
    if not res then
      ngx.say("Failed to revoke access token on "..uri.." : ", err)
    else
      ngx.status = res.status
      ngx.say(res.body)
    end
    end

  • Why should I use Content-Security-Policy?

    Why should I use Content-Security-Policy?

    HTML and Web Applications are the dominant applications of our time. HTML was originally designed as a read-only documentation format and over time became rich, interactive. Many popular web applications today accept user-generated content (comments, images, etc.) and then display to other users.

    In addition, as the web has become more complex, sites have adopted libraries from many 3rd parties, including ones which dynamically choose content such as advertisements and news feeds.

    When you mix these things together you create risk. A user, entering their credit card into a travel-site to buy something alongside an advertisement, presented via JavaScript coming from a CDN, and community comments, is a recipe for security disaster. And yet, it’s the norm.

    Many different tools address this challenge, but today we will talk about the most powerful (and most complex), Content-Security-Policy.

    Content-Security-Policy is a header that a web site emits, instructing the browser what to allow and deny, broken down by type (fonts, CSS, images, etc), and by domain (self, inline, other websites).

    A strong, secure Content-Security-Policy will only allow `self`. This means that we allow nothing hosted anywhere other than the source web server. However, this is not very realistic, it prohibits e.g. Google Analytics, fonts served from a CDN, etc. Previously I showed how to use Google Tag Manager with Content-Security-Manager.

    The risks you protect against with a strong Content-Security-Policy include unsafe 3rd party code evaluating (running) in the page model of the browser for your web page. Some pages are more sensitive than others (login pages, form submittals). However, with modern applications,  a session cookie or a JSON Web Token (JWT) representing the login and permission, are available on all pages: we need the Content-Security-Policy to be strong on all pages.

    A hybrid between `self` and named sites is called subresource-integrity. The browser checks a signature of the content, executing it only if matched. This is far more flexible than trying to estimate all possible sources of 3rd party content. However, it can be challenging to set up since all libraries must support it.

    If possible, use either `self` or subresource-integrity for all types. Block `object`. Do not allow `unsafe-inline` or `unsafe-eval` or `data:`.

    If you have an Angular application, I recommend compiling it as

    ng build --aot --subresourceIntegrity --outputHashing=all --prod=true

    An excellent resource to assess your Content-Security-Policy is the Mozilla Observatory.

    If you own and operate a web application, whether it be a static site like WordPress, or an e-commerce site, you must setup your Content-Security-Policy. No exceptions. Your customers fate rests in your hands, be responsible.

  • The Web Application Firewall and You: Who Should Use, and When.

    The Web Application Firewall and You: Who Should Use, and When.

    The Web Application Firewall (or WAF) is a firewall that operates at the Web (HTTP) layer of your application. It blocks common classes of errors that exist in web-based applications. It is useful to prevent zero-day attacks, to give you more time to apply patches, and as a general Defense-In-Depth strategy.

    The main protection it gives is generic for:

    • Cross-Site Scripting (XSS)
    • SQL Injection
    • Web Session Hijacking

    All while not changing the application source code.

    If you operate a web application (you operate the webserver), you should use a web application firewall if:

    • The application is not read-only (it accepts user input)
    • It accepts or displays 3rd-party content
    • It accepts or displays user-generated content
    • It has an API
    • The user can authenticate
    • The webserver is anything other than a simple Nginx or Apache server with static content (for example, you run Java or ASP or PHP)
    • The webserver has access to any internal content such as a database or shared filesystem

    Your Web Application Firewall should always be in use. It should have rules calibrated to each path and method call (for example, only authenticated users can POST to /api/updates). Setting up these rules can be complex and requires knowledge of how the application functions. Do not just accept the defaults and hope! If you have input to the design of the Web Application, follow these rules to simplify securing it:

    1. Put static content (images, css, html, javascript) in a single path (e.g. /assets)
    2. Avoid using self-modifying CSS and HTML (don’t require unsafe eval or inline)
    3. Have a common location in the API schema for the user-id
    4. Compile templates ahead of time
    5. Avoid using 3rd-party libraries and content hosted by external sites
    6. If you do use 3rd-party hosted, use subresource integrity

    An unexpected and positive side-effect of the web application firewall is simplified and enriched reporting into your security event logging.

    If you operate a web application, the web application firewall gives you peace of mind, simply, with low cost. It doesn’t replace writing secure applications, it augments.

  • Fixing the case of the un-sanitised input web app

    Fixing the case of the un-sanitised input web app

    Last year I met this web application. Let’s call it Hank. Hank accepted user input, without sanitising it. The administrator of Hank had a reports interface, which was generated as a comma-separated-values (CSV) file and downloaded. The security issue here is that the user’s desktop is likely configured to open CSV files in Excel. Since the input from unknown users ends up in this CSV, that could end up being interpreted as an equation. In Excel it is possible for equations to execute external commands, e.g. =cmd|' /c notepad' will open notepad on the Desktop. And, there are worse things than notepad.

    Since the administrator is likely inside the corporate firewall, this means an increased risk: a malicious actor, outside the firewall, can now use this as a vector to run code inside the firewall.

    To complicate matters further, the library generating the reports (Crystal Reports) had no ability to sanitise the data on output. The customer did not wish to change the source code to their application to try and sanitise the data on the input.

    Challenged to solve this complex problem we turned to the Agilicus Web Application Firewall. By writing complex rules in Lua we could redirect flows, or do simple sanitising. However, we did not feel this would be sufficient: if bad data got in the database, it would always generate a risky report. Wanted to do the processing in the output chain.

    To solve the problem we developed a filter (using Python and the xlrd library), running as a web service. It accepted, via a POST, an xls or csv file. It would then scrub it, quoting anything that looked like a formula, and return the result.

    We then configured a rule in the Web Application Firewall so that, when the user generates a report, the output of the web application is silently run through this filter, and then returned to the user. The result is completely transparent: no change in functionality. However it is safe: there is no circumstance where the administrator, running a report, need worry about it attacking their desktop.

    At the end we show the first bit of complexity, trapping and returning a different file, transparently to the user. We do this in OpenResty with a location block and some Lua. Learn more of the other techniques about getting .NET to the Net.

    location ~ ^/[^/]*/Export {
      access_by_lua_file "/rules/fix-crystal.lua";
      proxy_max_temp_file_size 0;
      content_by_lua_block {
    
      if ngx.status ~= 401 then
        local upstream_src = ngx.location.capture('/_crystal/'..ngx.var.request_uri)
        if upstream_src then
            local args, err = ngx.req.get_uri_args()
    	if args['ReportFormat'] ~= nil and args['ReportFormat'] ~= "Excel" then
    	  ngx.header["Content-Type"] = "application/pdf"
    	  ngx.header["Content-Disposition"] = "attachment; filename=report.pdf"
    	  ngx.say(upstream_src.body)
    	else
              if xls_token == nil then
    	      ngx.status = ngx.HTTP_SERVICE_UNAVAILABLE
    	      ngx.say("Error: xls filter token unavailable.")
    	      ngx.exit(ngx.OK)
              else
    	    local http = require "resty.http"
    	    local httpc = http.new()
    	    local ok, err = httpc:request_uri("https://xls-filter?token="..xls_token, {
    		method = "POST",
    		body = upstream_src.body,
    		headers = {
    		    ["Content-Type" ]= "application/vnd.ms-excel",
    		},
    		ssl_verify = true
    	    })
    	    if not ok then
    		ngx.status = ngx.HTTP_SERVICE_UNAVAILABLE
    		ngx.say("Error: xls filter service unavailable.")
    		ngx.exit(ngx.OK)
    	    elseif ok.status ~= 200 then
    		ngx.say("Error: xls filter detected problem with file: "..ok.body)
    		ngx.exit(ngx.OK)
    	    else
    		ngx.header["Content-Type"] = "application/vnd.ms-excel"
    		ngx.header["Content-Disposition"] = "attachment; filename=report.xls"
    		ngx.say(ok.body)
    	    end
              end
    	end
        else
          ngx.status = ngx.HTTP_SERVICE_UNAVAILABLE
          ngx.say("Error: crystal reports service not available.")
          ngx.exit(ngx.OK)
        end
      end
      }
    }
    
    location /_crystal/ {
      proxy_max_temp_file_size 0;
      fastcgi_hide_header X-AspNet-Version;
      fastcgi_hide_header X-AspNetMvc-Version;
      fastcgi_hide_header X-Powered-By;
      fastcgi_index Index.html;
      rewrite ^/_crystal(.*) $1;
      fastcgi_pass 127.0.0.1:9000;
      include fastcgi_params;
    }
    

  • Agilicus Story: Cloud Native Computing Foundation Stories

    Agilicus Story: Cloud Native Computing Foundation Stories

    Yesterday the Cloud Native Computing Foundation (CNCF) held an online meetup for the eastern Canada chapters. I (along with 3 other companys) presented our story. Our architecture, our strategy, what guides our technology decisions. You may recall I presented last year on how to defend the interior of your cloud, this is more about how we’ve built it, and why.

    Below you can see the recording for my part specifically. If you wish to see the overall set, they are on YouTube.

    The presentation is about 15 minutes long. In it I go into our vision, our philosophy, our general architecture, and some of the things that have worked well (and not worked well).

    Now, an ask. if you want to help us spread our story, please follow the company on LinkedIn.