Blog

  • DEFENSE IN DEPTH: CLOUD NATIVE DAY 2019 TALK

    DEFENSE IN DEPTH: CLOUD NATIVE DAY 2019 TALK

    Defense in Depth. As a philosophy it means “Don’t put all your eggs in one basket”. Assume that each layer of your system can be (or has been) breached, keep slowing the attacker. Be less attractive than others who might be attacked.

    I presented on this topic with respect to Cloud Native (and various CNCF tools) at Cloud Native Day Montreal. See the presentation online below (or linked here). In it I go through some common myths, things to watch out for, and things that we are doing that are lazy and dangerous.

  • How phishing negates your firewall

    How phishing negates your firewall

    Your corporate firewall. That invulnerable bastion that lets you fearlessly run less-than-secure internal tools like a CRM, a Finance portal. But, is it really invulnerable? Or is it a paper wall at best? We look at how Cross-Site-Scripting vulnerabilities, known session ID cookies or access tokens can allow content from the world to pierce it as if it were not there. We do this using the weakest link: you.

    How you ask? Assume that internal system contains some session cookie. You have access to it in your browser because, well, you logged in and you are you. Now lets assume it has some weak library. Perhaps an older version of jQuery or Bootstrap. This is a safe bet, these are two of the most popular libraries going. Now, lets assume you use some site with user-generated content. Or, I can influence you to open something in an email. This malware now runs in your browser in another tab, and boom, it walks sideways. Think it can’t happen to you?

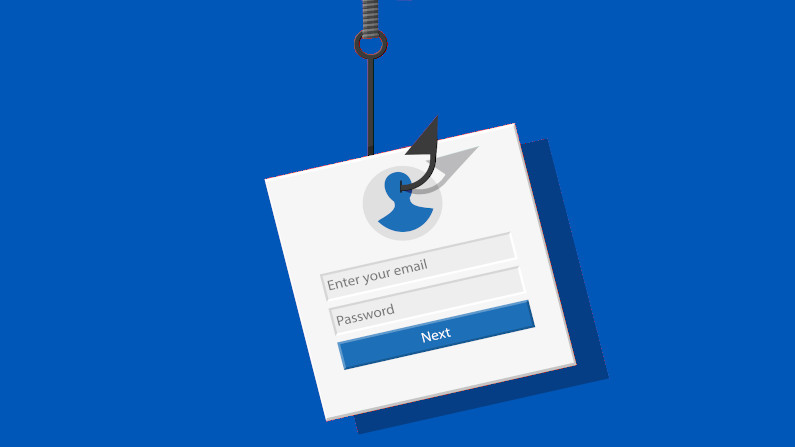
    With phishing we are often concerned about the message. Is it trying to get me to change payment info? To get me to login to some site and steal my info? What if all it is trying to do is get you to click? And then make it look as if nothing happened? Your browser is inside the firewall, its logged in to that other system.

    Let’s take a snippet of HTML and try. Take the below, save it to a file, open in your browser. This is from a vulnerability discussed in #20184.

    <script src="https://ajax.googleapis.com/ajax/libs/jquery/2.2.4/jquery.min.js"></script>
    <script src="https://maxcdn.bootstrapcdn.com/bootstrap/3.3.7/js/bootstrap.min.js"></script>
    <button data-toggle="collapse" data-target="<img src=x onerror=alert('You-are-hacked');>">Click Me, I'm Safe</button>

    What can we do about this? Well, introduce a Web Application Firewall in front of each application you use (including that internal Finance or CRM system). Make it identity and role aware so that it blocks requests that are inappropriate. Periodically run campaigns to teach & test your team, perhaps using Gophish. Ensure that all sites you have control over have strong Content-Security-Policies. I use Mozilla Observatory to check this. Perhaps use a tool like retirejs in your browser.

  • Logging real remote address with Nginx and Lua

    Logging real remote address with Nginx and Lua

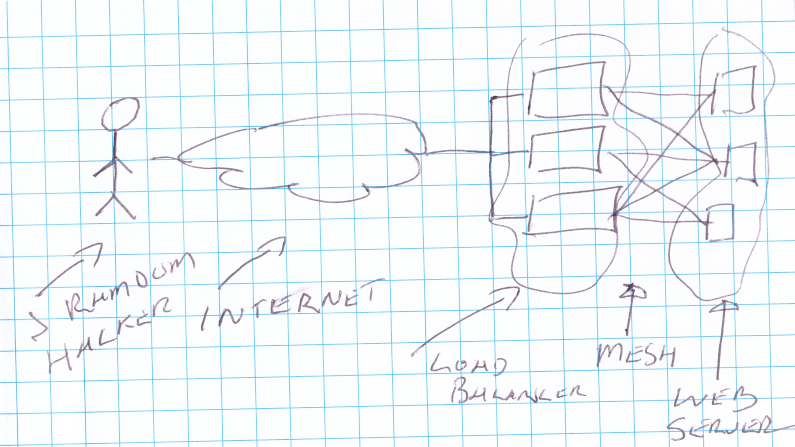
    A common pattern in the Cloud world is load-balancers. Your environment might have Kubernetes with Istio feeding a set of Pods that each have a web server in them, often based on Nginx. In this environment, the web server (Nginx) receives a header X-Forwarded-For which is trusted by you since it is your front-end load-balancer. The syntax is

    X-Forwarded-For: <client>, <proxy1>, <proxy2>

    However, you may have tools that parse your access logs and assume the remote address is Client, when in fact your are logging Proxy2. How can you fix this?

    Well, one approach is to use something like Proxy Protocol and make the IP transparent all the way through. Our team contributed this to Envoy. Another approach is to take the real client IP from the X-Forwarded-For and place it in the log. For this you might use the Nginx HTTP RealIP Module, but it has the side affects of changing the client address, not just logging it.

    Others may be using OpenResty which does not support the RealIP module. In this post I show you a happy medium: log (in JSON format for easy consumption into FluentBit and ElasticSearch/Kibana) such that the downstream_remote_address is filled in with the real remote IP. This does not have any other side affects other than the access log. If you paste these snippets into your nginx config in your various and sundry containers that run inside your cluster, it will just work.

    The key blob is the set_by_lua_block. We introduce a new variable, $real_remote. For every request, if X-Forwarded-For is set, we take the first component of it and use. Else we return the original remote_addr.

    Enjoy! If you wish to expose a service from inside your facility, and still want to know the origin IP, this can be for you.

    http {
     ...
      log_format json escape=json '{'
        '"time": "$time_iso8601",'
        '"downstream_remote_address": "$real_remote",'
        '"x_forward_for": "$proxy_add_x_forwarded_for",'
        '"request_id": "$request_id",'
        '"remote_user": "$remote_user",'
        '"bytes_sent": $bytes_sent,'
        '"start_time": $request_time,'
        '"response_code": $status,'
        '"authority": "$host",'
        '"protocol": "$server_protocol",'
        '"path": "$uri",'
        '"request_query": "$args",'
        '"request_length": $request_length,'
        '"duration": $request_time,'
        '"method": "$request_method",'
        '"http_referrer": "$http_referer",'
        '"http_user_agent": "$http_user_agent"'
      '}';
    
     ...
        server {
          listen 5000;
      ...
    
          set_by_lua_block $real_remote {
            if ngx.var.http_x_forwarded_for then
              for r in ngx.var.http_x_forwarded_for:gmatch('([^,]+)') do
                return r
              end
            end
            return ngx.var.remote_addr
        }
    ...

  • Why your VPN is slow: the case of the work-at-home streaming

    Why your VPN is slow: the case of the work-at-home streaming

    The VPN. Its like the leaky, clanky dirty boiler room of the corporate world. (Or is that Excel?). No one loves it, no one knows how to not have it.

    Today many of you were working from home via the VPN. More than usual. And it was not a speedy experience. A lot of that is due to the inherent properties of a VPN (its a stateful device, scaling by user rather than by bandwidth). But, you may not be aware, there is another cause: you. Yes you. When you are using the VPN all your traffic (likely) goes through it. Listening to spotify? Watching YouTube? Skyping that team member? Even though the endpoint is not inside your corporate network, the nature of a VPN is that it usually takes all traffic.

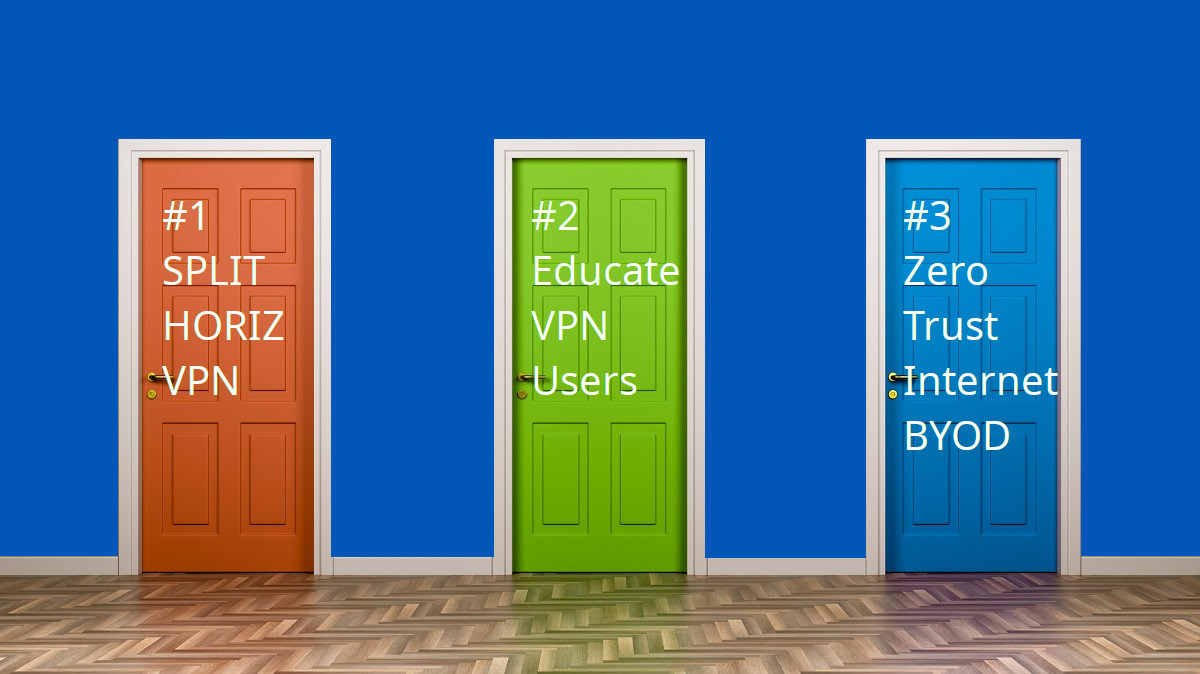
    The ‘split-horizon’ VPN (sometimes called the split-tunnel) is an alternative. Its not necessarily a good alternative, merely different. You see, when you set up a VPN you are presenting with two fairly tough choices: make things work (and be slow), or allow things to be efficient (but maybe break).

    Consider, you have a small home network. A PC. A printer. A Chromecast. You have the PC going, you print something over the network, you are streaming YouTube to the Chromecast, all is good. Then you start your corporate network, those things break. This is because the VPN takes all traffic, and your PC can no longer reach local things. Your YouTube now streams from the Internet to your corporate network and then to your house over the VPN. Hmm, what’s the alternative? Well. imagine the same house. The subnet allocated by that trusty home router is 192.168.0.0/24. But, your corporate IT people use that for the Wiki. If you enable split-horizon you can’t edit the Wiki. Argh.

    So what do you do? You send an email to all your co-workers reminding them not to use spotify/youtube/… while on the VPN? You ask your IT team to enable split-horizon and argue about security and reliability? Or you work on getting these applications available, Zero Trust style, directly on the Internet, and toss the VPN to the curb? Door number three sounds pretty sweet if you ask me.

  • Zero-Trust Makes Working From Home Secure And Reliable, Unlike VPN

    Zero-Trust Makes Working From Home Secure And Reliable, Unlike VPN

    Monday I made the difficult decision to send the team to work from home. Since everyone takes public transit, it would not be fair to leave it to individuals to decide, they might feel pressured. This makes me sad since we are all about Agile, which values live face-to-face discussions.

    What was not a concern for me was remote access. We are 100% Zero-Trust. The network is not part of the trust model. You are no different on our corporate network than on a mobile network or airport WiFi. Each service authenticates the user (using 2-Factor authentication), directly. No L2TP, no PPTP, no IPSEC, none of these. This means that we can scale just as easily on-site as off-site. The number of remote users does not matter.

    Monday night I helped my wife set up her VPN access for remote to work. It was, um, not modern. A different login experience. Web pages that ran on a local network and didn’t have domain names. A VPN that worked inside some browser tabs, but not all. Popup windows. It was device specific, curated, complex to maintain. And one thing I know about security: complex to maintain implies insecure. It may look secure with all the facades, but underneath it, something is not setup properly. I was very sad, how could things be this bad?

    I’ve talked earlier in Secure Exposed Access about how you could, with an increase in security and decrease in complexity, get rid of the VPN and expose individual applications to the Internet. In such a fashion that only authenticated users would see them. I think its a better model. It gives you a lot of the value of SaaS, without the short term transition issues. It gives you better segmentation and simpler deployment (on the client, on the network) than the VPN.

    Be safe, work from home, be productive. When you come out of your shells, challenge the status quo. Next time can be better.

  • Using Istio & OpenID Connect / OAUTH2 To Authorise

    Using Istio & OpenID Connect / OAUTH2 To Authorise

    We have a large number of management only services (kibana, grafana, prometheus, alertmanager, etc.). I want to make it very easy for developers to light up new ones, but also very secure. More specifically, I want to make it easier to be secure than to be insecure. Many breaches happen because a development-only thing is forgotten online. If you have a system where TLS + Authentication + Authorization is easy to do, and on-by-default, then you don’t have to worry (as much).

    The method we have settled on here at Agilicus is to have *.admin.DOMAIN be universally managed by OpenID Connect-based (OAUTH2) login. This means that all services XXX.admin get an automatic TLS certificate, an automatic authentication. Without any integration. Without any effort.

    How did we do this? The magic of Istio and Service Mesh. I’ll share the YAML below. But, in a nutshell, we run an oauth2_proxy for each domain we run (.ca, .com, .dev). This is integrated with our G Suite login. I talked more about it here.

    The key to the operation is a wee bit of Lua code in the filter. You will see we instantiate this for 3 entries (.ca/.com/.dev). All development occurs in .dev (which further guarantees it will be secured & encrypted since .dev is in the HSTS preload list entirely). Even without that, we added our domains to the preload list, guaranteeing that nobody forgets the encrypted-only memo.

    ---
    apiVersion: networking.istio.io/v1alpha3
    kind: EnvoyFilter
    metadata:
      name: authn-filter-8443
    spec:
      workloadSelector:
        labels:
          app: istio-ingressgateway
      configPatches:
        - applyTo: HTTP_FILTER
          match:
            context: GATEWAY
            listener:
              portNumber: 8443
          patch:
            operation: INSERT_BEFORE
            value:
              name: envoy.filters.http.lua
              typed_config:
                '@type': type.googleapis.com/envoy.extensions.filters.http.lua.v3.Lua
                inlineCode: |
                  base_host = string.upper("admin.__ROOT_DOMAIN__")
                  a, oauth_host = string.match("admin.__ROOT_DOMAIN__", '(admin.*%.)(.*%..*)')
                  oauth_host = "oauth2." .. oauth_host
    
                  function starts_with(str, start)
                    return str:sub(1, #start) == start
                  end
    
                  function ignore_request (request_handle)
                    local host = string.upper(request_handle:headers():get(":authority"))
                    local path = request_handle:headers():get(":path")
                    -- we skip un-protected hosts or 'well-known' paths (used for e.g. acme)
                    i, j = string.find(host, base_host, 0, true)
                    if i == nil or i == 1 or starts_with(path, '/.well-known/') then
                      -- if no match, or its just admin.__ROOT_DOMAIN__ (e.g. not X.admin) or its
                      -- /.well-known for acme
                      return true
                    end
    
                    -- request_handle:logWarn("Host protected")
                    return false
                  end
    
                  function login (request_handle)
                    local request_url = "https://"..request_handle:headers():get(":authority")..request_handle:headers():get(":path")
                    local redirect_url = "https://"..oauth_host.."/oauth2/start?rd="..request_url
                    headers = {
                        [":status"] = 302,
                        ["location"] = redirect_url,
                        ["content-type"] = "text/html"
                    }
                    request_handle:headers():add("content-type", "text/html")
                    request_handle:respond(headers, "")
                  end
    
                  function is_snippet (request_handle)
                    local ua = request_handle:headers():get(":user-agent")
                    if ua ~= nil and ua:match("snippet") ~= nil then
                      headers = {
                        [":status"] = 200
                      }
                      request_handle:respond(headers, '')
                      return true
                    end
                    return false
                  end
    
                  function envoy_on_request(request_handle)
                    if ignore_request(request_handle) then
                      return
                    end
                    if is_snippet(request_handle) then
                      return
                    end
    
                    cookie = request_handle:headers():get("Cookie")
                    if cookie == nil then
                      -- request_handle:logWarn("login")
                      login(request_handle)
                      return
                    end
                    -- request_handle:logWarn("validating token against /ouath2/auth")
                    local headers, body = request_handle:httpCall(
                        "outbound|443||"..oauth_host,
                        {
                          [":method"] = "GET",
                          [":path"] = "/oauth2/auth",
                          [":authority"] = oauth_host,
                          ["Cookie"] = cookie
                        },
                        nil,
                        5000)
                    local status
                    for header, value in pairs(headers) do
                      if header == ":status" then
                          status = value
                      end
                    end
    
                    -- request_handle:logWarn("token validation status:"..status)
                    if status ~= "202" then
                      -- request_handle:logWarn("Not validated")
                      login(request_handle)
                      return
                    end
                  end
    ---
    apiVersion: networking.istio.io/v1alpha3
    kind: ServiceEntry
    metadata:
      name: oauth2
    spec:
      hosts:
        - oauth2.MYDOMAIN.ca
        - oauth2.MYDOMAIN.com
        - oauth2.MYDOMAIN.dev
      ports:
        - number: 443
          name: https-for-tls
          protocol: HTTPS
      resolution: DNS
      location: MESH_EXTERNAL
    ---
    apiVersion: networking.istio.io/v1alpha3
    kind: DestinationRule
    metadata:
      name: oauth2-mydomain-ca
    spec:
      host: oauth2.MYDOMAIN.ca
      trafficPolicy:
        loadBalancer:
          simple: ROUND_ROBIN
        portLevelSettings:
          - port:
              number: 443
            tls:
              mode: SIMPLE 
              sni: oauth2.MYDOMAIN.ca
    ---
    apiVersion: networking.istio.io/v1alpha3
    kind: DestinationRule
    metadata:
      name: oauth2-mydomain-com
    spec:
      host: oauth2.MYDOMAIN.com
      trafficPolicy:
        loadBalancer:
          simple: ROUND_ROBIN
        portLevelSettings:
          - port:
              number: 443
            tls:
              mode: SIMPLE  
              sni: oauth2.MYDOMAIN.com
    ---
    apiVersion: networking.istio.io/v1alpha3
    kind: DestinationRule
    metadata:
      name: oauth2-MYDOMAIN-dev
    spec:
      host: oauth2.MYDOMAIN.dev
      trafficPolicy:
        loadBalancer:
          simple: ROUND_ROBIN
        portLevelSettings:
          - port:
              number: 443
            tls:
              mode: SIMPLE  
              sni: oauth2.MYDOMAIN.dev
    
  • The desktop crypto curveball: test your encryption

    The desktop crypto curveball: test your encryption

    I’m a huge fan of elliptic curve cryptography. Small beautiful keys make better security than the larger older ones. Its used in web security (https), in ssh, many areas. Absent going to some quantum-proof area its the current state of the art, its the best out there. But only if its working. Test your encryption periodically to check.

    What makes it weak are vulnerabilities in implementations. And one recently came to light in CVE-2020-0601, sometimes called Curveball. And you, yes you, might have some of it, and some is more than none, and none is the right amount. So, open https://curveballtest.com/ in a new tab. If its not all green, you my friend need to update some software (its a vulnerability in Windows CryptoAPI Crypt32.dll, and you would run Windows Update).

    OK, back? Feeling smug? or sad? Doesn’t matter, its behind you now, you’ve tested your encryption and resolved any issues. While you are here, lets test your server. Head on over to https://www.ssllabs.com/ssltest/ and type in the name of one of your many TLS sites. A+ is really the only score to accept here. You can look at our results https://www.ssllabs.com/ssltest/analyze.html?d=www.agilicus.com if you wish. If you are setting up a server, pick Modern (or Intermediate) from https://wiki.mozilla.org/Security/Server_Side_TLS, don’t try and build the list yourself, the order matters.

    Remember, strong encryption, properly setup, is one (and only one) of the elements of Defense in Depth.

  • Don’t trust the firewall: why defence in depth is important

    Don’t trust the firewall: why defence in depth is important

    You are sitting in your office. Nearby is a server running an application that is a disaster for security. No encryption, well-known password. But, well, its on a trusted network, and you trust your team, it should be fine, right?

    Hmm. Later that day you find the contents of that server on a “Data For Sale Cheap” site and are updating your resume. What happened?

    Well, it turns out you didn’t subscribe to the principle of Defence In Depth. You assumed the firewall prevented inbound badness, which it kind of did. But, you, or a colleague, your browser loaded some JavaScript, perhaps from advertising, perhaps from a site with a weakness. That JavaScript came through the firewall and then turned around and talked directly to this site.

    Think its impossible? Well, a few years ago various home routers got compromised using this exact technique. The weakness was in UPNP, in you not changing the password. The JavaScript on your desktop changed the DNS on the router, and, then, all your traffic is belong to us.

    What should you do? Well, treat the things inside the firewall as no more (and no less) secure than things outside the firewall. Content-Security-Policy. TLS. No passwords. OpenID Connect. XSS headers. Patched. Up to date.

  • Mutual Identity: Phone Scams And Workload Security

    Mutual Identity: Phone Scams And Workload Security

    I will bet that nearly 100% of you had a scam phone call in the last week. Someone called, pretending to be someone they weren’t. The caller ID confirmed what they said. Here in Canada we see a lot of CRA scams (CRA is the tax agency), someone calls, tries to convince you that you should buy some online gift cards or go to jail. Mutual identity is hard to know.

    Identity is a funny thing. We can all identify a friend, in-person. Its a combination of how you look and act. But bringing this to an online world is complex. The most common case you see is e.g. opening the web site of your bank. You enter ‘https://mybank’, and you look for the ‘green’ lock icon. It means that the site is who it says it is.

    But, a few questions spring to mind:

    1. Is it what I think it is? Maybe it should be https://my-bank?
    2. How can they identify me? This should be mutual

    In the phone world we tend to trust the caller-ID. But, you should not. It is very simple to spoof the caller-ID. This might never be fixable. So this means a phone number is not a valid method of asserting identity.

    So too in the online world an IP address is not a trustworthy means of establishing identity. We need something stronger.

    This gets even harder when we realise this crosses trust domains. I trust my bank, my bank trusts its own databases, but also external providers they may use. Federated identity is even more complex.

    We use a mutual TLS standard (based around Istio and SPIFFE) to allow us to do workload to workload identity. In this video I talk a bit about why.

  • I Fixed My Malware Injection Issue With Content-Security-Protection

    I Fixed My Malware Injection Issue With Content-Security-Protection

    Recently I updated the setup on my personal blog. I enabled Content-Security-Protection, and setup the report-uri (so that I would get notification of some of the blocked content).

    My expectation is this would be empty. After all, my blog doesn’t host advertising or user-generated content. But to my surprise, I saw some blocked notifications for rasenalong>dot>com (purposely not made a link here). Huh? What is that? Let’s dig in.

    After some research I find that some users are getting ads and other scummy content injected on my site. I purposely don’t place ads on it, I don’t want someone else’s message showing up. How could this be? What might those ads say?

    It turns out these users have a piece of malware called ‘LNKR‘. It was injecting JavaScript into my served page and then placing ads and tracking my users.

    I am appalled. My new changes mean that the users browser will block content that gets injected. So no more ads for me, showing who knows what.

    If you have not enabled Content-Security-Policy, or if you just want to check your site, head on over to observatory.mozilla.org. Its 1-minute, its free, its great.

    I’ve done a short video to talk about this, feel free to watch and subscribe.

  • Securing a web (site/app/api)

    Securing a web (site/app/api)

    We host a monthly tech meetup, the “Waterloo Technology Chautauqua”. This months topic was around securing a web site (or app, api). I talk about the basics (Content-Security-Policy, Cross-Origin Request Sharing, and the XSS- headers, as well as TLS. These are the Security 101, before we get into the deeper penetration tests.

    We show a couple of reports for real sites, and talk about the risks. The video is at the bottom here, and the presentation is below.

  • Assess Web Security Simply. You. Yes You.

    Assess Web Security Simply. You. Yes You.

    Assessing web security, at least the basics, is much simpler than you may think. A few free resources exist that can do a great job of assessing the Security 101 of your favourite web site.

    First, let’s explain a few of the threat vectors. When you open a web page, your browser fetches a manifest (index) from the site. That index in turn points to other resources (advertising, images, tracking, …), and they in turn point to some, etc. Your security is, unless explicitly set, only as good as that weakest link.

    In the video below I talk about the basic concepts of:

    And I show how these 3 ‘check-me’ web sites can give you a simple score:

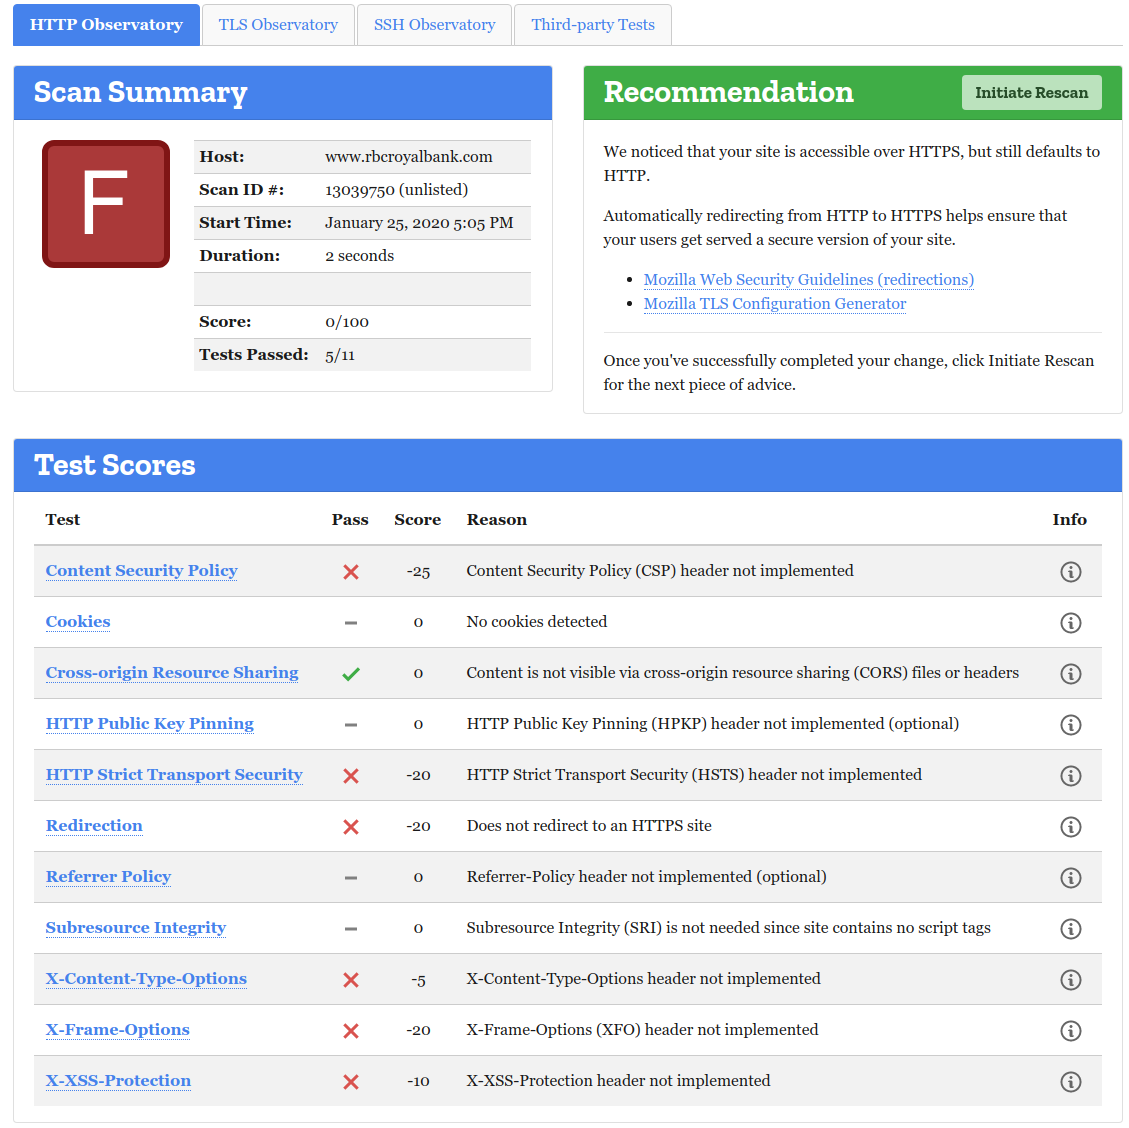
    Let’s start with a real example. My bank. The Royal Bank of Canada. We’ll head over to the Mozilla observatory here. To my (sadness? no-surprise?) it gets an F. None of the basic protections are enabled. Now, I’m sure some will say, it probably gets better once you login. Maybe?

    So, how do we interpret this. Well, no Content-Security-Policy is used. This means any 3rd parties they reference have cart-blanche to do whatever with my browser, my data. Install a javascript lib to watch me enter a password? Sure, no problem.

    Next, there is no XSS protection. This site can be reframed in another, meaning i might be tricked into visiting something that looks like my bank, and has me enter my real password, but watches and takes over. Hmm.

    Now let’s look at the encryption setup. Its a bank, I expect that this will be strong and proper, after all, this is why SSL/TLS was invented. We head to ssllabs.com to check. As predicted, the site gets an ‘A’.

    So, here’s what I will ask you to do. Watch the video (feel free to subscribe!). Then, pick a site you feel should be strong (or are certain is weak). Test it with the tools I’ve shown you. Comment on the video or here on the blog what you got, and whether you were surprised about this or not.

    And then apply this knowledge to your own web properties.

    And then, get someone else to watch the video and do the same. Lets make security viral.

    Finally, if you have an application you would like to expose to the Internet, and its not so strong in this area, I can help, read here!.

  • The Philosophy Behind The Name

    The Philosophy Behind The Name

    Agilicus. Its a compass on a shield, reminding us of the need to protect from the east-west traffic. But what about the name? The icus part invokes Spartacus (from which the Spartan shield of the Logo derived). But the Agil part? That comes from Agile, Continuous, small batch sizes.

    In this video I talk a bit about the philosophy of our general strategy. This is more of a philosophy lesson than the usual technology talks, so feel free to pull up a chair and listen in about Continuous, Small Batch Sizes, etc.

    And for gosh sakes, if you haven’t read “The Phoenix Project“, put it on your list.

  • Zero-Trust Principles

    Zero-Trust Principles

    About 10 years ago or so a new philosophy in security started to usurp the perimeter-based models. The principles of zero-trust are that each layer must affirmatively prove itself to its neighbour (in both directions). This continuous security (rather than a single strong vantage point) provides for Defense in Depth, one of my favourite principles.

    You see, I selected the logo of my company as a compass on a shield, to remind ourselves that threats have direction, and that we often forget the east-west threat of the risk that is already inside. I assume that the first layer of defense will be breached, and thing about delay and confuse as strategies for what is next.

    Imagine your body. Your skin is your firewall, keeps all sorts of bad bacteria out. But, you don’t die if you are scratched, your white blood cells provide the next layer, they don’t trust that the skin will do it all.

    Others have talked about Zero-Trust, from Google’s BeyondCorp, standards like SPIFFE and SPIRE, books, etc.

    Zero-Trust is the basis of our architecture, internally, and, of what we provide to our partners.

    The basic principles of zero trust are that each layer proves itself to its neighbour. If we imagine 5 layers (user, device, transport, application, data), we might think how each would protect itself from its neighbour, and show how its achieved that when asked.

    • A user? password + 2-factor authentication.
    • A device? UEFI Secureboot, encrypted storage, trusted computing, client certificates
    • Transport? (mutual) TLS
    • Application? Segment it from non-participating bits. Use mutual TLS + SPIFFE between the participating pieces.
    • Data? Checksum, tamper-proof audit logs.

  • Secure Exposed Access: Zero-Trust Legacy Online With High Security and No Work

    Secure Exposed Access: Zero-Trust Legacy Online With High Security and No Work

    Somewhere in your basement lurks a challenge. A web application that people need, but you don’t trust. Maybe its your timesheet or vacation planner. Maybe its your HR policies portal. But you know if it meets the Internet that you’ll be in the news. We need Secure Exposed Access!

    Sure, you could retool it. Add some 2-Factor Authentication. Audit its east-west traffic flows. Add a SIEM in the path. But, would you feel confident? Maybe we’ll just let it lay, internal use only. But, the costs are rising. We are now creating accounts in Active Directory for our temps and contractors solely to access this system. This is in turn causing a cost issue associated with Named Users licenses. Some of these temps don’t otherwise have a desk or PC in the building, and we are forced to create access locations. There has to be a better way.

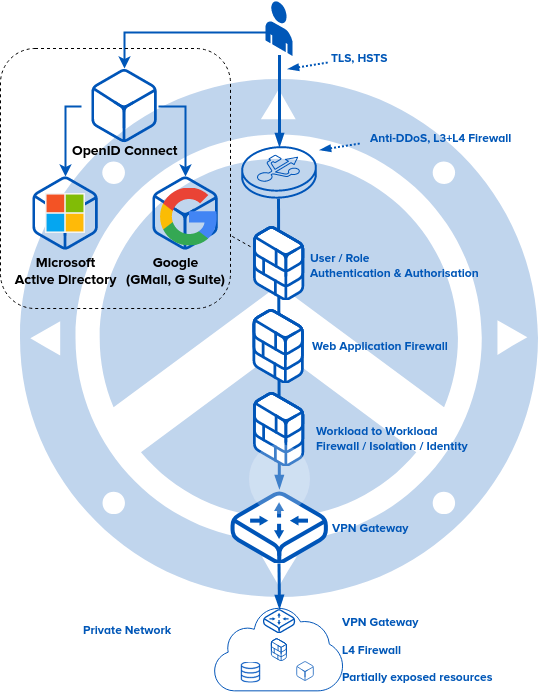
    Spoiler: there is, and we can help. Let’s use our concept of Zero Trust and Strong Identity. Let’s add an authentication & authorisation gateway on the public Internet, owning the domain name and TLS. Let’s add a web application firewall that is authz aware in the middle, enforcing that only authenticated users can access, and, that the access is appropriate for the role. Let’s endow that web application firewall with some rules to prevent common cross-site-scripting and click-jacking.

    Now, let’s keep that site in the basement. But, let’s add a simple VPN, and, on top of that, a workload identity-aware firewall, using a crypto-technology like SPIFFE.

    Boom. Our users think the site is now on the public Internet. BYOD works, any device, any user, any location, any time. 2-Factor (your YubiKey or TOTP) just works.

    Security is actually higher than when you were using it inside the building: those XSS attacks are mitigated, in the building they were still possible.

    Want to know more? Secure Exposed Access. contact us!

  • Free Your Applications: Ditch the IIS, Move Your .NET Apps To the Cloud. Safely. Securely. Simply

    Free Your Applications: Ditch the IIS, Move Your .NET Apps To the Cloud. Safely. Securely. Simply

    Your basement is full of servers running Microsoft IIS with .NET applications, chatting with local databases. You’ve read casually online about Cloud Native, Kubernetes, Containers, Docker. But this doesn’t apply to you, right? I mean, maybe in the future for new things, but not for the current? Well, let me try and change your mind. You can make your current applications become Cloud Native without a rewrite or rearchitect. Let me explain how.

    First, lets talk about the architecture of what you have. A private network, local database, Microsoft IIS running as an application server for .NET applications. Active Directory for login authentication. Users must be on premise or on network via VPN to use, and must use devices you provide.

    Now lets talk about the architecture of what we provide. A workload-based firewall to allow single applications to reach single databases (or other internal resources) without complex layer 3 and layer 4 firewall rules. This is based on cryptography (JWT headers per TCP flow) using technologies like SPIFFE. We provide automation of TLS certificates, a federated login, simple role and user management. And, without re-architecting or changing your software.

    We do this via taking your existing .NET application, moving it into a simple Docker container (somewhat like this one). We put a Web Application Firewall (WAF) in the path, add some OpenID Connect, move it into Kubernetes. In short, we learn and run the Cloud Native so you don’t have to, but you get the benefits of reduced cost and increased reliability.

    And, from a user perspective, things get much better. They can use any device, from any location, no VPN needed.

    You may want to look at part of the technology on our Github page, or the Dockerhub.

  • Strong Identity and Authentication: Avoid Named User License Costs With Federation

    Strong Identity and Authentication: Avoid Named User License Costs With Federation

    A strong yet simple security Identity, Authentication, and Authorisation system is the foundation to modern IT. We want users to be able to access their applications from anywhere securely, simply. We want 2-factor authentication that gets the job done without getting in the way.

    However, an unfortunate side-affect of Identity can be a hidden cost. The most obvious way for many organisations to implement Identity involves creating an entry in Microsoft Active Directory. However, if you have a set of users who are more casual, perhaps only using a small number of applications, creating entries in Active Directory can trigger a named-user license cost, uneeded, unwanted.

    So, how can we allow these part-time or casual users access to a subset of applications safely, securely, without adding a lot of cost? Federation. We provide an OpenID Connect federated authentication layer, using an upstream of Active Directory (for our full-time users), and, to Google (or other social logins) for our part-time or non staff users.

    The end user experience is identical: they login, no separate password or identity needed, optionally with 2-factor authentication.

    The administrator experience is the same: assign roles to identities.

    The Accounts Payable experience, however, is much improved. No named-user licenses are created solely for the purpose of simple authentication. We have succeeded in our goal: without increasing cost, we have provided uniform identity and authentication, strong, secure.

  • Tame the legacy beast with API’s

    Tame the legacy beast with API’s

    Most of you have some legacy beast of software. Its integrated with half your company, its a giant monolith that you spend half the year planning for, and half doing, the upgrades of. And, the vendor is clearly heading to some end-of-life timeline. But, it has a choke-hold on your data, leaving you with little choice: keep adding more integration points, or perish. However, have no fear, there is a method using modern API’s that can help you tame that legacy beast.

    The first step of understanding the problem is recognising we have a problem. The problem is: “I don’t want that system to become more powerful, but it owns my data”. These all-in-one monoliths (your ERP, CRM, payroll, …) are designed such that all integration points *increase* their hold on you. So lets take control of those integration points. We’ll use the power of decoupling and decomposition.

    First, lets recognise how we can get at the data. We can either grope around directly in the database, or we can use the native API integration points. The first challenges us on upgrades with compatibility. The second is expensive and rarely architected for our simple small applications, using big enterprise-busses like CORBA. What are we to do?

    Well, let’s build a moat. We’ll use OpenAPI and create small, RESTful API’s, as we need them. Each can be its own small microservice. It just has to model one thing. Now instead of having to update and test all applications when we upgrade the backend, we just have to update and test the API, secure in the knowledge the applications will remain compatible.

    As we decouple more and more from the direct control of the beast, we become more confident in eventually replacing it. After all, we would just have to keep these API’s compliant on the North (application-facing) side. The south-side might be different for the new ERP, but we won’t have to rewrite all our applications.

    A solid authentication, authorisation, and API layer gives us control of our destiny.

  • Two-Factor Herd Immunity: Mozilla 2-factor authentication

    Two-Factor Herd Immunity: Mozilla 2-factor authentication

    Recently Mozilla (you may know them as Firefox) moved to require all add-on authors to use two-factor authentication. They did this because of the concern about supply-chain attacks. Specifically, these 3rd-party add-on authors were the subject of ongoing spear-phishing attacks, trying to gain control of the software which people like you and I have installed.

    I’ve written about supply-chain attacks before. Its a huge risk. It means things can work their way into the internal of your trusted sphere, put there by *you* as you deploy things.

    Its this supply-chain which is one of the drivers of my key philosophy: Defense In Depth. Its Defense in Depth that caused me to choose a Shield on a Compass as a logo: the shield represents defense, and the compass represents the threat vectors, including east-west (internal to internal).

    I am so happy to see a big name like Mozilla moving to require 2FA. I use 2FA for everything I can, and so does everyone on team Agilicus. I dream of the day where sites like Github *enforce* 2FA rather than merely make it optional.

    You see, there’s this concept called Herd Immunity. The concept is, once you inoculate enough of the population, the rest are also dramatically protected. If we took a couple of key, large, popular sites, and got them to force the use of Two-Factor Authentication, the users of them would then start using it elsewhere. And so on. And then, well, most people would use it everywhere and would *demand* proper 2FA on all sites (including their banks).

    And once this happy state happens, spear-phishing becomes much less effective and the criminals move on elsewhere.

    So, Mozilla, I salute you. You picked an audience that was capable of enabling 2FA, you did the right thing in making it mandatory, and I hope others follow.

  • Remove information exposure: nginx banner

    Remove information exposure: nginx banner

    Information exposure. Many servers send a helpful banner out with the specific name and version of the software. This can in turn attract low-level attacks that use tools like Shodan.io to find vulnerable hosts. CWE-200 suggests we need to remove the information exposure. Let’s discuss.

    Some hold that hiding these banners increases security. For example, CWE-200 has this position. Others (myself included) are of the opinion that security through obscurity gives a false sense.

    Regardless of your opinion, you will fail parts of your security audit with the banners in place. And that is enough reason to remove them. Let’s discuss how to do this with nginx when it is used for the sole-purpose of a 301-redirect. Why would its sole purpose be 301 redirect? Because we allow nothing on HTTP (unencrypted), and want a navigation aid for people who end up there the first time (before their browser sees the HTTP-Strict-Transport-Security header, HSTS).

    Sadly, nginx by default will have two pieces of information exposure to remove: the banner as a header, and the name in the payload of the 301 response.

    Side note: in “We are all in on the HSTS preload” I wrote about how we added our domains to the browser-distributed preload list. I encourage you to do the same.

    OK, back? All preloaded? Good. You won’t forget again and let some unencrypted service go live! Let’s examine the config. I’ll dump it all below, and then discuss after (yes its a bit of a mouthful to pronounce!)

    load_module modules/ngx_http_headers_more_filter_module.so;
    
    worker_processes  1;
    
    error_log  /dev/stderr warn;
    pid /tmp/pid;
    
    events {
        worker_connections  1024;
    }
    
    http {
        include       /etc/nginx/mime.types;
        default_type  application/octet-stream;
    
        more_clear_headers Server;
    
        map $http_user_agent $excluded_ua {
            ~kube-probe  0;
            default      1;
        }
    
    
        log_format json escape=json '{ "time": "$time_iso8601", "remote_addr": "$proxy_protocol_addr",'
          '"x-forward-for": "$proxy_add_x_forwarded_for", "request_id": "$request", "remote_user": '
          '"$remote_user", "bytes_sent": $bytes_sent, "request_time": $request_time, "status": '
          '$status, "vhost": "$host", "request_proto": "$server_protocol", "path": "$uri", '
          '"request_query": "$args", "request_length": $request_length, "duration": $request_time, '
          '"method": "$request_method", "http_referrer": "$http_referer", "http_user_agent": '
          '"$http_user_agent" }';
    
        access_log  /dev/stdout json if=$excluded_ua;
    
        server_tokens off;
    
        keepalive_timeout  65;
    
        server {
          error_log    /dev/stderr;
    
          location /healthz {
          access_log off;
          return 200 "OK\n";
        }
    
            listen 8080 default_server;
            server_name _;
            server_tokens off;
    
            error_page 301 400 401 402 403 404 500 501 502 503 504 /301.html;
            # The 200 will be modified by the later return 301;
            location = /301.html {
              internal;
              return 200 "";
            }
            location / {
                return 301 https://$host$request_uri;
            }
       }
    }
    

    OK, that was a lot of text! But, in a nutshell, we are:

    1. setting logs to stdout/stderr (so we can run from CRI in Kubernetes)
    2. loading http_headers_more_filter_module to remove the nginx banner
    3. adding JSON log format (so it works better w/ fluent-bit)
    4. Squelching logs for kube-probe and /healthz
    5. adding custom 30x 40x and 50x pages with no body
    6. responding 301 redirect to https://path?params for all path?params

    You’ll need a container w/ the nginx-mod-http-headers-more package loaded. It can be as simple as:

    FROM alpine:3.10
    LABEL maintainer="don@agilicus.com"
     RUN apk update \
      && apk --no-cache add nginx-mod-http-headers-more \
      && touch /var/log/nginx/error.log \
      && chown nginx:nginx /var/log/nginx/error.log

    That was easy! Now we just run this (as non-root, on non-port 80), with a redirect in via Kubernetes service from 80->non-privileged port. And boom, we have anonymous HTTP->HTTPS redirect. We have removed the information exposure.
  • Auth and API: OpenID Connect for user + service, and enforcement along route

    Auth and API: OpenID Connect for user + service, and enforcement along route

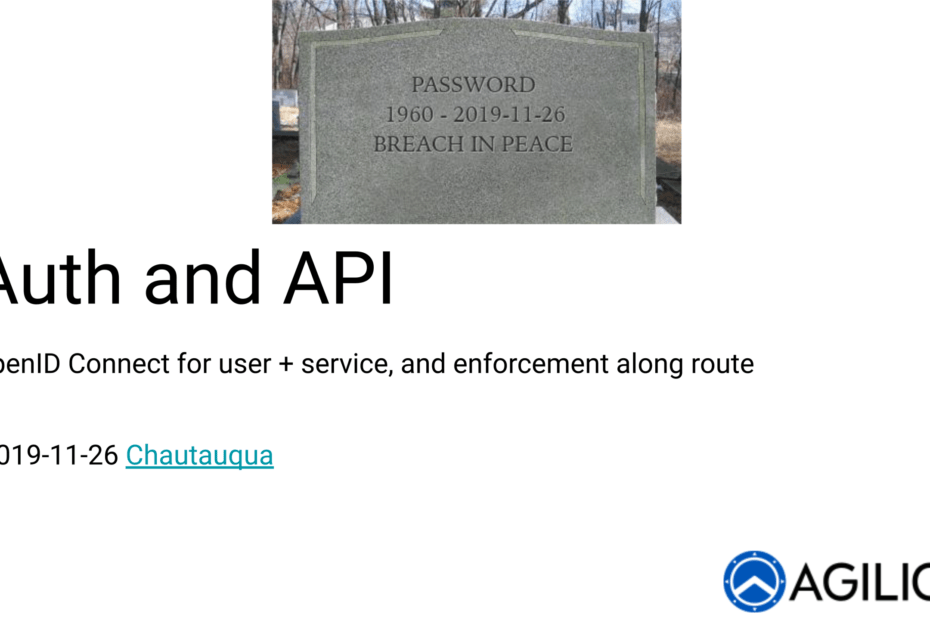
    Agilicus hosted a meetup (Chautauqua) on the topic of OpenID Connect for Authentication and Authorisation of users and API’s. We discussed the merits and drivers for OpenID Connect, as well as an implementation using Istio and Open Policy Agent (OPA) driven from OpenAPI specification.

    We had a bit of an issue with the primary lavalier microphones (hint: next time we will turn them on!) so this is from the backup camera and mic.

    Thanks to all who came out and chatted about OpenID connect, 2-factor authentication, JWT, how to protect API east-west in the network as a service rather than in code, and shared their experiences around API gateways.

    This motivation is also somewhat covered in my Municipal Infosec presentation showing some real world examples. By moving the user identity and auth into a standard, the experience becomes excellent. By moving the authorisation into the network from the application the security becomes strong yet simple. This is a win-win for all.

    Enjoy and hope to see you at the next meetup!

    The raw presentation is not as interesting without the colour commentary, but it is below for posterity.

  • Remove SMS from your 2-factor authentication

    Remove SMS from your 2-factor authentication

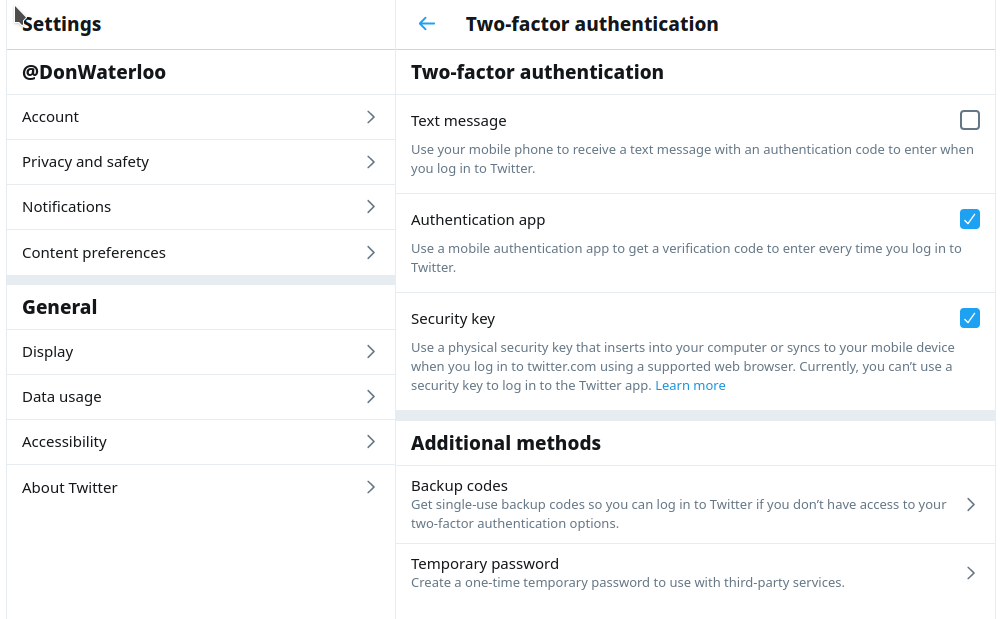
    Twitter recently fixed their 2-factor authentication, allowing you to remove SMS (text) from the authentication methods. And you should take them up on the offer immediately. All it took was the Twitter CEO getting hacked by a SIM-swap attack.

    Before you read on, I encourage you to head over to your Twitter Two-Factor Authentication screen and disable “Text message” as a method (relying on your TOTP application and your Security key).

    OK, back? This is not just about Twitter. Yes I think it was a mistake to force SMS in the list as they used to do… but Twitter was, and is, still more secure than most sites out there which have *NO 2-Factor Authentication* at all. Your bank?

    If its worth having a login, its worth having 2-factor: something you know, and something you have. In an ideal world you login with OpenID Connect (OAUTH2) so the application has *no password*, nothing to breach.

    Now, I know you. You are saying “It’s only Twitter, what harm can there be?”. Well, in today’s world, a hacker could cause World War III via Twitter. In an era where a US president makes policy proclamations via Twitter, and can cause the stock of Boeing to drop with 140 characters or less, yes, a false tweet from someone could cause a war. The morale of this is… the damage can always be worse than you think.

    SMS is not secure. It was not designed to be. Remove it from your 2-factor authentication list now. Everywhere. Its better than nothing, but we deserve better than that.

  • Creating the reliable cloud with unreliable components

    Creating the reliable cloud with unreliable components

    Team Agilicus has been working very hard to build a secure, reliable, economical hybrid cloud for municipalities moving infrastructure applications online. The secure part is done with a set of best practices, cryptography, etc. The reliable part and economical part, however, can often conflict. How do we achieve both, creating a reliable cloud with unreliable components?

    Traditionally reliability came from making each individual component as close to infinitely reliable as possible. Servers has redundant power supplies, redundant fan, ECC memory, redundant power grids, etc. This creates great cost. But, ironically, it also creates a limit to reliability. All of those extra components themselves introduce failure modes. Eventually there is diminishing and then reducing returns.

    So we have to focus on system reliability. And this is the big mental leap in cloud-native: each individual component is expected to fail often enough to observe. How do we then make the overall system reliable enough that failures are not observed?

    Once you have this mindset in place, you start looking to embrace the failures. Is there something that is 10% less available and 50% cheaper? Let’s use that! Enter the concept of the preemptible node. We are using Google Cloud, and it has the concept of a preemptible VM. In a nutshell, you tell Google, hey, this node I’m running on, if you need to move that server or do maintenance in the datacentre, go ahead, 30 seconds notice is fine, pull the power. Since this allows Google greater flexibility, they make this capacity available for less money. And, since we expect nodes to fail anyway, and have designed a system that makes that unobservable, we embrace it.

    Now, how often does this occur? If it occurred almost never, we would not have confidence that we handled it. Looking at the trailing 30 days of metrics for our clusters in Google Cloud Montreal, and showing a histogram of when the events occur vs time of day, we see there is a cluster around 6pm. My guess is a lot of people hit ‘git commit && push’ which cranks up their CI just before they head home, and this causes a capacity spike and rebalance.

    We did have a choice. We could have chosen non-preemptible nodes, costing us (and our customers) more money. But, and this is key, we would have either reduced reliability (by assuming the non-preemptible nodes were infinitely reliable) or needed to do the same work involving Kubernetes and service meshes etc., and thus leave the cost saving behind for no reason. We chose to create a reliable cloud with unreliable components.

    The moral of the story: embrace the failure, design for it, and use that to reduce your cost while increasing your reliability.

  • Email Strict Transport Security with MTA-STS

    Email Strict Transport Security with MTA-STS

    Email. Insecure by design. SMTP was designed in an era of high trust and low understanding of the shenanigans that would later arise on the Internet. In particular, encryption, let alone email strict transport security, was not something baked in from the start. Let’s fix that!

    After waves of spam and snooping and phishing and ransomware etc., many band-aids were added over the years. DNS-based realtime blackhole lists (DNSRBL), STARTTLS, authentication, DANE, … so many. Did you know some email providers don’t even allow encrypting your mail in transit?

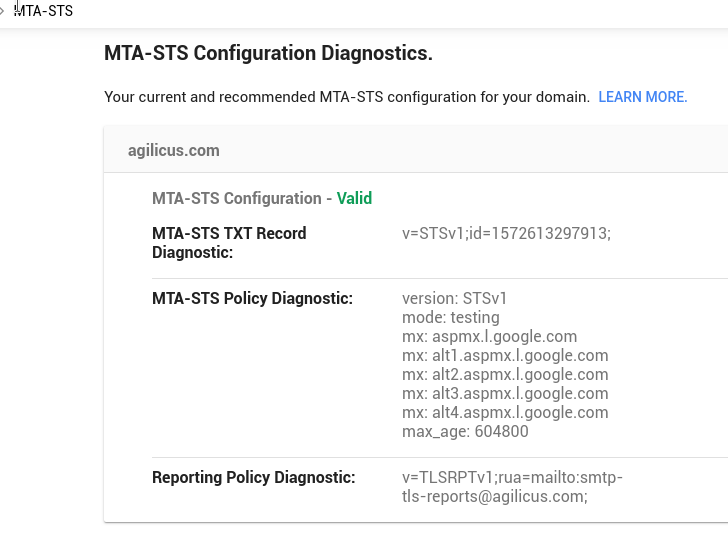
    After spending yesterday double and triple checking our DMARC, DKIM, SPF (due to some suspected delivery problems), I decided to enable MTA-STS. Why not, one more standard can’t hurt right? If you want to understand some of the issues this is addressing, this article from The Register is a good spot to start.

    In a nutshell, in MTA-STS, you add 2 more DNS records (because its a general purpose database of key/value pairs, right?), and then add a new web site (which must be proper TLS), with a single file (/.well-known/mta-sts.txt). And boom. You now have Strict Transport Security (STS) on your Mail Transfer Agent (MTA). As you know we are all-in on the TLS, placing our domain(s) on the HSTS preload list. Encryption or GTFO.

    Now, it might seem like a pain to bring up a new web site just for this. But, hold my beer, we got this. Cuz cloud native and Kubernetes. Engage your peril-sensitive sunglasses, here come some YAML. You can skip to the GitHub if you want to use it and start enjoying email strict transport security today.

    ---
     apiVersion: apps/v1
     kind: Deployment
     metadata:
       name: server
       namespace: mta-sts
     spec:
       selector:
         matchLabels:
           app: nginx
       replicas: 1
       template:
         metadata:
           labels:
             app: nginx
         spec:
           containers:
           - name: nginx
             image: nginx:1.17.5
             ports:
             - containerPort: 80
               name: http
               protocol: TCP
             volumeMounts:
               - name: config
                 mountPath: /usr/share/nginx/html/.well-known
           volumes:
             - name: config
               configMap:
                 name: config
    ---
    apiVersion: extensions/v1beta1
     kind: Ingress
     metadata:
       annotations:
         certmanager.k8s.io/cluster-issuer: letsencrypt-prod
         kubernetes.io/ingress.class: nginx-transparent
         ingress.kubernetes.io/ssl-redirect: "true"
       name: ingress
       namespace: mta-sts
     spec:
       rules:
     host: mta-sts.agilicus.com http:   paths: backend:
       serviceName: service
       servicePort: http
     path: /
     host: mta-sts.agilicus.ca http:   paths: backend:
       serviceName: service
       servicePort: http
     path: /
     tls:
     hosts: mta-sts.agilicus.com
     mta-sts.agilicus.ca
     secretName: mta-sts-tls 
    ---
     apiVersion: v1
     kind: ConfigMap
     metadata:
       name: config
       namespace: mta-sts
     data:
       mta-sts.txt: |
         version: STSv1
         mode: testing
         mx: aspmx.l.google.com
         mx: alt1.aspmx.l.google.com
         mx: alt2.aspmx.l.google.com
         mx: alt3.aspmx.l.google.com
         mx: alt4.aspmx.l.google.com
         max_age: 604800
    ---
     apiVersion: v1
     kind: Service
     metadata:
       name: service
       namespace: mta-sts
     spec:
       ports:
     name: http
     port: 80
     protocol: TCP
     targetPort: http
     selector:
     app: nginx
     type: ClusterIP 
  • What does your internal enterprise application login look like?

    What does your internal enterprise application login look like?

    Its easy to fall into the trap of “of course its on the Internet, its secured” having a silent corollary of “its just an internal test app, don’t bother with security”.

    The reality is, if it exists, it should be secure. If you allow people to be lulled into accepting bad SSL certificates and poor login on the test app, they will do accept it on the real app.

    2-Factor authentication is not a material barrier. You can have push notifications (your phone buzzes and says, is that you logging in?). You can have Authenticator apps. You can have hardware devices like YubiKey or Google Titan.

    If its worth having a login, its worth being secure. Look around your enterprise application inventory. Do any of them have internal password systems? Or are not 2-factor? Get them fixed. I’ll wait.

    You want the login to look like below. Financial, Municipal, Industrial, it doesn’t matter. Its important.

  • Hear Agilicus Talk Secure Municipal Cloud At MISA INFOSEC 2019

    Hear Agilicus Talk Secure Municipal Cloud At MISA INFOSEC 2019

    Excited to share that Oct 22, 2019, Agilicus and the City of Waterloo will be talking at MISA Ontario INFOSEC 2019 about a joint project, one that helps digitally enable a diverse workforce with great security and great simplicity. If you are heading to Orillia I’d love to meet you there.

    In this presentation we will explain how we took a set of simple web applications, each only accessible by City staff with Active Directory accounts, and made them:

    • Cloud Native (Google Cloud, Kubernetes, Container)
    • Secure (per-path role-based access control)
    • 2-Factor Authentication enabled (SMS, TOTP, FIDO U2F)
    • BYOD & Mobile, outside the firewall, without VPN or complex inbound rules
    • Securely access the database that remained inside the firewall
    • Enabled for a Contractor work-force without creation of Active Directory entries (and associated costs)
    • Hosted, Managed (including SOC & SIEM)
    • High availability with live, online Disaster recovery

    With nearly zero effort on a per-application basis.

    This removed the need for local services/licenses/capacity/monitoring, saving money, such as:

    • Citrix
    • vSphere
    • Microsoft IIS, Server

    This enabled the outside-plant workforce to do simple data entry, view their hours of service, from anywhere, with any device. With simple login. With high security. Without incremental costs.

    We will explain how we achieved Canadian Data Sovereignty while doing so.

    This solution is exceptionally strong for reducing spear-phishing (the single-sign-on coupled with 2-factor authentication means no more written-down passwords and stronger security).

    The cloud-hosting and in-built security features (e.g. read-only filesystem, e.g. signed-code-only, e.g. application-aware network routing, e.g. mutual TLS, e.g. SPIFFE) makes these applications exceptionally immune to Ransomware or other attacks (even if they themselves have susceptibility).

    More detail is in the Resources.

  • Team Agilicus gets new office, Okterbest-adjacent

    Team Agilicus gets new office, Okterbest-adjacent

    After many false starts and delays and a small amount of homelessness, we have moved into our new headquarters. Our quest to build the perfect hybrid municipal cloud is closer to completion!

    First job for each team member was to put together some furniture. Ikea and power drills. The result is below. Austere? Garage? Back to basics? Most of the budget went into the chairs for sure.

    Desks assembled, kitchen unpacked, we investigated our new world. Its Oktoberfest here, first day. Our street was closed off to become a ‘Bavarian village’. Bavarian village is code-word for ‘garden sheds on a street selling things’. We also attended the tapping of the keg. Nothing like seeing the city mayor yelling “Spank that spigot”!

  • Kustomizing Kustomize: Releasing Our Tools

    Kustomizing Kustomize: Releasing Our Tools

    Declarative. It becomes a way of life. We have chosen kustomize to safely build our inventory of YAML, including Istio and Cert-Manager. But, it has proven incredibly non-DRY. After some refactoring etc, I made a few Generators and Transformers to cover some of the most common cases.

    And, today, for the low low price of $0, you can snoop around and use them, via our Github page.

    It turned out that (as you might expect) the main driver was errors. One particularly complex thing was running Istio as (sole) Ingress(gateway) with Cert-Manager. We want TLS for all endpoints. We like Let’s Encrypt. We want to use solely Istio. But Cert-Manager was a bit picky about this. The solution needed to have calibrated YAML created for a Gateway, a VirtualService, and a Certificate. But, we kept making typos and then spending time debugging. The IstioGenerator solved that, reducing from ~100 lines of YAML to ~10 with no loss in fidelity.

    Each of these Generators and Transformers had a different driver. Security, Simplicity, Accuracy, Effort. All were implicated and involved.

    I hope you get some value from the collection. It will grow over time, and as always, Pull Requests are most welcome.

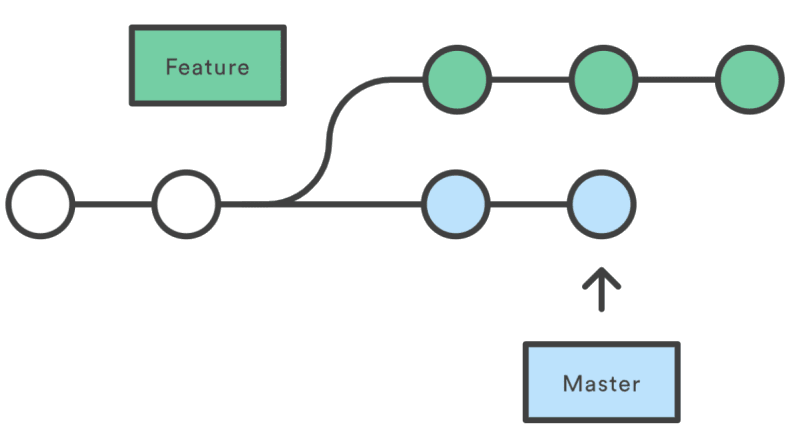
  • Declarative GitFlow: restrict kustomize to master branch

    Declarative GitFlow: restrict kustomize to master branch

    You believe in declarative, in GitFlow, in small feature branches. Perfect. Your team is now making small changes on a branch and Merge Requests are happening, the CI is happening, all is good in the world.

    Except sometimes people forget and do a kustomize build . | kubectl apply -f - from the wrong branch (e.g. not master, prior to merge). You know that someday the CD will fix this. But someday is not here.

    Enter this small hack piece of brilliance.

    $ cat agilicus/v1/branchrestrict/BranchRestrict 
     #!/usr/bin/env /usr/bin/python3
     import subprocess
     import sys
     import fnmatch
     import yaml
     with open(sys.argv[1], 'r') as stream:
         try:
             data = yaml.safe_load(stream)
         except yaml.YAMLError as exc:
             print("Error parsing BranchRestrict generator input (%s)",
                   file=sys.stderr)
     branch = subprocess.check_output(['/usr/bin/git',
                                       'rev-parse',
                                       '--abbrev-ref',
                                       'HEAD']).strip().decode('ascii')
     def allow(branch, target):
         print("---")
         sys.exit(0)
     def denied(branch, target):
         print(f"Error: branch '{branch}', denied by rule '{target}'",
                file=sys.stderr)
         sys.exit(1)
     for target in data['allowed_branches']:
         if fnmatch.filter([branch], target):
             allow(branch, target)
    
     for target in data['denied_branches']:
         if fnmatch.filter([branch], target):
             denied(branch, target)
    

    OK, a plugin generator. We’ll use that like:

    $ cat master-only.yaml 
    --- 
    apiVersion: agilicus/v1
    kind: BranchRestrict
    metadata:
      name: not-used-br
    name: branch-restrict
    allowed_branches:
    master
    denied_branches:
    '*' 

    Perfect. Now no-one will forget and accidentally apply from their not-yet-merged feature branch. Beauty.

  • Defense in Depth: Securing your new Kubernetes cluster from the challenges that lurk within

    Defense in Depth: Securing your new Kubernetes cluster from the challenges that lurk within

    In the greater Montreal area? Come see me speak tomorrow at Cloud Native Day.

    The abstraction layers of ‘container’ and ‘helm’ etc often make people not think about the security issues. I run ‘helm install X’ or ‘docker build’. That in turn imports many things which get delivered into my environment.

    Containers are not a (strong) security barrier. We often think about security as a Boolean (outside bad, inside good). Here I will talk about ‘Defense in Depth’: assuming that bad things are already in, and the steps we take to harden the environment.

    • service mesh
    • logging
    • network policy
    • reduction in privilege (de-root, de-privilege)
    • rbac, roles
    • understanding the upstream risk, quantifying, controlling
    • read-only filesystems
    • distroless

    And I’ll show a simple check list of activities you can do during your DevOps cycle that won’t change your cost (much).

    I will focus on Kubernetes environment, contrasting Helm (+Tiller) versus Kustomize, but this is applicable to other environments.