Blog

  • Snooping on your Kubernetes nodes containers without ssh’ing to it: dink

    Snooping on your Kubernetes nodes containers without ssh’ing to it: dink

    Sometimes you have this issue. You are developing, you are being lazy with image tags. You just want to keep pulling ‘latest’. But, caching, how does it work, why does it cache when I don’t want? You seem to be running a stale version.

    Or perhaps you want to snoop around a running container a bit.

    Sure you could ssh to your Kubernetes node. But, that’s a big song and dance on Azure AKS. There must be a better way to quickly get a comand-line that has access to the Docker commands, that has access to the node itself?

    I present ‘dink’ (Docker in Kubernetes). Its pretty self explanatory, you can see it below. Feel free to enjoy, to break things and never complain to me about how I just handed you a loaded gun and a 3-line readme file.

    $ git clone https://github.com/Agilicus/dink
    Cloning into 'dink'…

    don@cube:~/src$ cd dink
    don@cube:~/src/dink$ kubectl get nodes
    NAME STATUS ROLES AGE VERSION
    aks-agentpool-16358131-0 Ready agent 14d v1.11.5
    aks-agentpool-16358131-1 Ready agent 6d v1.11.5
    aks-agentpool-16358131-2 Ready agent 6d v1.11.5
    don@cube:~/src/dink$ ./dink -n aks-agentpool-16358131-0
    bash-4.4# docker images
    REPOSITORY TAG IMAGE ID CREATED SIZE
    agilicus/dink latest 61e27c1721b5 3 minutes ago 277MB
    cr.agilicus.com/utilities/dink latest 70a7f24d8c90
  • DoS’ing the cloud with logs

    DoS’ing the cloud with logs

    A few years ago an NTP issue came to light that caused a lot of damage. Cloudflare did a good writeup on this if you want to see the details. But in a nutshell, if there is a request which can be sent which causes a larger response, you have amplification. In the NTP case, a small packet requesting the peer list would get a much larger response. Coupled with being UDP and a lot of providers not implementing BCP38, meaning I can generate a request from your IP, and the large response goes to you, and you have a problem.

    OK what does this have to do with cloud you ask? Well, lets look at logging. A lot of people use ‘logging as a service’ (stackdriver, elasticsearch, …). It can be managed by your cloud provider (Google, Microsoft, …), or by a 3rd party. But, well, you log a lot of stuff in (moderatly) abnormal circumstances.

    Now lets look at a particular tool. ‘Tranquility‘ (this observation seems true for nearly any Java program as far as I have observed). When something happens, it logs a stack trace. As an end-user? useless. Lets look at one below. When someone connects to my service without knowing my credentials, they eventually time out and leave this bomb. Its 9747 bytes. From a single connect. This is in fact worse than the above NTP issue.

    But it gets worse. Each of these lines is bundled up into JSON, with a timestamp, some fields around originating host, etc. It turns out by the time this lands on the wire on the way out to my log provider its more like 20KB. That’s right, a hundred bytes or so of inbound SYN and ACK cause this. Now I know what you are thinking, what endpoint of Don’s can I try this on? Well its ‘http://127.0.0.1‘. Go ahead.

    How long before someone finds and attacks this vector? Hmm.

    2019-02-03 22:08:00,959 [qtp1247938090-34] WARN  c.m.t.server.http.TranquilityServlet - Server error serving request to http://tranquility.druid.agilicus.ca:443/v1/post/logs
    java.lang.InterruptedException: null
        at java.util.concurrent.locks.AbstractQueuedSynchronizer.doAcquireSharedNanos(AbstractQueuedSynchronizer.java:1039) ~[na:1.8.0_181]
        at java.util.concurrent.locks.AbstractQueuedSynchronizer.tryAcquireSharedNanos(AbstractQueuedSynchronizer.java:1328) ~[na:1.8.0_181]
        at java.util.concurrent.CountDownLatch.await(CountDownLatch.java:277) ~[na:1.8.0_181]
        at com.twitter.util.Promise.ready(Promise.scala:667) ~[com.twitter.util-core_2.11-6.42.0.jar:6.42.0]
        at com.twitter.util.Promise.result(Promise.scala:673) ~[com.twitter.util-core_2.11-6.42.0.jar:6.42.0]
        at com.twitter.util.Await$$anonfun$result$1.apply(Awaitable.scala:151) ~[com.twitter.util-core_2.11-6.42.0.jar:6.42.0]
        at com.twitter.concurrent.LocalScheduler$Activation.blocking(Scheduler.scala:220) ~[com.twitter.util-core_2.11-6.42.0.jar:6.42.0]
        at com.twitter.concurrent.LocalScheduler.blocking(Scheduler.scala:285) ~[com.twitter.util-core_2.11-6.42.0.jar:6.42.0]
        at com.twitter.concurrent.Scheduler$.blocking(Scheduler.scala:115) ~[com.twitter.util-core_2.11-6.42.0.jar:6.42.0]
        at com.twitter.util.Await$.result(Awaitable.scala:151) ~[com.twitter.util-core_2.11-6.42.0.jar:6.42.0]
        at com.twitter.util.Await$.result(Awaitable.scala:140) ~[com.twitter.util-core_2.11-6.42.0.jar:6.42.0]
        at com.metamx.tranquility.tranquilizer.Tranquilizer.flush(Tranquilizer.scala:243) ~[io.druid.tranquility-core-0.8.3.jar:0.8.3]
        at com.metamx.tranquility.server.http.TranquilityServlet$$anonfun$doSend$3.apply(TranquilityServlet.scala:204) ~[io.druid.tranquility-server-0.8.3.jar:0.8.3]
        at com.metamx.tranquility.server.http.TranquilityServlet$$anonfun$doSend$3.apply(TranquilityServlet.scala:204) ~[io.druid.tranquility-server-0.8.3.jar:0.8.3]
        at scala.collection.mutable.HashMap$$anon$2$$anonfun$foreach$3.apply(HashMap.scala:108) ~[org.scala-lang.scala-library-2.11.8.jar:na]
        at scala.collection.mutable.HashMap$$anon$2$$anonfun$foreach$3.apply(HashMap.scala:108) ~[org.scala-lang.scala-library-2.11.8.jar:na]
        at scala.collection.mutable.HashTable$class.foreachEntry(HashTable.scala:230) ~[org.scala-lang.scala-library-2.11.8.jar:na]
        at scala.collection.mutable.HashMap.foreachEntry(HashMap.scala:40) ~[org.scala-lang.scala-library-2.11.8.jar:na]
        at scala.collection.mutable.HashMap$$anon$2.foreach(HashMap.scala:108) ~[org.scala-lang.scala-library-2.11.8.jar:na]
        at com.metamx.tranquility.server.http.TranquilityServlet.doSend(TranquilityServlet.scala:204) ~[io.druid.tranquility-server-0.8.3.jar:0.8.3]
        at com.metamx.tranquility.server.http.TranquilityServlet.com$metamx$tranquility$server$http$TranquilityServlet$$doV1Post(TranquilityServlet.scala:141) ~[io.druid.tranquility-server-0.8.3.jar:0.8.3]
        at com.metamx.tranquility.server.http.TranquilityServlet$$anonfun$4.apply(TranquilityServlet.scala:87) ~[io.druid.tranquility-server-0.8.3.jar:0.8.3]
        at com.metamx.tranquility.server.http.TranquilityServlet$$anonfun$4.apply(TranquilityServlet.scala:85) ~[io.druid.tranquility-server-0.8.3.jar:0.8.3]
        at org.scalatra.ScalatraBase$class.org$scalatra$ScalatraBase$$liftAction(ScalatraBase.scala:270) [org.scalatra.scalatra_2.11-2.3.1.jar:2.3.1]
        at org.scalatra.ScalatraBase$$anonfun$invoke$1.apply(ScalatraBase.scala:265) ~[org.scalatra.scalatra_2.11-2.3.1.jar:2.3.1]
        at org.scalatra.ScalatraBase$$anonfun$invoke$1.apply(ScalatraBase.scala:265) ~[org.scalatra.scalatra_2.11-2.3.1.jar:2.3.1]
        at org.scalatra.ScalatraBase$class.withRouteMultiParams(ScalatraBase.scala:341) [org.scalatra.scalatra_2.11-2.3.1.jar:2.3.1]
        at org.scalatra.ScalatraServlet.withRouteMultiParams(ScalatraServlet.scala:49) [org.scalatra.scalatra_2.11-2.3.1.jar:2.3.1]
        at org.scalatra.ScalatraBase$class.invoke(ScalatraBase.scala:264) [org.scalatra.scalatra_2.11-2.3.1.jar:2.3.1]
        at org.scalatra.ScalatraServlet.invoke(ScalatraServlet.scala:49) [org.scalatra.scalatra_2.11-2.3.1.jar:2.3.1]
        at org.scalatra.ScalatraBase$$anonfun$runRoutes$1$$anonfun$apply$8.apply(ScalatraBase.scala:240) ~[org.scalatra.scalatra_2.11-2.3.1.jar:2.3.1]
        at org.scalatra.ScalatraBase$$anonfun$runRoutes$1$$anonfun$apply$8.apply(ScalatraBase.scala:238) ~[org.scalatra.scalatra_2.11-2.3.1.jar:2.3.1]
        at scala.Option.flatMap(Option.scala:171) ~[org.scala-lang.scala-library-2.11.8.jar:na]
        at org.scalatra.ScalatraBase$$anonfun$runRoutes$1.apply(ScalatraBase.scala:238) ~[org.scalatra.scalatra_2.11-2.3.1.jar:2.3.1]
        at org.scalatra.ScalatraBase$$anonfun$runRoutes$1.apply(ScalatraBase.scala:237) ~[org.scalatra.scalatra_2.11-2.3.1.jar:2.3.1]
        at scala.collection.immutable.Stream.flatMap(Stream.scala:489) ~[org.scala-lang.scala-library-2.11.8.jar:na]
        at org.scalatra.ScalatraBase$class.runRoutes(ScalatraBase.scala:237) [org.scalatra.scalatra_2.11-2.3.1.jar:2.3.1]
        at org.scalatra.ScalatraServlet.runRoutes(ScalatraServlet.scala:49) [org.scalatra.scalatra_2.11-2.3.1.jar:2.3.1]
        at org.scalatra.ScalatraBase$class.runActions$1(ScalatraBase.scala:163) [org.scalatra.scalatra_2.11-2.3.1.jar:2.3.1]
        at org.scalatra.ScalatraBase$$anonfun$executeRoutes$1.apply$mcV$sp(ScalatraBase.scala:175) ~[org.scalatra.scalatra_2.11-2.3.1.jar:2.3.1]
        at org.scalatra.ScalatraBase$$anonfun$executeRoutes$1.apply(ScalatraBase.scala:175) ~[org.scalatra.scalatra_2.11-2.3.1.jar:2.3.1]
        at org.scalatra.ScalatraBase$$anonfun$executeRoutes$1.apply(ScalatraBase.scala:175) ~[org.scalatra.scalatra_2.11-2.3.1.jar:2.3.1]
        at org.scalatra.ScalatraBase$class.org$scalatra$ScalatraBase$$cradleHalt(ScalatraBase.scala:193) [org.scalatra.scalatra_2.11-2.3.1.jar:2.3.1]
        at org.scalatra.ScalatraBase$class.executeRoutes(ScalatraBase.scala:175) [org.scalatra.scalatra_2.11-2.3.1.jar:2.3.1]
        at org.scalatra.ScalatraServlet.executeRoutes(ScalatraServlet.scala:49) [org.scalatra.scalatra_2.11-2.3.1.jar:2.3.1]
        at org.scalatra.ScalatraBase$$anonfun$handle$1.apply$mcV$sp(ScalatraBase.scala:113) [org.scalatra.scalatra_2.11-2.3.1.jar:2.3.1]
        at org.scalatra.ScalatraBase$$anonfun$handle$1.apply(ScalatraBase.scala:113) [org.scalatra.scalatra_2.11-2.3.1.jar:2.3.1]
        at org.scalatra.ScalatraBase$$anonfun$handle$1.apply(ScalatraBase.scala:113) [org.scalatra.scalatra_2.11-2.3.1.jar:2.3.1]
        at scala.util.DynamicVariable.withValue(DynamicVariable.scala:58) [org.scala-lang.scala-library-2.11.8.jar:na]
        at org.scalatra.DynamicScope$class.withResponse(DynamicScope.scala:80) [org.scalatra.scalatra_2.11-2.3.1.jar:2.3.1]
        at org.scalatra.ScalatraServlet.withResponse(ScalatraServlet.scala:49) [org.scalatra.scalatra_2.11-2.3.1.jar:2.3.1]
        at org.scalatra.DynamicScope$$anonfun$withRequestResponse$1.apply(DynamicScope.scala:60) [org.scalatra.scalatra_2.11-2.3.1.jar:2.3.1]
        at scala.util.DynamicVariable.withValue(DynamicVariable.scala:58) [org.scala-lang.scala-library-2.11.8.jar:na]
        at org.scalatra.DynamicScope$class.withRequest(DynamicScope.scala:71) [org.scalatra.scalatra_2.11-2.3.1.jar:2.3.1]
        at org.scalatra.ScalatraServlet.withRequest(ScalatraServlet.scala:49) [org.scalatra.scalatra_2.11-2.3.1.jar:2.3.1]
        at org.scalatra.DynamicScope$class.withRequestResponse(DynamicScope.scala:59) [org.scalatra.scalatra_2.11-2.3.1.jar:2.3.1]
        at org.scalatra.ScalatraServlet.withRequestResponse(ScalatraServlet.scala:49) [org.scalatra.scalatra_2.11-2.3.1.jar:2.3.1]
        at org.scalatra.ScalatraBase$class.handle(ScalatraBase.scala:111) [org.scalatra.scalatra_2.11-2.3.1.jar:2.3.1]
        at org.scalatra.ScalatraServlet.org$scalatra$servlet$ServletBase$$super$handle(ScalatraServlet.scala:49) [org.scalatra.scalatra_2.11-2.3.1.jar:2.3.1]
        at org.scalatra.servlet.ServletBase$class.handle(ServletBase.scala:43) [org.scalatra.scalatra_2.11-2.3.1.jar:2.3.1]
        at org.scalatra.ScalatraServlet.handle(ScalatraServlet.scala:49) [org.scalatra.scalatra_2.11-2.3.1.jar:2.3.1]
        at org.scalatra.ScalatraServlet.service(ScalatraServlet.scala:54) [org.scalatra.scalatra_2.11-2.3.1.jar:2.3.1]
        at javax.servlet.http.HttpServlet.service(HttpServlet.java:790) [javax.servlet.javax.servlet-api-3.1.0.jar:3.1.0]
        at org.eclipse.jetty.servlet.ServletHolder.handle(ServletHolder.java:800) [org.eclipse.jetty.jetty-servlet-9.2.5.v20141112.jar:9.2.5.v20141112]
        at org.eclipse.jetty.servlet.ServletHandler.doHandle(ServletHandler.java:587) [org.eclipse.jetty.jetty-servlet-9.2.5.v20141112.jar:9.2.5.v20141112]
        at org.eclipse.jetty.servlet.ServletHandler.doScope(ServletHandler.java:517) [org.eclipse.jetty.jetty-servlet-9.2.5.v20141112.jar:9.2.5.v20141112]
        at org.eclipse.jetty.server.handler.ScopedHandler.handle(ScopedHandler.java:141) [org.eclipse.jetty.jetty-server-9.2.5.v20141112.jar:9.2.5.v20141112]
        at org.eclipse.jetty.server.handler.HandlerWrapper.handle(HandlerWrapper.java:97) [org.eclipse.jetty.jetty-server-9.2.5.v20141112.jar:9.2.5.v20141112]
        at org.eclipse.jetty.server.Server.handle(Server.java:497) [org.eclipse.jetty.jetty-server-9.2.5.v20141112.jar:9.2.5.v20141112]
        at org.eclipse.jetty.server.HttpChannel.handle(HttpChannel.java:310) [org.eclipse.jetty.jetty-server-9.2.5.v20141112.jar:9.2.5.v20141112]
        at org.eclipse.jetty.server.HttpConnection.onFillable(HttpConnection.java:248) [org.eclipse.jetty.jetty-server-9.2.5.v20141112.jar:9.2.5.v20141112]
        at org.eclipse.jetty.io.AbstractConnection$2.run(AbstractConnection.java:540) [org.eclipse.jetty.jetty-io-9.2.5.v20141112.jar:9.2.5.v20141112]
        at org.eclipse.jetty.util.thread.QueuedThreadPool.runJob(QueuedThreadPool.java:620) [org.eclipse.jetty.jetty-util-9.2.5.v20141112.jar:9.2.5.v20141112]
        at org.eclipse.jetty.util.thread.QueuedThreadPool$3.run(QueuedThreadPool.java:540) [org.eclipse.jetty.jetty-util-9.2.5.v20141112.jar:9.2.5.v20141112]
        at java.lang.Thread.run(Thread.java:748) [na:1.8.0_181]
    
    
  • Using single-sign-on oauth2 across many sites in Kubernetes

    Using single-sign-on oauth2 across many sites in Kubernetes

    You have a set of web resources (a kibana dashboard, a grafana dashboard, a few other misc ones). You are setting them all up with ‘basic’ auth because its simple, and secretly hoping no-one guesses “MyS3cret”. You, my friend, are doing it wrong. Let me explain. (see how to do this with Istio here).

    It turns out there is a protocol called ‘oauth2’. You have probably seen this on many sites (e.g. ‘sign in with Google’/’GitHub’ etc). As a consumer, you should always do that when you can. Its much better to have one strong setup (your Google one) than many weak ones. When you ‘sign in with Google’ it doesn’t actually share your password or profile, it just does authentication.

    Now, how can we translate that into the misc set of web pages that we run in our system? This is super simple but it wasn’t well documented and took me a bit to figure out how to do it well.

    First, lets create a small yaml file, ‘oauth2-values.yaml’. Fill it in like so. You will need to get the clientID and clientSecret. I am using Google (so https://console.cloud.google.com/apis/credentials), but there are other sites like GitHub, GitLab, etc you can use, and ample instructions online for this. In the Google case, allow redirect URI of ‘oauth2.MYDOMAIN/oauth2/callback

    config:
      clientID: "xxxxx.apps.googleusercontent.com"
      clientSecret: "yyyyyyy"
      # Create a new cookieSecret with the following command
      # python -c 'import os,base64; print base64.b64encode(os.urandom(16))'
      cookieSecret: "zzzzz=="
      configFile: |-
        pass_basic_auth = false
        pass_access_token = true
        set_authorization_header = true
        pass_authorization_header = true
    
    image:
      repository: "quay.io/pusher/oauth2_proxy"
      tag: "v3.1.0"
      pullPolicy: "IfNotPresent"
    
    extraArgs:
      provider: "google"
      email-domain: "MYDOMAIN"
      cookie-domain: "MYDOMAIN"
      upstream: "file:///dev/null"
      http-address: "0.0.0.0:4180"
    
    ingress:
      enabled: true
      annotations:
        ingress.kubernetes.io/ssl-redirect: 'true'
        kubernetes.io/ingress.class: nginx
        kubernetes.io/tls-acme: "true"
        certmanager.k8s.io/cluster-issuer: letsencrypt
        nginx.ingress.kubernetes.io/proxy-body-size: 100m
        path: /
      hosts:
        - oauth2.MYDOMAIN
        - oauth2.MYDOMAIN
      tls:
        - secretName: oauth2-noc-tls
          hosts:
            - oauth2.MYDOMAIN
            - oauth2.MYDOMAIN
    

    Now we are going to install an ‘oauth2 proxy’. We will run *1* for our entire domain, and it will allow anyone with our domain to access.

    helm install -f oauth2-values.yaml --name oauth2 --namespace oauth2 stable/oauth2-proxy

    OK, now we just need to add 2 annotation lines to every ingress:

     nginx.ingress.kubernetes.io/auth-signin: https://oauth2.MYDOMAIN/oauth2/start?rd=$http_host$request_uri
     nginx.ingress.kubernetes.io/auth-url: https://oauth2.MYDOMAIN/oauth2/auth

    And boom we are done. I’m assuming you are already using the excellent cert-manager so your site is TLS protected. Now you have strong sign-on, and, more usefuly, single-sign-on.

    The key is that ‘cookie-domain’ above. It means we are using a single oauth2-proxy protecting the entire domain, and, once one site is signed in, all sites are signed in. So great!

    Even better, if you use Multi-Factor-Authenticaation it fits in with it. Rarely type a password again, prevent needing passwords for new sites, and be more secure. What’s not to love!

  • Multiple Kubernetes contexts and your multi-coloured prompt

    Multiple Kubernetes contexts and your multi-coloured prompt

    You are working with multiple clouds. But, you keep changing context and then accidentally applying something. Ooops. If only this could be simpler.Drop these two bits in your .bashrc. Now you can simply say ‘context foo’ and be in that context with a little bit of colour in your prompt to remind you.Side node:  the \[$B1\], the \[ is important otherwise bash doesn’t know how ‘wide’ that is and your command-history will go funny for long lines.

    context() {
      if [ $# -eq 1 ]
      then
          if [ "$1" = "list" ]; then
    	  /usr/bin/kubectl config get-contexts -o name
          else
    	  /usr/bin/kubectl config use-context "$1" 2>/dev/null
          fi
      fi
      B1="$(tput bold)$(tput setf 2)"
      B0="$(tput sgr0)"
      KUBERNETES_CONTEXT="[$(/usr/bin/kubectl config current-context | cut -c1-11)]"
      PS1='\u@\h\[$B1\]$KUBERNETES_CONTEXT\[$B0\]:\W\$ '
    
      # Assumes you have source <(kubectl completion bash) above
      complete -F __kubectl_config_get_contexts context
    }
    
    context
    
  • I Declare is not the same as Make It So

    I Declare is not the same as Make It So

    Years ago there was a really great TV show. Kirk, Spock, McCoy, Scotty. You know the one. Later it was remade with some characters long forgotten. Except 1. Picard. His trademark ‘make it so’ was the hallmark of a great leader. With this one phrase he could turn his attention elsewhere, knowing that it would happen.


    This is also the hallmark of a new world order in computing. Declarative vs Imperative. In a ‘declarative’ world I document the desired state, and it is the job of the system to ‘make it so’. In a declarative world you don’t need to worry about ‘how’, and you don’t need to worry about things later breaking… If they change, the system puts it back. Its a control system, like that PID controller you learned years ago.


    In an imperative world, you instruct each step. Install that software, configure that port, etc. You are the controller. If something later breaks, you notice and change it.


    OK, we are clear on the concept. Now does it work in practice? Mostly. Where it breaks are things that cannot be updated. Let’s take an example. Let’s say I have a horizontally scalable app. Its beautiful, shards of all shapes and sizes are hanging out. Now, in order to maintain consistency, I need a minimum number online. As I scale it up, that number would change, right? It might be 2/3 of the total online number, something like that.


    Enter the humble PodDisruptionBudget. Lets say I use this feature, in conjunction with setting the # of replicas in my StatefulSet.

    apiVersion: policy/v1beta1
     kind: PodDisruptionBudget
     metadata:
       labels:
         app: COOL
       name: MYAPP
     spec:
       minAvailable: 2
       selector:
         matchLabels:
           app: COOL

    What is one to do here when I follow the law of the declarative world. I set the config the way I want, commit to git and… “The PodDisruptionBudget “master” is invalid: spec: Forbidden: updates to poddisruptionbudget spec are forbidden.” O no. I’m now stuck.
    Hmm. I cannot ‘make it so’?

  • When you throw in the towel on declarative

    When you throw in the towel on declarative

    I’ve talked a lot recently about the declarative versus imperative viewpoints. Its the Lilliput vs Blefuscu of our time. Its the vi versus emacs saga.

    Today I ran into a scenario that I just threw in the towel on. I had a largish yaml file (~300 lines) that is actually a config to a container (e.g. its not Kubernetes yaml).

    I’m using kustomize which means i cannot use the tricks I would in helm with ‘tpl’ and {{ }} (those are imperative or templating!).

    I need to change one line in it per environment (a hostname). And I really didn’t feel good about copying the file into multiple output directories.

    After an hour, I threw in the towel. The declarative police will come and get me, but I present to you my solution. Open sourced for your pleasure.

    See my new container ‘envsubst‘. It auto-builds into dockerhub for you lazy folks. You are one

    docker pull agilicus/envsubst

    away from this big pile of perfection.

    It’s simple. This container takes arguments in the form input:output. input will be passed through envsubst and redirected to output, making directories as needed.

    docker run --rm -it agilicus/envsubst /etc/passwd:/dev/stdout

    So e.g.:

    docker run --rm -it agilicus/envsubst /config/ifile:/etc/config/dir/ofile

    will take ifile, run through envsubst, mkdir -p /etc/config/dir, and place the output in /etc/config/dir/ofile

    Now, from Kubernetes, I make an emptyDir: {}. I mount it (read-only) in my ultimate container, and read-write in this new one (as an initContainer). I pass args as the list of files above. Presto. All environment variables are expanded. Into that big grotty yaml file that started this problem i place a ${THE_URL}. And I’m done.

    Am I proud of this? Well, I don’t have a lot of skin in the declarative vs imperative game. So. Um. I’m done with it.

  • pause: how to debug your Kubernetes setup

    pause: how to debug your Kubernetes setup

    Sometimes you need a debug container hanging around to check something from within your cluster. You cobble something together, make the ‘command’ be ‘sleep 3600’ or ‘tail -f /dev/null’ and call it a day. But they don’t terminate gracefully.

    kubectl run debug --restart=Never --image=agilicus/pause

    The magic is this ‘pause.c’. It simply waits for a couple of signals, calls pause(2) and thus waits. It exits immediately if anything happens. This means that it uses near zero resources while sleeping and exits gracefully.

    #include <unistd.h>
    #include <signal.h>
    
    static void 
    _endme(int sig)
    {
      _exit(0);
    }
    int
    main(int argc, char **argv)
    {
      signal(SIGINT, _endme);
      signal(SIGTERM, _endme);
      pause();
      _exit(0);
    }
    

    Now, this seems esoteric, but give it a try. Now, once you have run that run command above, you can simply  kubectl exec -it debug bash and from in there apk add tool.

    So you might apk add curl and then curl http://myservice. Simple, right?

    Now, I know a lot of you are committing the cardinal sin of having a shell and debug environment in every container just in case. Well, let me tell you, that security attacker is going to love your just in case toolset. Why not let the container run as root with a writeable filesystem and a compiler while we are at it.

    You can check out the copious code @ https://github.com/Agilicus/pause.

  • Let’s Encrypt Staging. Curl without the -k

    Let’s Encrypt Staging. Curl without the -k

    Are you lazy and use ‘-k’ to curl all the time when using Let’s Encrypt staging? Or worse, use snake-oil? Or even worse, use just http for ‘test’?

    curl -sSL https://letsencrypt.org/certs/fakelerootx1.pem > fakelerootx1.pem
    curl --cacert fakelerootx1.pem https://my-site-issued-with-le-staging

    There, how hard was that? Now you can test that the cert was generated properly (even though its not properly signed).

  • Speed your CI, decrease your cost. The preemptible node

    Speed your CI, decrease your cost. The preemptible node

    We are running gitlab, self-hosted, in Google Kubernetes Engine (GKE). And we use gitlab runner for our CI. And I have to say, this has been working beyond expectations for me: it works really well.

    Now a bit of a puzzle hit our happy landscape about 6 months ago or so. One large project which didn’t economically fit into the model. I tried a few things, finally settling on running 2 runners (each in a separate Kubernetes cluster). The one in the GKE was labelled ‘small’ and the other ‘big’. The ‘big’ one runs in my basement on the 72 thread / 256GB machine which would be uneconomical to leave running in GKE.

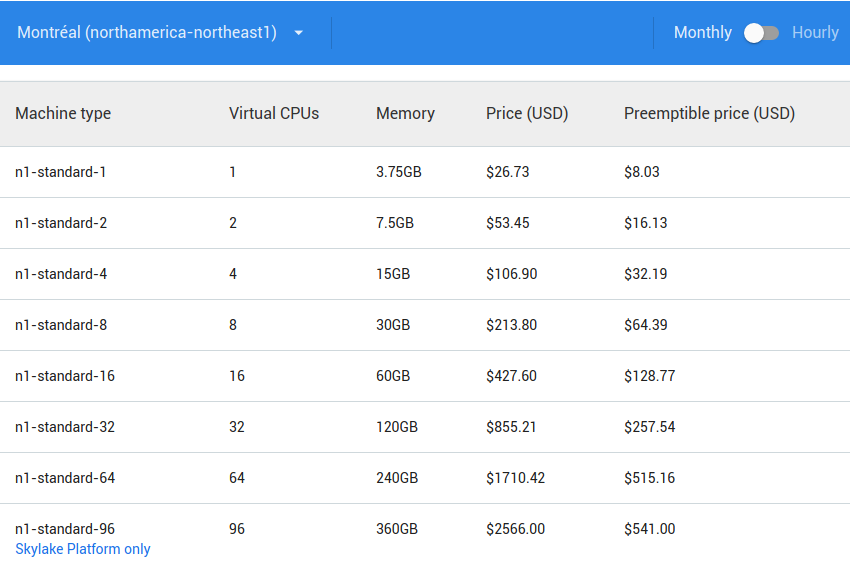
    Enter the ‘pre-emptible’ VM. Pricing is here. As you can see, its quite a bit less. In return, you get reset at least once per day. Also, if the neighbours get ‘noisy’ you get unscheduled for a bit. This is probably acceptable for the CI pipeline.

    I added this nodeSelector to the gitlab-runner:

    nodeSelector:
      cloud.google.com/gke-preemptible: "true"

    I then added a ‘taint’ (no really that is what it is called) to prevent this nodepool from attracting scheduled Pods that didn’t explicitly tolerate:

    kubectl taint nodes [NODE_NAME] cloud.google.com/gke-preemptible="true":NoSchedule
    

    And boom, we have a faster ‘small’ CI, which costs less than what it replaced. I still am going to keep the beast of the basement online for a bit.

  • ‘first’ and ‘only’ are four-letter words in cloud. How to do something ‘once’ and ‘first’ in a Kubernetes Deployment

    ‘first’ and ‘only’ are four-letter words in cloud. How to do something ‘once’ and ‘first’ in a Kubernetes Deployment

    A funny problem exists that you may not be aware of. If you like being blissfully unaware, perhaps head over here to kittenwar for a bit. But it involves the words ‘first’ or ‘only’.

    You see, in a cloud-native world, there is a continuum. There is no ‘first’ or ‘only’, only the many. Its kind of like the ‘borg’. You have a whole bunch of things running already, and there was no start time. There was no bootstrap, initial creation. No ‘let there be light’ moment. But, you may have some pre-requisite, some thing that must be done exactly once before the universe is ready to go online.

    Perhaps its installing the schema into your database. Or upgrading it. if you have a Deployment with n replicas, if n>1, they will all come up and try and install this schema, non-transactionally, badly.

    How can you solve this dilemma?  You could read this long issue #1171 here. It’s all going in the right direction, replicaset lifecycle hooks, etc. And then it falls off a cliff. Perhaps all the people involved in it were beamed up by aliens? It seems the most likely answer.

    But, while you are waiting, I have another answer for you.
    Let’s say you have a Django or Flask (or Quart you Asynchio lover!) application. It uses SQLAlchemy. The schema upgrades are bulletproof and beautiful. If only you had a time you could run them in Kubernetes.

    You could make a Job.  It will run once. But only once, not on upgrade. You can make an initContainer, but it runs on each Pod in the replica (here a Deployment). So, lets use a database transaction to serialise safely.

    Now, last chance to head to kittenwar before this gets a bit complex. OK, still here? Well, uh, Python time.

    In a nutshell:

    • create table
    • start nested session
    • lock table
    • run external commands
    • commit
    • end session

    Easy, right? I chose the external commands method rather than calling (here flask) migrate to allow the technique to work for other things.

    Hack on.

    """
    This exists to solve a simple problem. We have a Deployment with >1
    Pods. Each Pod requires that the database be up-to-date with the
    right schema for itself. The schema install is non-transactional.
    If we start 2 Pods in parallel, and each tries to upgrade the schema,
    they fail.
    If we don't upgrade the schema, then we can't go online until some
    manual step.
    Instead we create a 'install_locks' table in the database. A wrapper
    python script creates a transaction lock exclusive on this table,
    and then goes on w/ the initial setup / upgrade of the schema.
    This will serialise. Now 1 Pod will do the work while the other waits.
    the 2nd will then have no work to do.
    Whenever the imageTag is changed, this deployment will update
    and the process will repeat.
    The initContainer doing this must run the same software.
    Note: we could have done this not as an initContainer, in the main
    start script.
    See kubernetes/community#1171 for a longer discussion
    """
    import sqlalchemy
    import environ
    import os
    """
    Could have just run this:
    db = SQLAlchemy(app)
    …
    migrate = Migrate(app, db)
    from flask_migrate import upgrade as _upgrade
    _upgrade()
    but want this to be generate for other db operations
    so call os.system
    """
    from sqlalchemy import create_engine
    from sqlalchemy.orm import sessionmaker
    from sqlalchemy import Table, Column, Integer, String, MetaData, ForeignKey
    from sqlalchemy import inspect
    env = environ.Env(DEBUG=(bool, False), )
    SQLALCHEMY_DATABASE_URI = env(
    'SQLALCHEMY_DATABASE_URI',
    default='sqlite:////var/lib/superset/superset.db')
    print("USE DB %s" % SQLALCHEMY_DATABASE_URI)
    db = create_engine(SQLALCHEMY_DATABASE_URI)
    Note: there is a race here, we check the table
    then create. If the create fails, it was likely
    created by another instance.
    if not db.dialect.has_table(db, 'install_locks'):
    metadata = MetaData(db)
    Table('install_locks', metadata, Column('lock', Integer))
    metadata.create_all()
    Session = sessionmaker(bind=db)
    session = Session()
    session.begin_nested()
    session.execute('BEGIN; LOCK TABLE install_locks IN ACCESS EXCLUSIVE MODE;')
    os.system("/usr/local/bin/superset db upgrade")
    … other init commands …
    session.commit()
  • Let’s Encrypt Staging. Safely.

    Let’s Encrypt Staging. Safely.

    Let's Encrypt. One of the best things done in recent years. It makes it simple and free to have decent TLS security. There's really no excuse not to now.

    One minor challenge has been the ‘staging’ environment. You want to use this when you are debugging your setup,  automatically creating certificates for the first time, etc. They have a generous but not unlimited set of certificates you can create per time and you don’t want to hit this limit because your un-debugged script went nuts. So for this they make the staging environment available.

    Now the only problem with the staging environment, the intermediate certificate is not in the root store of your browser. And there’s a reason. They don’t hold it to the same standard (its for debugging after all).

    So let’s say you have a shiny new .dev domain. Its in the HSTS store of your browser, and you want to use Let’s Encrypt staging.

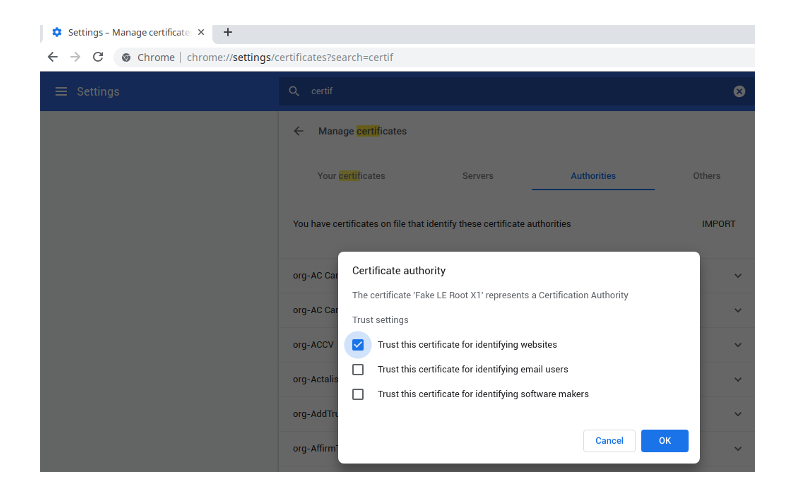
    Well, you can simply import the staging intermedate cert into a new browser profile, one that is only used for this testing. Download the Fake LE Intermediate X1. First, we make a new HOME dir (mkdir -p ~/.google-chrome-le). Now, run a chrome with HOME=~/.google-chrome-le google-chrome --profile-directory=lets-encrypt-staging-trust. And then in it, import this cert. Use this profile, and only this profile, for your testing.

    Why did we create a new HOME dir? Well, chrome uses ~/.pki/nssdb  for all certificate store, across all instances. If you don’t do this, you will be importing the Let’s Encrypt fake store to your main chrome.

    Import the certificate by opening chrome://settings/certificates?search=certif and then select ‘authorities’. This browser has none of your bookmarks, saved passwords, etc. So don’t make it sync them 🙂

    Have fun using the Let’s Encrypt staging environment. When done, don’t forget to switch to the live environment tho!

    I made a .desktop file and special icon so i could launch it like my regular browser, as below, but this is not required

    $ cat ~/.local/share/applications/chrome-le.desktop
    [Desktop Entry]
    Exec=google-chrome-beta "--profile-directory=lets-encrypt-staging-trust"
    GenericName=chrome-le
    Icon=Pictures/chrome-le.png
    Name=chrome-agilicus-le
    NoDisplay=false
    Path=
    StartupNotify=false
    Terminal=false
    Type=Application
    X-DBUS-ServiceName=
    X-DBUS-StartupType=none