VTScada and Twilio Direct Access Through Firewall
This is a technical walk through of how to set up Agilicus AnyX with Twlilio® and VTScada for remote use without a VPN or DMZ. See the Infosheet for a high level view.
The Case Study “Zero Trust Remote Operations and Asset Management” provides more detail on how this can be leveraged.
Overview: VTScada (v12.1.30+) and Twilio Inbound Access
Twilio® requires inbound access for the Twilio Telephone API to interact with the VTScada® environment.
This can be challenging to achieve since it is never recommended to have a VTScada system exposed to the Internet.
Thin security policies like a port-forward or a DMZ are insufficient.
In this example we show VTScada and Twilio Inbound Access without opening the firewall, without a VPN, without a fixed IP, without port-forwarding.
As of VTScada v12.1.30
( https://www.vtscada.com/general-release-v12-1-30/ ) ,
The use of custom address lists for server connections in the Thin Client/Server Setup dialog simplifies the configuration steps and no longer requires custom SSL certificate installations.
In this guide we are going to be making some changes to the VTScada setup. Notably:
- We will configure the Agilicus inbound server name in the VTScada address connection dialog
- We will create a Twilio endpoint on VTScada
- We will create an application in Agilicus AnyX
- We will select and enable a firewall rule in the Agilicus AnyX for the Twilio endpoint
This is a technical walk through of how to set up Agilicus AnyX with Twlilio® and VTScada for remote use without a VPN or DMZ. See the Infosheet for a high level view.
The Case Study “Zero Trust Remote Operations and Asset Management” provides more detail on how this can be leveraged.
Requirements
The following requirements need to be satisfied in the VTScada configuration to enable Twilio:
- VTScada must be version v12.1.30 or newer,
- not be the free version, and must support alarms
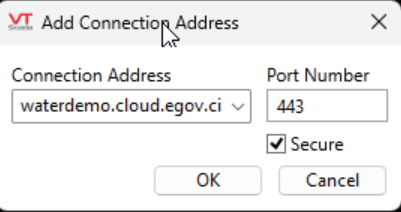
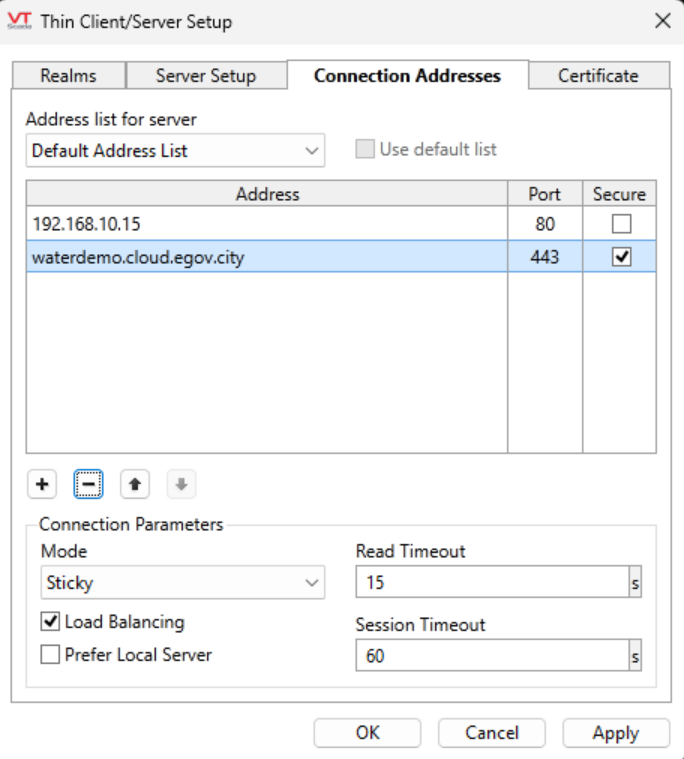
- The VTScada “Connection Addresses” dialog tab of thin client manager must be configured with a host entry that matches exactly the Agilicus configured application hostname in the Server List. In this walkthrough, we will be using the hostname “waterdemo.cloud.egov.city”
Additionally, to complete this exercise, you will need access to a Twilio account, complete verification of the telephone number you wish to add to the roster, and register a telephone number in your Twilio account.
In this guide, we will set up a VTScada environment to be authenticated by proxy. This means a server will be available by a hostname, but no traffic will be allowed to the VTScada environment until the authorization rules have been met.
This may include identity and multi-factor credential verification. The Agilicus AnyX will manage a valid third-party signed TLS certificate via our partner Let’s Encrypt, configure to ensure the best practices for TLS are followed, and ensure all network traffic is audited and subject to the additional access control measures enabled through Agilicus AnyX.
Agilicus AnyX Application Configuration
Use the ‘New Application’ stepper to create a new application.
In this example, the endpoint we are creating will be called ‘waterdemo’ in the Organization using the cloud.egov.city subdomain.
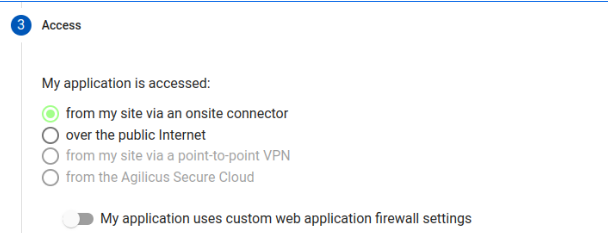
Choose “My application is accessed: from my site via an onsite connector”
Configure the upstream service to match the server realm being used by VTScada. Here we can use the “Default” Realm server configured on HTTP Port 80 .
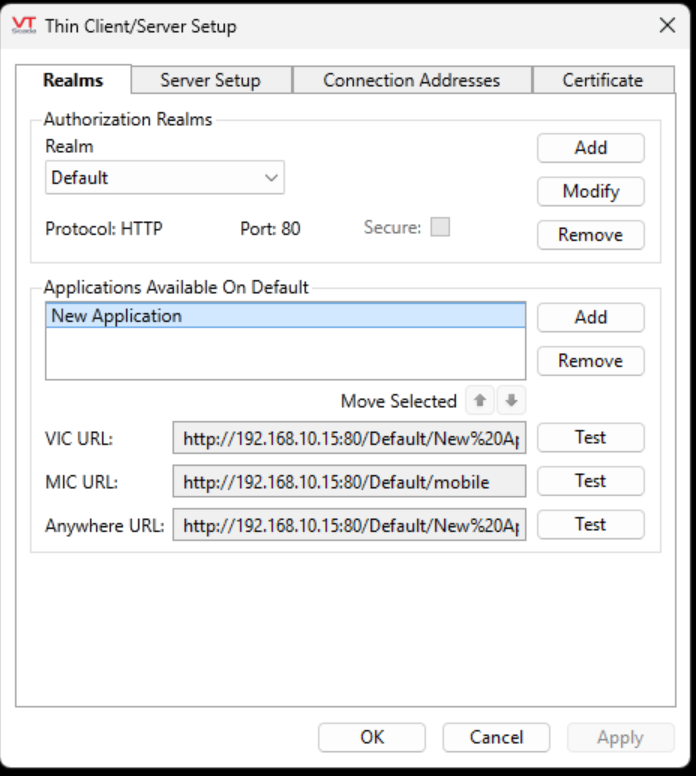
For the upstream local hostname/ip address, we can enter the IP address as used by the Realm server seen above (ie: 192.168.10.15 ). If selecting the internal hostname, enter the value of `hostname` lowercase (e.g. open a ‘cmd’ shell on the VTScada machine and run that to get the exact computer name), ensure the host running the Agilicus connector can both resolve the hostname locally, and has reachability to the TCP port as well

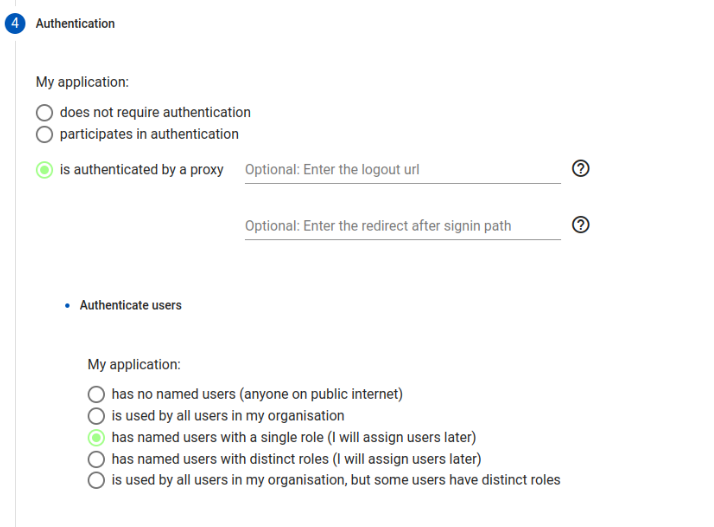
For authentication, select is authenticated by a proxy, has named users with a single role.
Navigate to Applications/Overview, and select the “Configure Application” action for the newly created application. This will move you to the application’s details.
Choose the Security tab to configure the firewall to configure the Twilio firewall rules.
Open the ‘Configure Application’ for the newly created VTScada application.
Choose the ‘Security’ tab to configure the firewall.
Create a new Firewall Rule allowing POST and GET methods for anyone matching the prescribed path.
The path can be described as containing the Realm name, Realm GUUID and Telecom specific syntax.
The <realm> will be a GUUID and can be seen in the URL when loading up the Anywhere Client, e.g. 48708544-07e3-4d1b-9b6e-ea8ace4b00fe.
The GUUID follows a standard string pattern.
We can then select one of three Firewall rule option that employ ever stricter limitations to access the VTScada server path for the Twilio endpoint.
The first rule, can use a Regular Expression to match the Twilio path with a GUUID pattern across all Realms:
Option 1.
/[0-9a-fA-F]{8}-([0-9a-fA-F]{4}-){3}[0-9a-fA-F]{12}/TELECOM/Twilio
If we wish to limit to the particular realm (eg: Default) , we can anchor (^) the firewall rule and match the Realm specific URL path precisely. This rule would be:
Option 2.
^/Default/[0-9a-fA-F]{8}-([0-9a-fA-F]{4}-){3}[0-9a-fA-F]{12}/TELECOM/Twilio
Finally, if we wish to filter specifically for both the Realm and GUUID path, we can anchor the path match (^) to the beginning of the URL and also the specific GUUID value.
Option 3.
^/Default/48708544-07e3-4d1b-9b6e-ea8ace4b00fe/TELECOM/TwilioVTScada Configuration
In the “Thin client/Server setup” menudialog, select “Connection Addresses” and configure the Agilicus external server name exactly as previously configured in the Agilicus Application stepper (in this case, the waterdemo FQDN). Make sure to check the “Secure” checkbox and specify port 443.
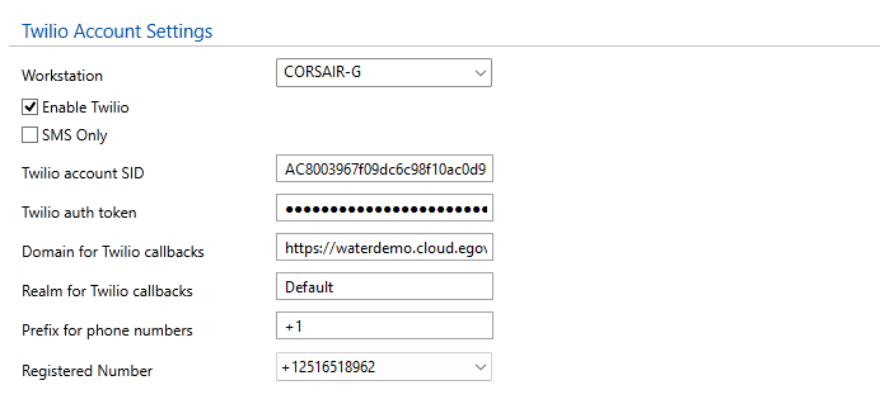
Configure the user credentials, domain and realm in the Alarm properties. The realm matches the configured realm and domain must be https://<agilicusexternalname>
Testing the Alarm Call-Out
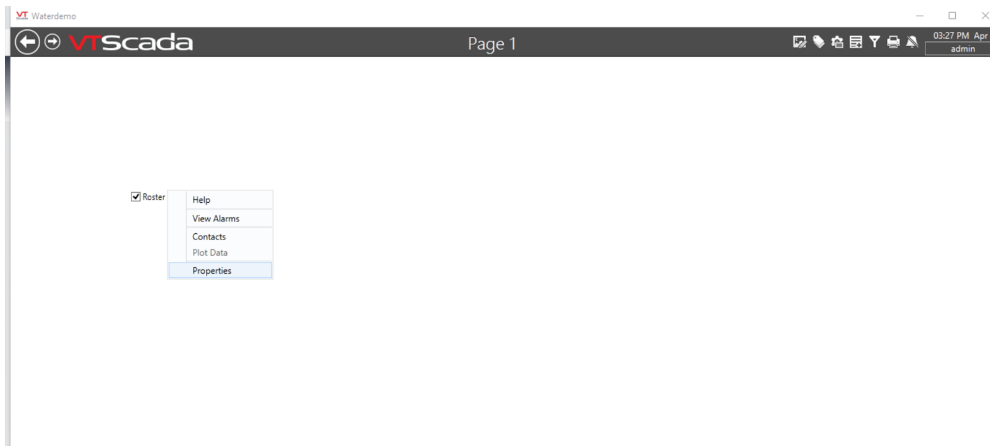
To test alarm call-out, use Idea-studio to create new page with “Roster Alarm Test” widget
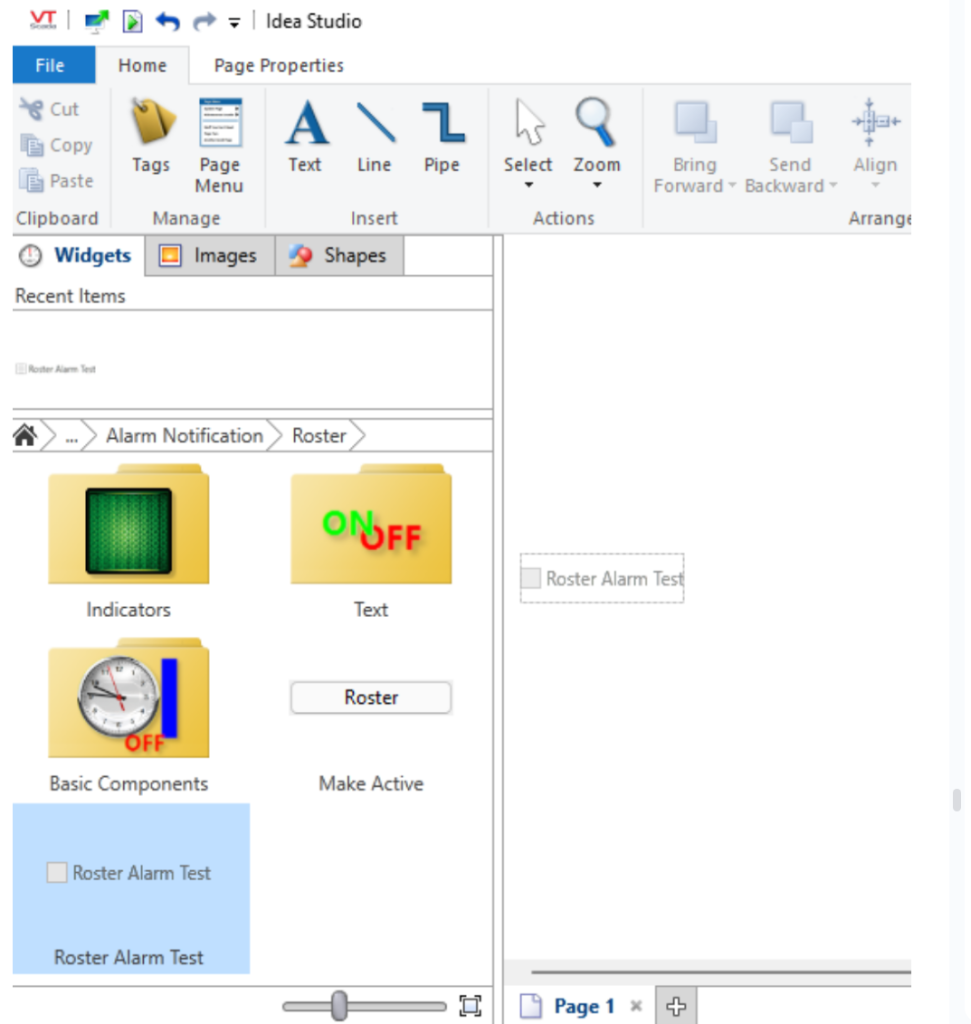
The widget is located under
Tag Types\Communications\Alarm Notification\Roster
Assign the tag “Default Call-Out Off
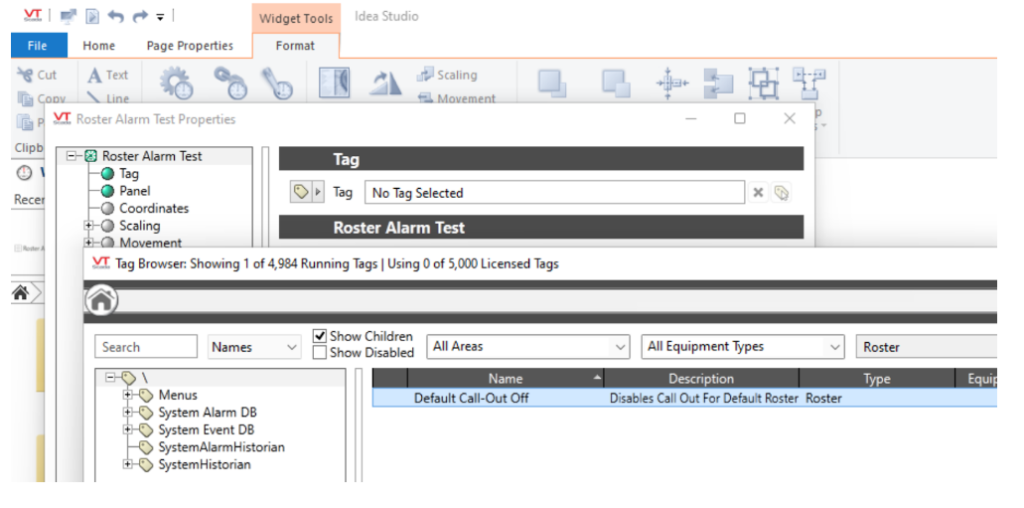
You can now use the newly created page to configure the roster and trigger an alarm.
Checking the checkbox will trigger an alarm.
Right clicking the checkbox will allow you to edit the call-out roster.
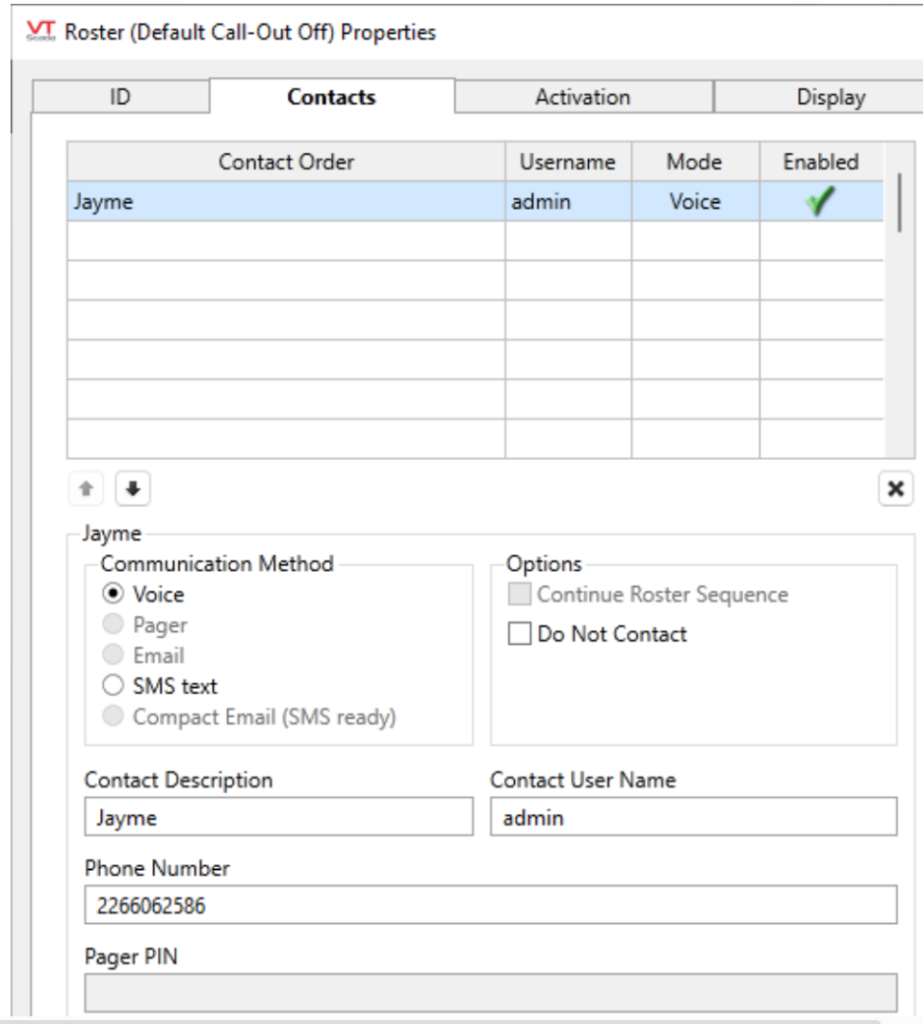
Create a contact row. Link the contact to the user with alternate contact details.
If you have successfully configured Twilio and Agilicus, you will receive a phone call-out repetitively until the alarm is acknowledged after the roster callout checkbox has been toggled. You can see the call-out status in the alarms page.

Troubleshooting
VTScada Twilio logs will also be present in your VTScada installation path under:
<VTScada Installation Path>\<Application Name>\Data\TwilioLogs New log files are only written when the max # of lines (configurable) is reached or the application is stopped. So it’s possible the log files for the current troubleshooting session are not present until the application is stopped.
Here we can verify the callback URLs are being passed correctly to Twilio, in log lines such as:
  "Body": {
      "VoiceUrl": "https://waterdemo.cloud.egov.city/Default/48708544-07e3-4d1b-9b6e-ea8ace4b00fe/TELECOM/Twilio/3ea70e49-40fc-4c6a-87ad-9b8537e89ed2/Answer",
      "StatusCallback": "https://waterdemo.cloud.egov.city/Default/48708544-07e3-4d1b-9b6e-ea8ace4b00fe/TELECOM/Twilio/3ea70e49-40fc-4c6a-87ad-9b8537e89ed2/Status",
      "FallbackUrl": "https://waterdemo.cloud.egov.city/Default/48708544-07e3-4d1b-9b6e-ea8ace4b00fe/TELECOM/Twilio/3ea70e49-40fc-4c6a-87ad-9b8537e89ed2/Error",
      "VoiceMethod": "POST",
      "SmsUrl": "https://waterdemo.cloud.egov.city/Default/48708544-07e3-4d1b-9b6e-ea8ace4b00fe/TELECOM/Twilio/3ea70e49-40fc-4c6a-87ad-9b8537e89ed2/SMSMessage",
      "SmsMethod": "POST",
      "SmsFallbackUrl": "https://waterdemo.cloud.egov.city/Default/48708544-07e3-4d1b-9b6e-ea8ace4b00fe/TELECOM/Twilio/3ea70e49-40fc-4c6a-87ad-9b8537e89ed2/SMSError",