Microsoft Remote Desktop
Most of your applications are now modern, responsive web apps. However, you still have some native Desktop applications. You need to be able to access them remotely, safely, simply. You need to be able to grant access to specific Desktops to specific users, but, they may not work for you. Your Desktop may run in a site without a public IP, or a configurable firewall allowing safe inbound access. Perhaps your house, perhaps a branch office.
In 10 minutes you can have 1-click remote access to that Desktop. With no configuration onsite, no change to the Desktop or the firewall.
Via Remote Desktop Protocol, or via VNC.
Via a Native Client, or via a web interface.
Desktop Access Setup
Note: you can use a site-to-site VPN via IPSEC, or use the onsite Agilicus Connector for each pool of servers. These instructions assume the latter.
1. CREATE ORGANISATION
Your Organisation lets you setup your identity providers, your DNS name (CNAME), and control your users.
See SIGNUP
2. SETUP IDENTITY
You can enable Google, Apple, LinkedIn as check box items. You may also wish to enable Azure Active Directory
Also setup initial users and group membership.
3. CREATE CONNECTOR PER SITE
Each pool of servers needs a method to reach it. This can be a site-to-site VPN, or an on-site connector. Install a connector now, this may be on each SSH server, on 1 of the servers that can reach the others, on a machine in the same network, its up to you.
4. CREATE DESKTOP RESOURCE
Each Desktop host will require a Desktop Resource to provide the coordinates. This will include a name, and hostname/IP. The Hostname/IP will be in the internal coordinates.
5. ASSIGN PERMISSIONS
We must now assign ‘Owner’ permission to each user or group that should be able to connect. See “Resource Permissions” for more information.
6. CONNECT
From https://profile.YOURDOMAIN, you may open the Remote Desktop. By default this will launch your native remote desktop client (e.g. mstsc). You may also install the Launcher from the Profile, will give you an icon on your regular operating system start menu.
Detailed Desktop Creation
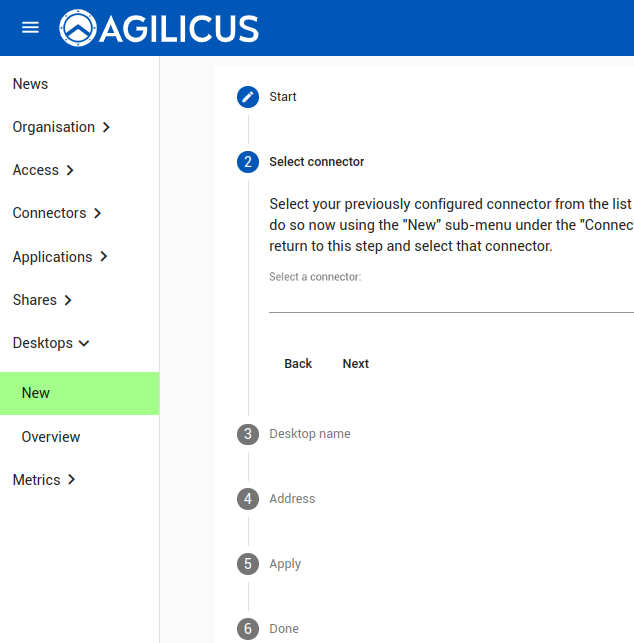
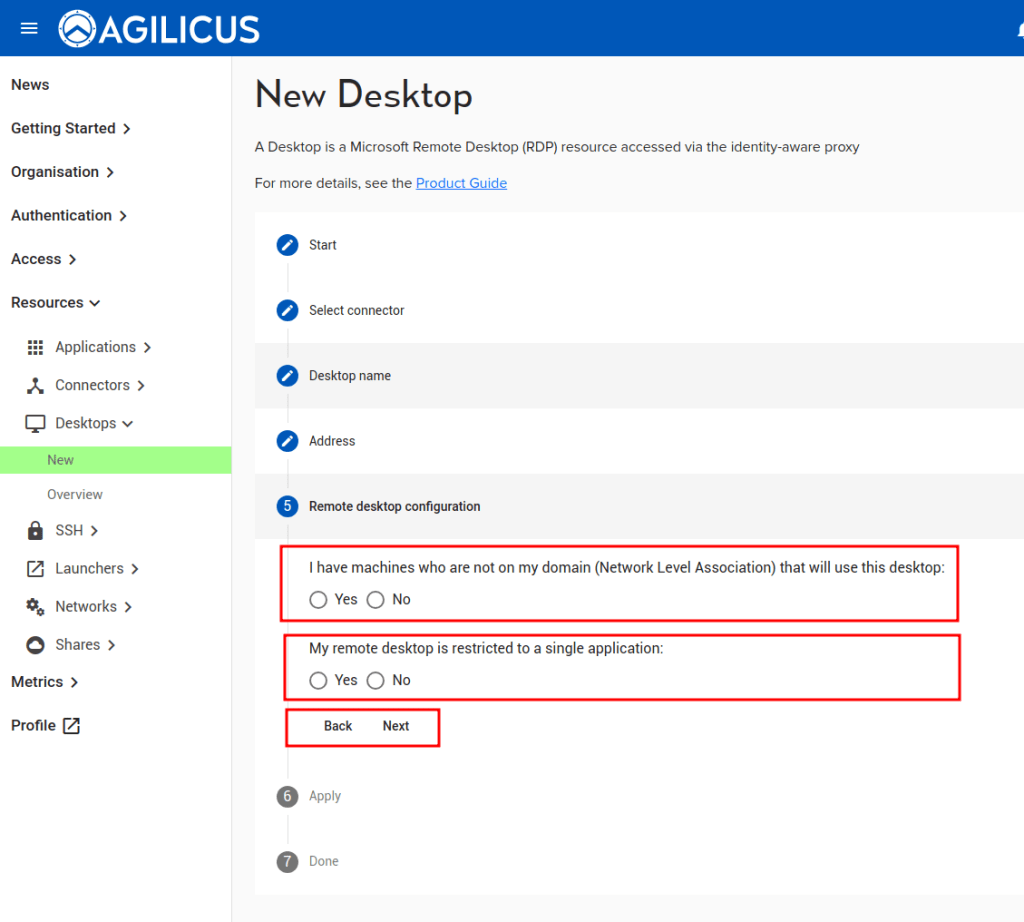
The ‘Desktops/New’ asks 3 questions:
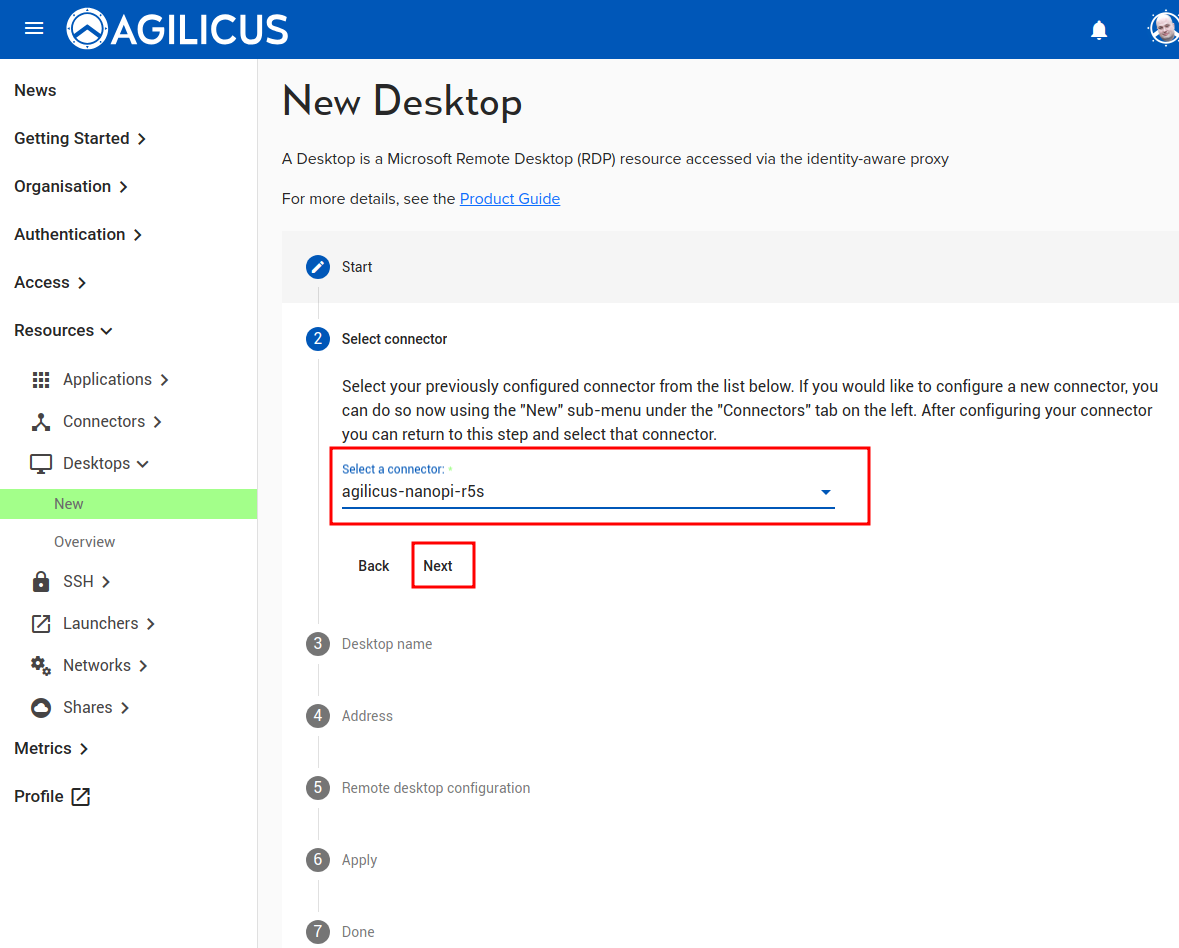
- Connector. This you will have already setup, you need 1 per site (or more if you wish, e.g. 1 per host)
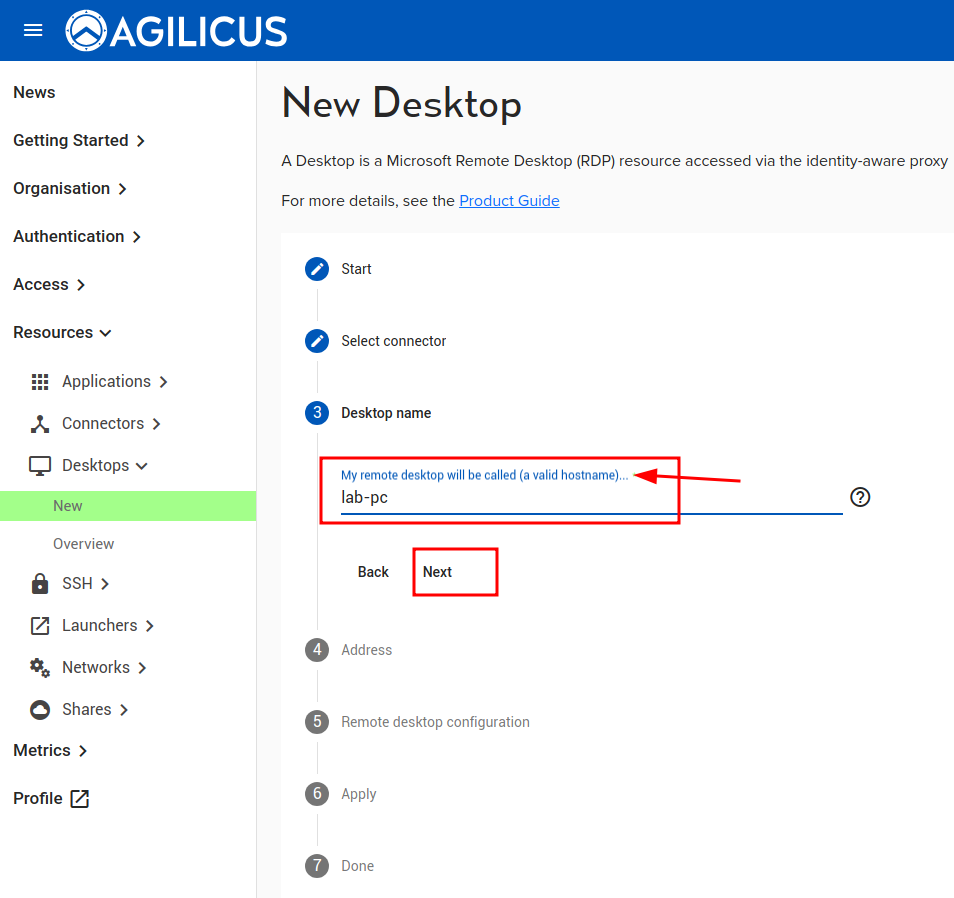
- Name. This will be the ‘name’ you assign permission to, it will show in the audit, the end-user will see it
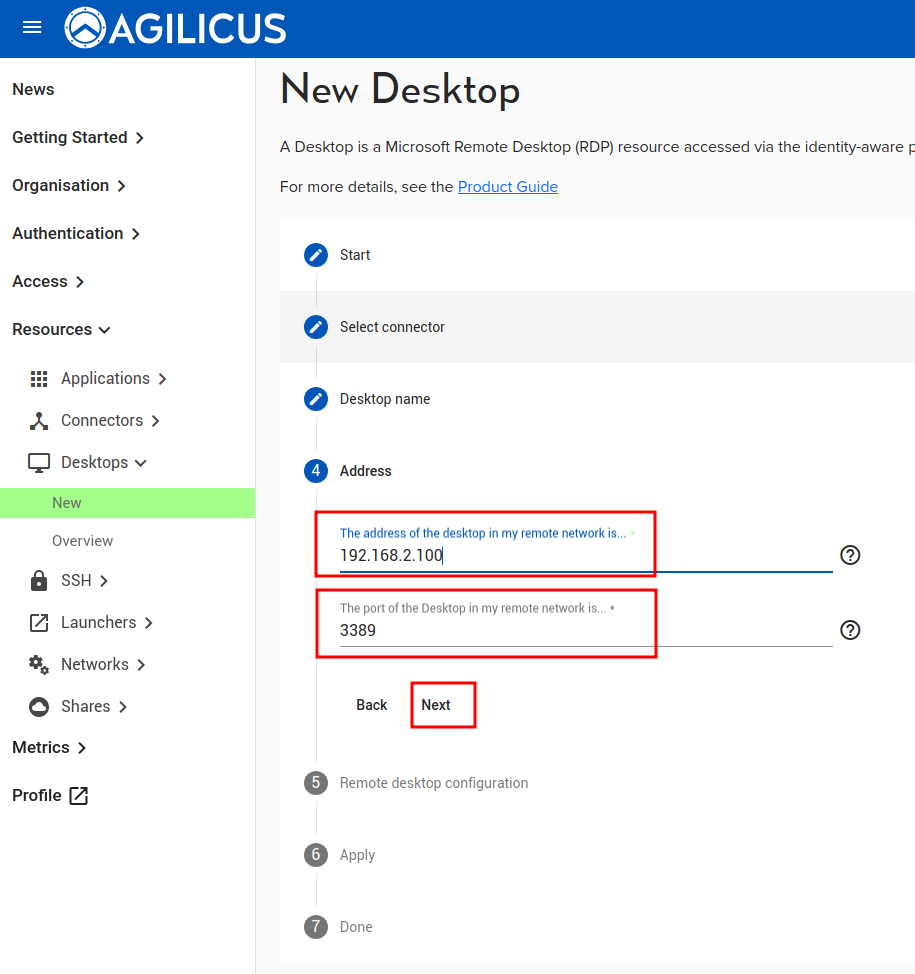
- Hostname/IP. This is how you would address the Desktop within the (private) site.
Once you have completed these steps, as an Administrator you will be offered the opportunity to download an RDP file. This will open in your native Remote Desktop application (on all platforms). The Desktop will become available approximately 1-2 minutes after you apply the config. (This is to test the configuration)
You may now assign permissions (by group, or by user). Each user who has access will see, in https://profile.MYDOMAIN, an icon for the same Remote Desktop. They may also install the Agilicus Launcher which will create start menu icons automatically.
The detailed steps and screen shots are shown below.
❗
Some versions of Microsoft Windows (e.g. Windows 10 Home) do not support Remote Desktop Server. You may try a different OS, you may try VNC, or, there are some workarounds.
Connection Parameter Override
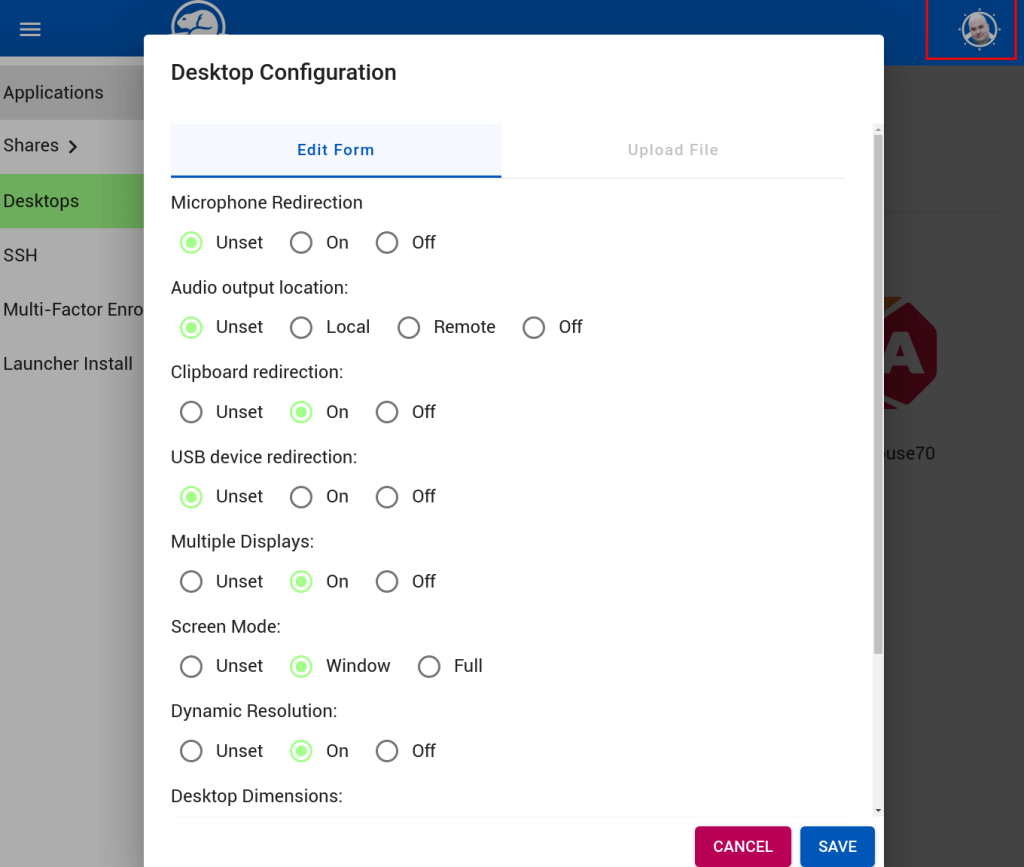
End users may wish to configure specific overrides regarding their local displays, resolution, clipboard, etc.
The configuration options are found in their Profile (https://profile.YOURDOMAIN), under their account icon.
Users may choose to passthrough their microphone or audio output, clipboard (cut and paste), usb devices.
Some remote desktop servers have multiple displays, these can be passed through if desired.
The user may select dynamic resolution (e.g. they can resize the current window and it will resize the remote), or a specific dimension.
NOTE: You may need to change the Network Level Authentication on the server
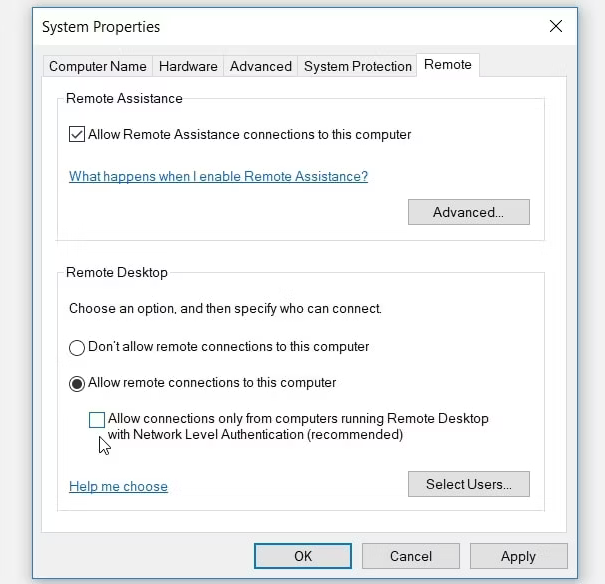
- Press Win + R to open the Run command dialog box.
- Type sysdm.cpl and press Enter to open the System Properties window.
- Navigate to the Remote tab.
- Uncheck the Allow connections only from computers running Remote Desktop with Network Level Authentication (recommended) box.
- Press Apply and then press OK. From there, restart your PC to save these changes.